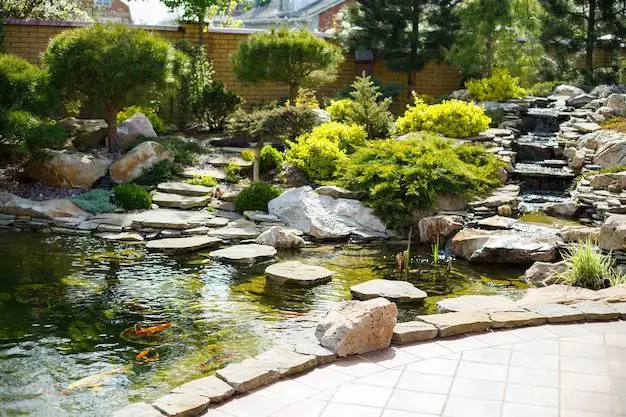
Building a backyard waterfall and pond can greatly enhance the beauty and serenity of your outdoor space. The gentle sounds of cascading water combined with the visual appeal of a pond and waterfall create a relaxing oasis right in your own yard. With some planning and preparation, you can create a gorgeous backyard waterfall and pond to enjoy for years to come.
Page Contents
- 1 What is needed to build a backyard waterfall and pond?
- 2 How to design and plan your backyard waterfall and pond
- 3 Excavating and preparing the backyard pond site
- 4 Installing the pond liner
- 5 Constructing the waterfall
- 6 Adding water to the pond
- 7 Installing pond equipment
- 8 Adding pond plants and fish
- 9 Caring for your backyard waterfall and pond
- 10 Conclusion
What is needed to build a backyard waterfall and pond?
Here are the key elements you will need to create your own customized backyard waterfall and pond:
- Pond liner – EPDM or PVC liners are commonly used to contain the water. You’ll need to determine the pond size and shape first.
- Pumps – A submersible pump is required to pump the water to the waterfall. Calculate the flow rate needed for your desired waterfall height.
- Tubing and plumbing supplies – Flexible tubing, fittings, and valves are needed to route the water from the pump to the waterfall.
- Filter – A filtration system helps keep the water clean and free of debris and algae. Biological and mechanical pond filters are popular options.
- Rocks and gravel – Natural stones and pebbles are used to construct the waterfall itself as well as the pond perimeter.
- Plants – Oxygenating and marginal pond plants help create a balanced ecosystem for the pond.
- Lighting – Submersible pond lights can illuminate the waterfall at night for dramatic effects.
Optional extras like fountains, statues, bridges, and benches can further enhance your pond area. Having the right tools like shovels, hoses, and wheelbarrows will also make the installation easier.
How to design and plan your backyard waterfall and pond
Careful planning is crucial when building a waterfall and pond. Here are some key steps to design your project:
- Decide on the location – Consider sunlight exposure, views, proximity to power sources, and convenience of access.
- Sketch out the basic pond shape and dimensions.
- Determine the waterfall design – Number of tiers, total height, waterfall width, etc.
- Account for electrical, plumbing, and other utility lines underground.
- Plan locations for the pump, filter, and external tubing.
- Calculate the pump flow rate needed for your waterfall height.
- Select suitable materials – Liner, rocks, pipes, hoses, fittings, etc.
- Plan for safe access – Such as steps, pathways, and benches around the pond.
- Check local building codes and obtain any required permits.
It’s important to consider how the waterfall and pond will fit in with the rest of your landscape. Having a clear vision ahead of time will ensure your project goes smoothly.
Excavating and preparing the backyard pond site
Once you have a plan in place, you can start digging and prepping the site. Here are the key steps involved:
- Mark out the pond outline using spray paint or stakes.
- Remove grass and roots from the area.
- Dig out the pond to the desired shape and depth. Slope the edges.
- Create a deeper channel where the waterfall will be located.
- Shape and contour the bottom of the pond bowl.
- Add an underwater shelf around the edges for marginal plants.
- Build up the area where the external pump will sit.
- Add drainage and prepare plumbing trenches.
- Install an underground electrical supply if needed.
- Slope the surrounding area away from the pond to prevent runoff entering.
- Add sand or gravel to smooth and protect the excavated area.
The excavated soil can be used to create mounds, raised beds, and other elevations around the pond. Take safety precautions when digging, and be sure to call 811 before any digging to locate underground utility lines.
Installing the pond liner
Pond liner is essential for keeping the water in. Follow these steps to install it correctly:
- Add padding material if needed – Foam underlay or sand.
- Unfold and position the liner over the excavated area.
- Allow enough overlap – At least 12-24 inches over the edges.
- Temporarily weight down the liner until it gets filled.
- Trim off excess liner material once the pond is full.
- Hide liner edges with rocks or using special edging strips.
- Add a protective underlay for areas that will have rocks or pavers installed on top.
No seams should be positioned in the main water areas. The liner should be wrinkle-free and contour smoothly to the pond shape. A liner calculator can help determine the size needed based on your pond dimensions.
Constructing the waterfall
The waterfall itself can now be built up. This involves positioning rocks to create a cascading effect down to the pond. Follow these general steps:
- Build up the waterfall foundation with larger rocks and boulders.
- Create tiers and levels using medium rocks for each step.
- Use smaller rocks and pebbles to form the cascading water flow.
- Hide the pump behind larger stones at the top.
- Camouflage the tubing or river with rocks as it flows down.
- Test and adjust rocks as needed to control the water flow.
- Apply waterfall foam sealant to prevent water escaping between rocks.
The rock placement takes some trial and error to make sure the water flows smoothly and evenly down the entire waterfall. Focus on making each step consistent and level across the width of the waterfall.
Adding water to the pond
Once construction is complete, it’s time to start filling the pond! Here are some tips for this important step:
- Begin slowly, filling 4-6 inches of water at a time.
- Check for leaks and repair any liner punctures if found.
- Allow the liner to stretch and settle before filling more.
- Place heavy rocks or other weights around the perimeter to hold the liner down as the water level rises.
- Turn on the pump once there is enough water flow for the intake.
- Adjust and top up until the desired water level is reached.
- Consider adding water clarifier or dechlorinator as you fill.
- Let the waterfall run steadily to clear any murkiness before finishing up.
Go slowly during this step to ensure the liner and structures remain stable. The sounds of flowing water will start to come alive as the pond fills up!
Installing pond equipment
The pump, plumbing, filtration systems, and other support equipment are key to a properly functioning pond. Here are some guidelines on installing pond equipment:
- Position the pump in a recessed well at the top of the waterfall or off to the side.
- Secure tubing and route it inconspicuously from pump to waterfall.
- Install a check valve inline to prevent backflow.
- Connect the biological and mechanical pond filters as per instructions.
- Conceal filter boxes as much as possible or situate them farther away.
- Use merging to blend plumbing into the surroundings.
- Install a drain valve to allow draining or lowering the water level.
- Hide electrical cords safely away or underground as needed.
- Test everything extensively and troubleshoot any issues.
Proper installation of supporting equipment will help ensure your pond systems run smoothly. Always follow manufacturer’s instructions for placement and connections.
Adding pond plants and fish
The final touches involve adding plants, fish, and other decorative features:
- Partially fill the pond first before introducing any fish or plants.
- Choose plants suited for pond depths – marginal, oxygenating, floating, etc.
- Plant in baskets or containers buried in the shelf areas.
- Select fish species compatible with your pond size.
- Acclimate fish slowly – float bags and add small amounts of water periodically.
- Add marine salt to reduce fish stress.
- Introduce a few fish at a time over several weeks.
- Install lighting, fountains, statues, and other decor as desired.
The plants and fish will take some time to establish themselves as the pond ecosystem matures. Maintain proper water quality and filtration to keep them healthy.
Caring for your backyard waterfall and pond
Regular maintenance is essential for a clean and healthy pond. Here are some care tips:
- Remove debris like leaves frequently.
- Clean or replace filter media per manufacturer instructions.
- Trim back vegetation to keep it from overgrowing.
- Monitor and maintain proper water chemistry.
- Top up to replace water lost from evaporation.
- Watch for signs of leakage and repair as needed.
- Inspect equipment regularly for issues.
- Remove string algae and treat for green water blooms if they occur.
- Use beneficial bacteria or enzymes to aid breakdown of organics.
- Remove pond pumps and clean thoroughly before winter if living in colder climates.
With regular care and maintenance, you will enjoy your beautiful backyard waterfall and pond for many years to come! Let the relaxing sounds of water help create your own peaceful oasis.
Conclusion
Installing a waterfall and pond involves significant planning, excavation, construction, and finishing work. But the end result is a beautiful, serene feature that adds immense value to your landscape. Follow the steps outlined above to create your own gorgeous backyard waterfall and pond tailored exactly to your vision. Pay close attention to proper installation of equipment and materials to ensure your pond functions smoothly. With routine care and maintenance, you’ll be able to enjoy the sights and sounds of your new water feature for years to come. Let your backyard become an oasis of tranquility with the addition of a stunning waterfall and pond.