Soundproofing ceiling joists is an effective way to reduce noise transfer between floors in a home. The ceiling joists are the framing members that run parallel to each other across the ceiling. As they are directly connected to the floor above and below, noise can easily travel along them, allowing sounds from upstairs to be heard downstairs. By implementing soundproofing materials and techniques, the noise path can be broken, creating a quieter space.
There are several reasons you may want to soundproof ceiling joists:
- To reduce footfall noise from upstairs rooms
- To block noise from home theaters or loud kids’ rooms
- To create quiet spaces for working from home
The good news is you don’t have to be an expert carpenter to soundproof existing ceiling joists. With some simple DIY methods and affordable supplies from your local hardware store, you can reduce noise transfer substantially.
Page Contents
How Does Sound Travel Through Ceilings?
Before learning how to soundproof ceiling joists, it helps to understand how noise travels from upstairs rooms to downstairs spaces. There are two main paths sound can take:
Airborne noise – This refers to sounds that travel through the air, like voices, TVs, footsteps. Without any soundproofing, these noises can pass directly through the ceiling space from the room above to below. Lightweight ceiling materials like drywall allow airborne noise to transmit easily.
Impact noise – This is caused by direct impacts on the ceiling, such as people walking or moving furniture above. The energy travels through the physical structure, along the joists and down through the ceiling. Impact noise is harder to block than airborne noise.
The best soundproofing methods will block both airborne and impact noise transmission. To stop impact noise, you need to isolate the ceiling joists or add mass. For airborne noise, you either need to create airtight seals or use sound-absorbing materials.
How To Soundproof Ceiling Joists in 5 Steps
Ready to get started soundproofing your ceiling? Follow these 5 key steps:
Step 1: Inspect the Existing Ceiling and Joists
Start by taking a close look at the underside of your ceiling and carefully inspecting the joists:
- Are the joists exposed or is the ceiling covered with drywall? An exposed ceiling will allow you better access.
- How far apart are the joists? Standard spacing is every 16″ or 24″ on center.
- Note the depth and thickness of the joists. Most are 2″ x 8″, 2″ x 10″ or 2″ x 12″.
- Look for any sagging areas that will need reinforcement.
- Also check for air gaps or openings around lighting, vents, etc.
This info will help you determine the best soundproofing materials and techniques to use.
Step 2: Seal Air Leaks
Before adding soundproofing, first seal any cracks or holes that allow airborne noise to pass through. This relatively inexpensive step can make a big difference.
Use acoustic sealant to fill gaps around:
- Light fixtures
- Vents
- Electrical boxes
- Pipes and ductwork
- Any seams, cracks or openings
Sealing these leaks will prevent noise flanking paths. Make sure to only use sealants that are designed for indoor use.
Step 3: Add Soundproofing Materials Between Joists
Now you’re ready for the main soundproofing step – adding materials in between the joists to block noise. There are several good options:
Mineral Wool Insulation – This fiber insulation works very well for soundproofing. It’s available in batts sized to fit between standard joist spacing. Place batts perpendicularly across the full length of each joist bay. Make sure there are no gaps.
Acoustic Insulation – Special soundproofing insulation like Roxul Safe’n’Sound is great for reducing both airborne and impact noise. It’s rigid which helps dampen vibration.
Green Glue – Applying Green Glue between two rigid layers can significantly block noise. Glue a second layer of drywall to the joists using Green Glue adhesive.
Resilient Channel – Installing resilient channel before drywall adds a noise dampening air space. It decouples the drywall from the joists which reduces sound transmission.
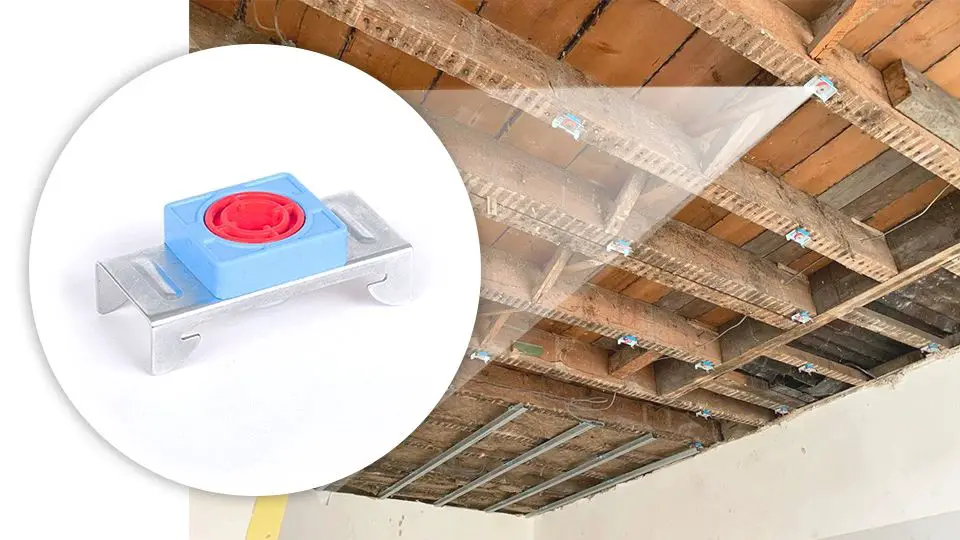
Step 4: Use Soundproofing Clips or Blocks
For even better isolation from impact noise, use soundproofing clips or blocks between the joists and drywall:
Resilient Sound Clips – These mount between the joists and drywall to create a detached noise barrier. Popular options are Whisper Clips or Resilient Sound Clips.
Soundproofing Blocks – Rubber or neoprene blocks decouple and absorb vibration in the joists. Install 1-2 blocks per joist/drywall connection. Great option for DIYers.
Both these options work great but sound clips provide slightly superior decoupling and noise control.
Step 5: Apply Soundproofing Drywall
The final layer that goes over your soundproofed joists should be drywall specifically designed for soundproofing:
- Green Glue Noiseproofing Sealant – Contains damping compounds to reduce sound transmission. Apply 1-2 layers.
- QuietRock Drywall – This multi-layer drywall with viscoelastic polymer absorbs noise. Very effective but more expensive.
- Double or Triple-Layer Drywall – Adding multiple layers of standard drywall improves mass and damping.
Properly installed, soundproof drywall can reduce noise coming through the ceiling by over 50%. Double layer drywall with Green Glue gives great noise blocking.
How Effective is Ceiling Joist Soundproofing?
When installed correctly using the right materials, soundproofing ceiling joists can reduce noise coming through by 50-80%. Here are some approximate noise reduction levels you can expect:
| Treatment | Noise Reduction |
|---|---|
| Sealing cracks/leaks only | 10-20dB |
| Insulation between joists | 25-30dB |
| Resilient channel + double drywall | 35-40dB |
| Sound clips + double drywall with Green Glue | 45-55dB |
| Double stud wall or ceiling | 55-80dB |
As you can see, just basic sealing and insulation provides decent noise reduction. But combining several soundproofing techniques gives the best results.
Also keep in mind, lower frequencies are harder to block. Footfall and bass noise may still pass through, so don’t expect a completely silent ceiling. However, you should be able to significantly reduce noise like voices, TVs, foot traffic etc.
Tips for Soundproofing Ceiling Joists
Follow these tips to ensure your ceiling soundproofing project is effective:
- Inspect joists and seal air leaks thoroughly first.
- Always use soundproofing materials like insulation designed for the purpose.
- Completely fill joist bays avoiding any gaps.
- Stagger seams between layers of drywall.
- Hang drywall using acoustical sealant for air tight installation.
- Use sound isolation clips correctly according to the manufacturer.
- Consider hiring a professional installer if you’re unsure of doing it yourself.
Pay attention to details like tightly sealing the perimeter and properly spacing fasteners. This will prevent flanking noise and vibration transmission.
Common Soundproofing Mistakes
It’s easy make some acoustic mistakes that can ruin your noise reduction efforts:
- Not adequately sealing air gaps before installing insulation.
- Leaving gaps between insulation batts or around edges.
- Using lightweight, porous insulation that’s not designed for soundproofing.
- Installing resilient channel incorrectly so it contacts framing.
- Attaching drywall tightly so it’s not decoupled from joists.
- Using only one layer of standard drywall.
- Not properly sealing and finishing drywall.
Avoid these errors by carefully researching the entire soundproofing process beforehand. Planning out the details will help achieve better acoustic isolation.
How Much Does it Cost to Soundproof Ceiling Joists?
The cost to soundproof existing ceiling joists can range anywhere from $300-$2000 depending on the size of the ceiling, which materials you use, and whether you do the installation yourself. Here is a rough breakdown:
- Acoustic caulk and basic supplies – $75
- 6″ insulation batts – $1-$2 per sq ft
- Resilient channel – $1-$3 per sq ft
- Soundproof drywall – $1-$3 per sq ft
- Green Glue – $25 per tube
- Soundproofing clips – $1-$5 per clip
- Hiring an installer – $40-$80 per hour
For a standard 12′ x 12′ ceiling using double drywall, insulation, resilient channel and glue, expect to spend $600-$1200 in materials. Add several hundred dollars more for pro installation.
While not an inexpensive project, the noise reduction benefits are well worth the investment in most homes. And it’s far less costly than remodeling an entire floor structure.
Conclusion
Soundproofing ceiling joists is one of the most effective ways to reduce noise transfer between upstairs and downstairs rooms. With the right combination of sealing gaps, adding sound-absorbing insulation, using isolation clips, and installing specialized drywall, you can decrease noise by 50 decibels or more. Pay close attention to each installation step and don’t cut corners with materials. Hiring a professional can also ensure proper installation and maximum noise blocking if you’re unsure about DIY. While a ceiling soundproofing project does require an investment, the benefits of reduced footfall noise and overhead sounds make it worthwhile in many homes and worth considering if noise is an issue.