Changing your own oil can seem daunting, but with the right preparation and tools it can be a straightforward DIY task. An oil change involves draining the old oil from your engine, replacing the oil filter, and refilling the engine with fresh oil. The key steps are making sure you have the right oil and filter for your vehicle, raising your car safely to access the oil drain plug and filter, draining the old oil completely, replacing the filter, reinstalling the drain plug, and refilling the engine with the correct amount of new oil.
With some basic mechanical skills and the right equipment, you can save money by changing your own oil instead of paying a mechanic. Read on to learn the necessary steps involved, what tools and supplies you’ll need, and tips for beginners doing their own oil changes.
Page Contents
Is changing your own oil worth it?
Doing your own oil changes can provide several advantages:
Cost savings
The biggest incentive is the cost savings versus paying a mechanic. Oil change prices at shops and dealerships typically range from $40-$100 or more. If you change your own oil, the DIY cost is just $25-$50 for the oil and filter. That’s a potential savings of $200 or more per year if you get oil changes every 5,000 miles.
Convenience
Changing your own oil allows you to do it on your schedule. No waiting at a shop or trying to fit it into your busy week. Just jack up the car when you have time and knock it out in your own driveway or garage.
Peace of mind
You can ensure it’s done right and not cut corners. Some quick-lube shops are notorious for cross-threading drain plugs, not replacing filters, over or under-filling oil, and other mistakes. Doing it yourself, you can take the time to do it carefully.
Better for your car
DIY oil changes allow you to use high-quality oil of your choice. Quick-lube places often use cheap conventional oil. You can upgrade to full synthetic or other premium oils tailored for your vehicle.
What you’ll need for a DIY oil change
These basic tools and supplies make oil changes much easier:
Oil and filter
– Make sure you get the right oil type (conventional, synthetic, synthetic blend) and viscosity grade (0W-20, 5W-30 etc) specified in your owner’s manual. Using the wrong oil can seriously damage your engine.
– Double check that the oil filter is the right one for your vehicle’s make and model. Filters are usually cheap, so get a few spares.
Oil filter wrench
A filter wrench or oil filter pliers make removing the old oil filter much easier. Don’t use vice grips or other improvised tools that can crush the filter.
Drain pan
Use a large pan with a 6+ quart capacity to catch the dirty oil as it drains out. Avoid shallow pans that can overflow.
Jack and jack stands
Safely lifting the vehicle is crucial. Never rely on just a floor jack. Always use jack stands secured on a solid level surface for stability when you’re under the car.
Ratchet and socket
Loosening the drain plug takes some torque. A ratchet with the right size socket prevents stripping out the plug.
Torque wrench
Tightening everything to the right specs prevents leaks. A torque wrench ensures you don’t overtighten the drain plug.
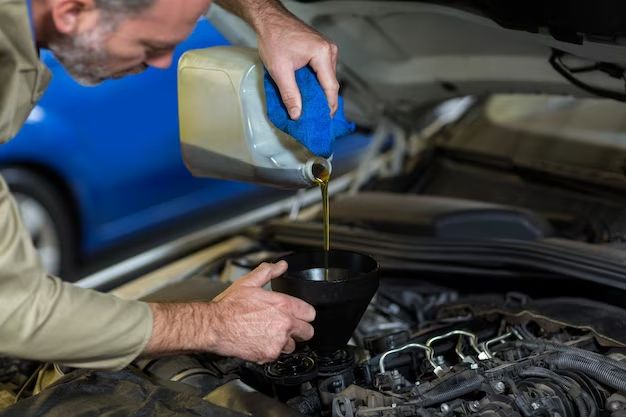
Funnel
A long funnel directs oil cleanly into the fill hole when refilling the crankcase. Buy a dedicated metal oil funnel.
Rags
Keep some rags or paper towels handy for cleaning up spills and drips.
| Tool | Purpose |
|---|---|
| Oil and filter | New oil and filter for your engine |
| Oil filter wrench | Loosening stuck oil filters |
| Drain pan | Catch oil as it drains out |
| Jack and jack stands | Safely raising the vehicle |
| Ratchet and socket | Loosening drain plug |
| Torque wrench | Tightening plug and getting bolts to spec |
| Funnel | Refilling new oil |
| Rags | Cleaning drips and spills |
Step-by-step oil change instructions
Now that you’ve got the right supplies, here are the key steps for safely changing your oil:
Park on level ground
Park your car on a flat, level surface and apply the parking brake. This allows the oil to drain completely and reduces spills. Never rely on a jack alone when working under a car.
Jack up vehicle and support on stands
Locate the manufacturer’s recommended lift points and jack up the vehicle. Securely place jack stands at the proper lift points and lower the car onto them.
Spread out tarps or cardboard
Lay down some absorbent tarps or cardboard under the oil drain area. This contains spills and drips to make cleanup easier.
Locate oil drain plug and filter
Find the drain plug, typically located on the oil pan under the engine. Position your drain pan beneath. Also locate the oil filter, mounted to the engine.
Loosen drain plug
Using your ratchet and socket, loosen the drain plug by turning it counterclockwise. When it’s loose, unscrew it slowly by hand and let the oil drain into your pan.
Change oil filter
An oil filter wrench makes this easier. Strap it onto the old filter and turn counterclockwise to remove. wipe the filter mount surface clean and coat the gasket of the new filter with fresh oil. Screw on the new filter by hand until snug.
Reinstall and tighten drain plug
Check the drain plug threads for debris. Reinstall the plug by hand until just snug. Then use a torque wrench to tighten to the spec in your manual (typically 25-30 ft-lbs).
Refill with new oil
Using your funnel, pour in the recommended amount and type of new oil. Refer to your manual for the right quantity – usually around 5 quarts.
Check oil level
Let the oil settle for a minute or two, then check the dipstick. Top off if needed till it reads full. Screw the dipstick back in when you’re done.
Lower vehicle and check for leaks
Carefully raise the jack to lift the vehicle off the stands. Remove the stands and continue lowering the jack. Inspect the drain plug and filter for any leaks before driving the car.
Tips for DIY oil changes
If you’re tackling your own oil changes, keep these tips in mind:
Start when engine is warm
Warm oil flows out faster and more completely when draining. Park your car and let the engine run for a few mins beforehand.
Handle used oil carefully
Used motor oil contains hazardous chemicals. Dispose of it properly at an oil recycling center, never in the ground or down a drain.
Check owners manual
Your manual has vital info on oil type, viscosity, quantity and service intervals. Follow it closely instead of generic guides.
Work safely under vehicle
Never get under a car unless it’s safely supported on jack stands. Rock the car to ensure it’s stable before getting underneath.
Torque bolts properly
Under or over tightening the drain plug can lead to leaks. Use a preset torque wrench to torque it to spec.
Double gasket oil filters
Many filters have a rubber gasket pre-attached. Adding another gasket can cause leaks. Check before installing.
Dispose of filter properly
Place the old filter in a zip top bag and compress out the remaining oil before trashing it. Recycle if possible.
Check for leaks
Inspect closely for any drips or leaks from the drain plug, filter, or elsewhere before driving the car after an oil change.
Conclusion
With proper preparation and care, DIY oil changes are definitely achievable for a beginner with basic mechanical skills. Just be sure to use the right materials for your vehicle, work safely and methodically, and follow the manufacturer procedures. While intimidating at first, you can save significant money in the long run by learning to change your own oil. It will get easier each time as you get comfortable with the steps and requirements. Just take it slow, be cautious, and double check your work.