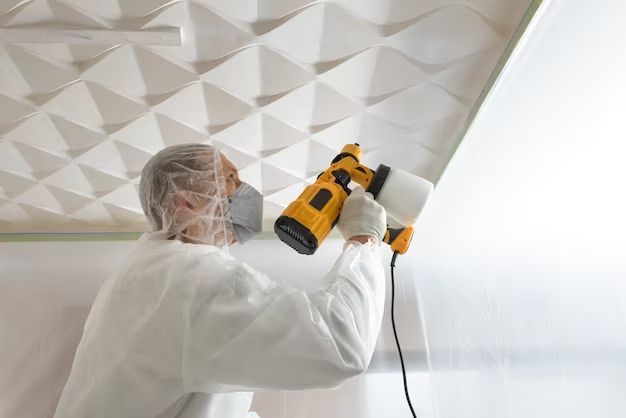
Painting a ceiling can be a difficult and messy process, especially if done with a roller or brush. However, using a paint sprayer can make ceiling painting much easier and less messy. A paint sprayer allows you to quickly apply paint in a fine, even coat across a large surface area like a ceiling. With some preparation and technique, a ceiling can absolutely be painted using a paint sprayer.
Page Contents
What is a Paint Sprayer?
A paint sprayer (also known as an airless paint sprayer) is a power tool that uses compressed air to atomize paint and apply it to surfaces. Paint is pumped from a reservoir through a hose and nozzle. When the paint is forced through the nozzle at high pressure, it breaks up into a fine spray pattern.
Paint sprayers allow you to apply paint quickly and efficiently compared to brushes or rollers. The spray nozzle distributes the paint evenly in a fine mist, resulting in a smooth, consistent coat. Sprayers are available in different sizes and power levels for small or large painting jobs.
Types of Paint Sprayers
There are a few different types of paint sprayers that can be used for ceiling painting:
Airless paint sprayer – This is the most common and versatile type of paint sprayer for both indoor and outdoor painting jobs. Airless sprayers use hydraulic pressure to push paint through the hose, rather than relying on air compression. This allows them to spray thicker paints and coatings with more power.
High volume low pressure (HVLP) sprayer – HVLP sprayers use lower pressure to atomize the paint. This results in less overspray and waste compared to airless sprayers. The lower pressure makes them better suited for painting indoors and spraying thinner materials like stains and sealers.
Air-assisted airless sprayer – This type uses compressed air to help atomize the paint at lower fluid pressures. The air cap on the spray gun allows for finer paint atomization. This makes air-assisted airless sprayers good for detailed interior painting jobs.
Benefits of Using a Paint Sprayer
Using a paint sprayer offers several advantages over traditional brushes or rollers:
– Speed – Paint sprayers can cover far more surface area much faster than manually painting. This saves time and energy when painting large surfaces.
– Efficiency – There is less wasted paint using a sprayer. The fine mist deposits paint directly onto surfaces with a high transfer efficiency.
– Consistency – The spray pattern coats surfaces evenly, avoiding the brush and roller marks that sometimes happen with manual painting.
– Reach – Sprayers allow you to easily paint high, hard to reach areas like ceilings and second floors. The spray nozzle can reach up to spray paint overhead.
– Clean lines – Paint sprayers excel at painting sharp, straight lines and edges. The spray nozzle can cleanly coat borders and trim.
Preparing to Paint a Ceiling with a Sprayer
Proper prep work is crucial before spraying any paint project. Prep work for painting a ceiling includes:
Cleaning the Ceiling
Start by cleaning the ceiling surface thoroughly to remove any dust, grease, or other grime. Use a general household cleaner and rinse with clean water. Allow the ceiling to fully dry before spraying. Any debris left on the surface can clog the paint sprayer or prevent proper paint adhesion.
Repairing Any Holes or Cracks
Inspect the ceiling and repair any cracks, holes, or other problem areas. Use spackle or drywall joint compound to patch and smooth holes. Sand any repairs smooth when dry. Addressing flaws ahead of time will result in a nicer finished painted ceiling.
Masking Off the Area
Use painter’s tape and plastic sheeting to mask off other surfaces like walls, trim, and flooring. This protects them from accidental paint spray. Mask several feet out from ceiling edges to catch any paint overspray. Cover furniture and other items as well. Proper masking takes time but avoids cleaning splattered paint later.
Priming the Surface
Most ceilings should be primed before painting with a sprayer. The primer coat helps the new paint better adhere to the ceiling. Use an interior latex primer suited for ceilings. Allow the primer to fully dry before the paint topcoat. Priming results in a better quality, longer lasting finish.
Ventilating the Room
Paint fumes and overspray can circulate through a house. Opening windows and running exhaust fans helps ventilation as you spray paint overhead. Proper ventilation makes the process healthier and more comfortable.
Choosing the Right Paint
Pick a top quality interior latex ceiling paint recommended for sprayers. Oil-based or exterior paints are too thick and require paint thinners. Verify the paint can be used with your model of paint sprayer. Ceiling paint in flat, matte, or eggshell finishes all work well.
How to Use a Paint Sprayer on Ceilings
Once the prep work is done, it’s time to start spraying the ceiling paint. Follow these tips for successfully painting a ceiling with a sprayer:
Adjust the Pressure and Nozzle
Refer to the paint sprayer manual for properly configuring the settings. Adjust the pressure regulator to achieve a wide, even spray pattern without too much overspray. Turn the pressure down for ceilings compared to spraying siding or fencing. Attach the correct nozzle tip as recommended for the paint type and thickness.
Strain the Paint
Always strain the ceiling paint through a paint strainer before pouring it into the sprayer paint reservoir. This filters out any particles or debris that could clog the spray nozzle. Straining prevents paint specks from messing up your finished ceiling.
Work in Sections
It’s most manageable to paint a ceiling in 3 foot by 3 foot sections in a logical sequence. Apply two coats across each section, allowing proper drying time between coats. Moving methodically helps ensure an even coat across the entire ceiling.
Overlap the Passes
Be sure to slightly overlap each pass of the sprayer nozzle as you paint. Hold the nozzle perpendicular to the ceiling about 12 inches away. Gently squeeze the sprayer trigger while moving your arm in a steady, even pass across each section. Overlapping the passes creates a uniform finish.
Apply Light Coats
Work quickly but avoid applying too much paint too fast. Wet, dripping paint will sag and ruin the finish. Apply multiple light coats to build up to full coverage. Let each light coat tack up for at least 10 minutes before the next pass. Proper technique prevents drips or runs in the paint.
Work From the Farthest Point
To avoid bumping into wet paint, start spraying in the corner farthest from the entry door. Slowly work backward towards the door as you coat the entire ceiling. This technique eliminates smudging or disturbing paint that’s still drying.
Watch Your Arm Movement
Move your entire arm smoothly and steadily, not just your wrist, as you spray side to side. Keep your spraying arm perpendicular to the ceiling and maintain the same distance from the surface. Consistent arm movement results in a more uniform paint application.
Clean the Tip Between Coats
Check the spray tip periodically as you work and clean it if needed between coats. Paint can start to dry and clog the nozzle. Use a toothbrush and solvent to gently clean dried paint from the tip. Test the spray pattern on cardboard before resuming.
Inspect for Missed Spots
Look over each section carefully to catch any areas you may have missed. Apply additional light coats to cover spots that look thin or uneven. It’s much easier to address missed spots now versus after everything has dried.
Applying the Finish Coats
Once the initial coats have dried on the ceiling, finish up by applying one or two more smooth, finishing topcoats.
The final coats should go on lighter than the first coats now that you have an established layer of paint. Focus on keeping an even wet edge and smooth uniform finish.
Don’t try to over-correct or mess with the paint much once it’s on the ceiling. Let any brush marks or uneven areas smooth out on their own as the paint levels.
Be extra careful as you apply the final coats to avoid any drips marring the finish. Work slowly and gently.
Allow the ceiling several hours to fully dry and cure before removing any masking materials.
Clean Up and Maintenance
Cleaning the Paint Sprayer
Thoroughly clean the paint sprayer immediately after finishing according to the manufacturer’s directions. Leaving paint to dry in the hose or tips will ruin the sprayer. Most sprayer parts can also be soaked in solvent if needed to remove stubborn paint residue. Proper cleaning will keep a sprayer in good working condition for many future projects.
Removing Masking Materials
Carefully remove any masking materials and protective coverings once the paint has fully cured. Pull up any tape slowly and gently to avoid peeling up new paint. Use a putty knife to gently scrape paint drips from nearby surfaces. Clean up any minor paint splatters right away before they have a chance to fully dry.
Touch Up Painting
Inspect around the ceiling’s edges and corners after removing masking. Use a small trim brush to touch up any spots the sprayer missed around borders, light fixtures, and trim details. Touch ups help achieve the cleanest looking finished paint job.
Ventilating the Room
Keep ventilating the room for at least 24 hours after painting to allow solvents and fumes to fully dissipate. The room may have lingering odors for several days depending on ventilation and paint type. Close windows after fumes clear to avoid temperature/humidity changes that may affect the new paint.
Let the Paint Fully Cure
It takes approximately 30 days for new paint to fully adhere, cure, and become resistant to scuffs and marks. Avoid cleaning or rubbing the newly painted ceiling during this period. Handle gently and touch up any new marks if needed.
Conclusion
Painting a ceiling with a sprayer allows you to achieve smooth, professional looking results much faster than using rollers or brushes. With proper sprayer selection, prep work, application technique, and cleanup, a sprayer can be used to coat any standard ceiling surface. Patiently working in controlled sections yields the best outcome. While spraying overhead requires getting used to, a little practice goes a long way. Following these tips will have you expertly painting ceilings with a sprayer in no time!
| Prep Work | Application | Finish |
|---|---|---|
| Clean surface | Adjust sprayer settings | Apply final coats |
| Repair flaws | Strain paint | Clean up |
| Mask off area | Work in sections | Touch up paint |
| Prime the ceiling | Overlap spray passes | Allow for curing |
| Ventilate the room | Apply light coats | |
| Choose right paint | Spray farthest point first |
Supplies Needed
- Paint sprayer suited for ceilings
- Drop cloths and masking tape
- Painters plastic sheeting
- Ceiling paint
- Paint strainers
- Primer
- Clean rags
- Putty knife
- Sandpaper
- Paintbrushes
- Solvent for cleanup