Page Contents
- 1 Quick Answer
- 2 Tools and Materials Needed
- 3 Selecting the Correct Drill Bit
- 4 How to Drill Ceramic Tile Without Cracking
- 5 Tips for Specific Tile Types
- 6 What Size Hole Can Be Drilled in Ceramic Tile?
- 7 How Close to Edges Can Holes Be Drilled?
- 8 How to Smooth Rough Ceramic Tile Hole Edges
- 9 How to Fix Ceramic Tile Drilling Mistakes
- 10 Conclusion
Quick Answer
Yes, it is possible to drill holes in ceramic tile. With the right tools, techniques, and preparation, holes can be drilled through ceramic tiles without cracking or breaking them. The key things needed are a diamond-tipped drill bit, water for lubrication and cooling, and drilling at a slow speed. Ceramic tiles are brittle, so drilling requires patience and care. But it can be done successfully with some simple precautions.
Tools and Materials Needed
Drilling holes through ceramic tile can be done with commonly available tools. Here is a list of what is needed:
- Diamond-tipped drill bit – This is a must for drilling ceramic tile. Diamond bits are very hard and can grind through the tile. Carbide or steel bits are more likely to chip the tile.
- Electric drill – Either a cordless drill or corded drill will work. Variable speed is best to start drilling slowly.
- Water in a spray bottle – Water is used to keep the drill bit lubricated and cool as you drill. A spray bottle allows controlled water application.
- Tape – Masking tape can be used to mark the desired hole location.
- Safety glasses – For eye protection from flying tile shards while drilling.
- Towels – For cleaning up water and debris during drilling.
In addition to these tools, a few other supplies can be helpful:
- Piece of scrap wood – Can be clamped beneath the tile to prevent cracking as the drill bit punches through.
- Duct tape – Can also be used to support the underside of the tile.
- Putty or clay – To provide backing support when drilling a hole close to an edge or corner.
Selecting the Correct Drill Bit
Choosing the right drill bit is critical for success in drilling ceramic tile. The bit must be harder than the tile material to grind through it without damaging the bit. Here are some tips on selecting the best drill bit for ceramic tile:
- Use diamond-tipped bits only – Diamond is one of the hardest materials and provides excellent abrasion resistance for drilling through tough ceramics.
- Check the drill bit package – It should be clearly labeled for use with ceramics/tile if it is designed for that purpose.
- Choose a small diameter bit – 3/16 inch or smaller diameter is best for ceramic tile holes. Larger bits are more prone to cracking the tile.
- Purchase high-quality bits – Bits designed for ceramic drilling are worth the extra cost over cheap options. Name brand diamond bits work best.
Avoid using carbide or steel bits. While they may be able to drill tile, they are at high risk of becoming dull and ruining the tile. Investing in the right diamond-tipped ceramic drill bits will make the job much easier.
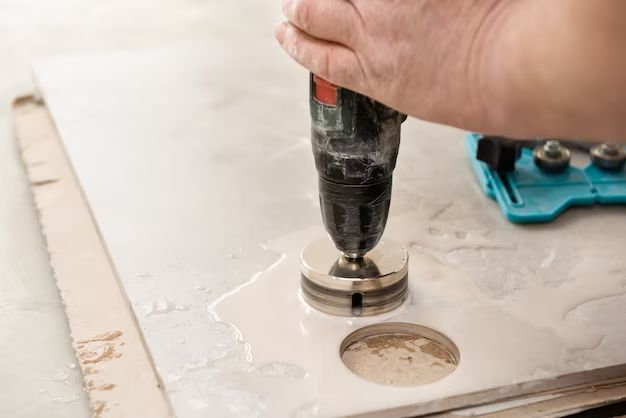
How to Drill Ceramic Tile Without Cracking
With the proper tools on hand, here are the steps to drill holes in ceramic tiles successfully:
- Mark the desired hole location – Use masking tape to stick to the tile and mark the center point with a pencil.
- Prepare a surface to support the tile – Clamp scrap wood beneath the marked location or tape down a wood block.
- Fill spray bottle with water – Have it ready to spritz the tile while drilling to keep the bit lubricated.
- Start drilling slowly – Begin at a low speed, applying light pressure. Increase speed gradually.
- Spray water continuously – This will keep the bit cool and wet to prevent overheating.
- Drill partially through, then finish from the other side – This prevents cracking as the drill breaks through.
- Drill at an angle if needed – For holes close to edges, drill at a 45 degree angle to avoid cracking.
- Rinse debris – Wash away all debris when finished and allow tile to dry completely.
Patience and care are key throughout the drilling process. Take it slow, use water to keep the bit cool, and take precautions if drilling near corners or edges. Rushing increases the chance of cracking the tile.
Tips for Specific Tile Types
Ceramic tiles come in a range of types, sizes, and thicknesses. Small adjustments may be needed depending on the specific tile being drilled:
Porcelain Tile
- Very dense and hard – Needs diamond bit and slow drilling speed.
- Prone to cracking – Support underside and drill at an angle near edges.
- Use lubricant if needed – Soapy water or cutting oil instead of regular water.
Natural Stone Tile
- Softer than porcelain – Carbide bit can work but diamond is better.
- Fragile edges – Tape extra support near outer corners.
- Control dust – Use low speed and water to minimize harmful dust.
Glass Tile
- Drill very slowly – Glass can crack easily with pressure or heat.
- Clamp material beneath – Plywood or MDF provide good support.
- Diamond coatings only – Bits designed for glass drilling work best.
Knowing the characteristics of the specific tile type allows choosing the right tools and techniques for a successful drilling job.
What Size Hole Can Be Drilled in Ceramic Tile?
Smaller drill bits are safer for ceramic tiles. Larger holes have a higher risk of causing cracks. Here are some guidelines on hole sizes:
- Optimal size is 3/16 inch or less – Bits this small have little risk of cracking tile.
- Holes up to 1/4 inch can work – Use extra care and support when drilling larger holes.
- Don’t exceed 1/2 inch holes – Attempting such a large hole could easily damage the tile.
- Drill multiple small holes instead of one large hole if needed – Several smaller holes are less stressful than one big one.
The thickness and density of the tile also impact maximum hole size. Thicker tiles can accommodate slightly larger holes. But when in doubt, stick to smaller 3/16 inch or less diameters for best results.
How Close to Edges Can Holes Be Drilled?
Drilling too close to the outer corners or edges of a tile increases the chance of cracking. Allow for a reasonable minimum distance based on tile type:
- Keep at least 1/2 inch from edges in porcelain – Dense porcelain is prone to corner cracking.
- Allow at least 3/4 inch margin in natural stone – Softer and needs extra support near edges.
- Maintain 1/8 inch clearance for glass tiles – The corners are very fragile.
- Drill at a 45 degree angle – Entering at an angle rather than straight on reduces stress near edges.
- Back exterior holes with clay – This support reduces the risk of blowout cracks.
In some cases holes may need to be drilled closer to edges, such as for wall anchors. Take extra precautions like drilling at an angle and build up backing support behind the hole.
How to Smooth Rough Ceramic Tile Hole Edges
The diamond drill bits will leave a slightly coarse hole edge in the tile. To smooth and finish the hole edges:
- Use a small file or rasp – Gently smooth out any small nicks or high spots around the hole.
- Rub sandpaper over the edge – Start with 180 grit and work up to 600 grit for a polished finish.
- Apply grout sealer – Sealing the edges helps prevent cracking and moisture damage.
- Consider edge liners – Small plastic or rubber grommets can protect rough inner edges.
- Check for hidden corner cracks – Chip out the exit hole edges to expose any small cracks for repair.
Taking some time to properly smooth and finish the hole edges gives a clean finished look. The tile will also be less prone to cracking or chipping from everyday use.
How to Fix Ceramic Tile Drilling Mistakes
Despite best efforts, sometimes cracks and other drilling mistakes happen. Here are some tips for fixing common ceramic tile drilling problems:
Small Spider Cracks
- Etch cracks with a Dremel to “open” them – Allows filling material to penetrate better.
- Clean out cracks thoroughly – Remove all debris for good adhesion.
- Fill cracks with epoxy resin – Press firmly into the cracks to fully fill.
- Smooth excess resin while still wet – After drying, sand and buff to blend with tile.
Corner and Edge Cracks
- Carefully chip away any cracked section – Bevel the edges so fill can adhere.
- Build up a corner support – Pack plumber’s putty into missing corner before filling.
- Fill missing pieces with epoxy – Take care to match level with surrounding tile.
- Re-grout gaps if needed – Use matching color grout once epoxy has dried.
Blowout Hole Damage
- Determine if tile needs to be replaced – Assess how much material is missing around hole.
- Cut a clean opening if tile will be replaced – Diamond hole saw provides clean cut.
- Trace outline of tile on new piece – Cut to match exactly for seamless fill.
- Carefully chip out old tile – Remove without harming nearby tiles.
- Fill with new tile and re-grout – Use proper techniques for smooth finish.
With some patience and creativity, it is possible to repair minor mishaps in the drilling process without having to fully replace the tile.
Conclusion
Drilling into ceramic and other tile materials is possible with the right approach. By using diamond-tipped bits, controlling drill speed, lubricating with water, and taking precautions around tile edges, holes can be added without cracks or damage. While tiles are brittle and require care, holes for anchor points, plumbing, shelving, and other needs can be cleanly drilled. With the proper methods and tools, holes can be drilled in ceramic tiles without ruining them.