Whether a stove vent can go through the roof is a common question for homeowners and renters alike. Properly venting cooking fumes and smoke from the stove is important for indoor air quality and safety. There are a few factors to consider when deciding if a roof vent is right for your stove. In this comprehensive guide, we will explore if and how a stove vent can go through the roof.
Page Contents
- 1 Can You Vent a Stove Through the Roof?
- 2 Stove Vent Duct Material and Size
- 3 How to Install a Stove Vent Through the Roof
- 4 Special Considerations for Venting Gas Stove Through the Roof
- 5 Choosing a Roof Vent Cap for Stoves
- 6 Cost to Vent a Stove Through the Roof
- 7 Alternatives to Venting a Stove Through the Roof
- 8 Conclusion
Can You Vent a Stove Through the Roof?
The short answer is yes, you can vent a stove through the roof in most cases. Stove vents are typically vented vertically through the roof rather than horizontally through the wall. There are a few reasons why roof venting is preferred:
- Roof vents allow for the most direct path to ventilate fumes and smoke outside. The shorter and straighter the ductwork, the better the ventilation performance.
- Roof vents do not require as many turns or bends in the ductwork compared to wall vents. Bends and turns restrict airflow and reduce ventilation efficiency.
- Roof vents are less likely to be affected by winds and drifting snow or rain than wall vents. Sidewall vents can sometimes vent back into the home if installed incorrectly.
The National Fuel Gas Code requires that stove vents terminate at least 3 feet above the highest point of the roof penetration. This helps adequately disperse fumes away from the home.
When a Roof Vent May Not Work
While roof venting is ideal in most cases, it is not always possible. Some situations when a stove vent may not work going through the roof include:
- The existing roof structure does not allow for a new penetration and vent. Some roofs may have architectural elements in the way.
- The existing stove location makes it difficult to route a vertical duct up through the roof. Long horizontal duct runs reduce venting performance.
- Multi-story homes may not have a straight vertical path to vent through the roof. Too many turns in the ductwork would be required.
- Townhomes or condos may not allow new roof penetrations due to building codes or homeowners association regulations.
In these situations, a wall vent may be the only option. However, a roof vent is preferable when possible.
Stove Vent Duct Material and Size
The stove vent duct leading up through the roof needs to be made of the proper material and sized correctly. Two main types of vent ductwork for stoves include:
Smooth Metal Ductwork
Smoke and fumes from stoves are hot and filled with grease particles. Smooth metal ductwork is required to handle the venting conditions.
- Acceptable materials include stainless steel and aluminum.
- Galvanized steel should not be used due to its tendency to corrode from greasy residue.
- Metal ductwork is rigid and holds its shape. This allows smooth airflow and prevents crimping.
Rigid Plastic Vent Pipes
Some stoves allow for venting with rigid plastic vent pipes, such as high-temperature PVC and CPVC:
- The plastic vent pipes must be UL-listed for stove ventilation use with temperatures up to 500°F.
- Plastic vents are often cheaper than metal vents.
- The vent joints must be properly solvent welded and secured according to the manufacturer’s instructions.
Regardless of the material, the vent size must match the stove vent outlet size. Reducing the vent size will restrict airflow. Most stove vents are 6-8 inches in diameter.
How to Install a Stove Vent Through the Roof
When installing a stove vent through the roof, proper planning, material selection, and installation steps are critical. Here is an overview of how to route a stove vent through the roof:
- Select the location for the vent based on stove proximity and ease of installing the ductwork with minimal turns.
- Determine the ducting path through the home up to the roof penetration location.
- Cut an appropriate sized hole through the roof decking material to fit the vent diameter.
- Frame a “chase” around the hole through the attic insulation to prevent fire risks.
- Install a roof flashing and weatherproofing collar at the penetration site.
- Run the smooth metal or plastic vent pipe sections from the stove up through the roof.
- Secure all vent pipe connections with sheet metal screws or per code.
- Install a vertical vent termination cap and secure with screws.
- Seal all roof and attic penetrations thoroughly.
- Slope horizontal ducting up towards the roof at 1⁄4 inch per foot.
Proper clearance around the vent and sealing are critical safety steps. Venting codes should always be followed.
Special Considerations for Venting Gas Stove Through the Roof
While the overall process is similar, venting a gas stove through the roof has some unique considerations.
Gas stoves require proper clearance to combustibles all along the vent path. Special fire-rated materials may be required where the vent passes through ceilings and attics.
The vent size on a gas stove is specifically matched to the BTU output of the stove and cannot be reduced.
Gas stoves also need sufficient combustion air. Air intake vents are often installed alongside the roof vent termination.
Always refer to the gas appliance manufacturer instructions for proper venting and clearances. In many cases, a certified gas technician is required for gas appliance vent installations.
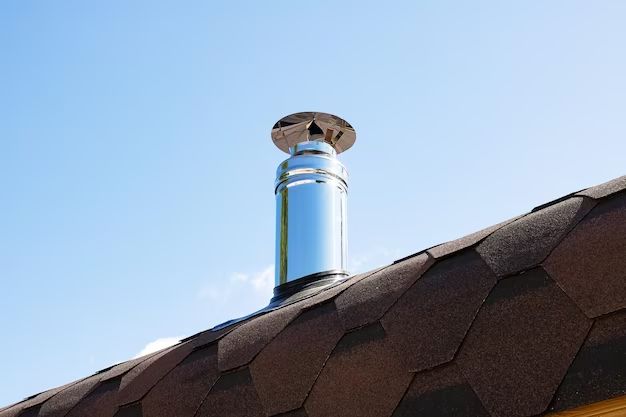
Choosing a Roof Vent Cap for Stoves
Choosing the proper roof vent cap is important to protect the ductwork and maintain proper ventilation. The most common types of vertical vent caps for stoves include:
Straight Cap
This is the most basic and common cap type resembling a chimney.
- Provides simple vertical venting for standard installations.
- Typically has mesh screens to reduce pest or debris entry.
Chinaman Cap
So-named for resemblance to a Chinese rice paddy hat.
- Angled top helps vent fumes upwards and reduces downdrafts.
- Mesh screen across angled top opening.
Wind-Resistant Cap
Designed to maintain airflow in windy conditions.
- Has internal baffles and passages to stabilize airflow.
- Great for exposed roofs prone to wind.
The stove vent cap should be durable, non-combustible, and designed for kitchen ventilation use.
Cost to Vent a Stove Through the Roof
The total costs to vent a stove through the roof typically ranges from $200 to $1,000. The most significant cost factors include:
- Vent cap – $50 to $250 depending on type and material.
- Vent pipe and elbows – Approximately $2 to $5 per linear foot of venting.
- Roof flashing and weatherproofing – $50 to $150.
- Labor –depends on installer hourly rate and venting complexity.
Simple venting jobs under 10 feet with easy roof access can cost around $200 total. Complex venting up to 30 feet with multiple elbows in difficult attic spaces can cost $800 to $1,000.
Alternatives to Venting a Stove Through the Roof
If it is not possible to vent a stove up through the roof, the main alternative is venting through an exterior wall. Wall venting has some downsides but can work in certain home configurations.
Sidewall Venting
Venting through an exterior wall has some pros and cons:
Pros:
- Typically easier to install and less expensive than roof venting.
- Allows stove placement flexibility since it does not require vertical alignment.
Cons:
- More bends required leading to reduced airflow.
- Risk of downdrafts forcing exhaust back inside.
- Vents can become blocked by snow or debris.
Proper sidewall venting requires angling ductwork up slightly and installing a backdraft damper. Wall caps must have proper clearance above the ground and from windows or doors.
Downdraft Ventilation
Some modern stoves have integrated downdraft ventilation that vents through the bottom of the stove unit, mainly designed for island stove placement where venting overhead is difficult.
A duct kit channels the downflow exhaust horizontally until it can be vented vertically through the floor and foundation. This is the least common venting approach as it has high installation complexity.
Conclusion
Venting a stove through the roof is the best practice in most cases for optimal smoke and fume removal. The ductwork should be as short and straight as possible using smooth interior pipes sized to match the appliance vent outlet. Proper flashing, cap selection, and sealing are critical for performance and safety. Wall venting is an alternative when roof venting is impossible, but it has some downsides to consider. With good planning and execution, venting a stove through the roof can provide effective ventilation for years to come.