Chimney cracks are a common issue that many homeowners face. Cracks in the chimney or fireplace can allow water to seep in, which can lead to much larger problems if left unaddressed. Thankfully, most chimney cracks can be repaired if caught early. This prevents further damage and ensures your chimney remains safe and functional.
In this comprehensive guide, we will cover everything you need to know about chimney crack repairs, including:
Page Contents
What causes chimney cracks?
There are a few common causes of cracks in chimneys:
– Settlement: Over time, subtle shifts in the foundation of a house can cause the chimney to settle and crack. This frequently happens in older homes.
– Improper construction: Chimneys that were poorly constructed or built using substandard materials are more prone to cracking.
– Physical impacts: Severe weather events like hail storms or high winds can damage the chimney structure. Animals nesting on the chimney or debris falling onto it can also cause physical cracks.
– Normal wear and tear: Regular expansion and contraction from heating and cooling cycles will eventually degrade the chimney mortar joints. Cracks tend to form where the mortar breaks down first.
– Chemical weathering: Moisture and pollution in the air can react with the chimney materials, weakening the structure over many years of exposure.
Should chimney cracks be repaired?
It is highly recommended to repair any cracks in your chimney, no matter how small. Cracks violate the smoke-tight seal of the chimney system and present the following risks if left unrepaired:
– Water intrusion – Cracks let rainwater and melted snow seep into the chimney structure. This can cause damage through freeze-thaw cycles in cold climates. Water intrusion also promotes spalling, which is when the face of the brick or stone pops off.
– Nesting animals – Birds, raccoons, squirrels, and other wildlife are attracted to the warm, sheltered environment inside a chimney. Nesting debris can clog the flue and animal droppings are highly corrosive.
– Reduced draft – Cracks disrupt the flow of air up through the chimney. Poor draft makes it harder to light or control your fire.
– Backdrafting – Negative pressure can pull dangerous combustion gases like carbon monoxide back down into the living space through cracks instead of up the flue.
– Fire hazards – Flaming embers or heat can escape through cracks and ignite the roof or other combustible parts of the house.
For your safety and to protect your investment, it is wise to repair chimney cracks as soon as they are noticed regardless of size. Avoiding repairs can lead to much more expensive chimney reconstruction later.
Inspecting Chimney Cracks
Before undertaking any chimney repairs, it is important to fully inspect the area to understand the type and extent of cracking present. This inspection will guide your repair approach. Follow these steps:
Look at the exterior
Do a walk around of your chimney on the outside of the house. Use binoculars for multi-story chimneys. Look for any cracks, missing chunks of mortar, or damage to the crown. Make notes on all issues noticed. Pay particular attention to the top few rows of brick or stone.
Inspect the interior
Go inside and examine the fireplace and flue system. Use a bright flashlight to spot cracks along the smoke chamber, damper, and flue liner. Soot stains around cracks may indicate ventilation issues. Bring along a small mirror on an extension rod to get views of hard to see areas.
Consider hiring a professional
A trained chimney pro has video cameras, flue scopes, and other specialized tools to thoroughly inspect the chimney. They can identify problems that may be hidden from external view. This is recommended for suspected serious issues. Expect to pay around $150 for a professional chimney inspection.
Classify the cracks
Once you’ve identified all cracks, note the type and severity of each one:
– Surface cracks – These affect the exterior masonry facade but do not penetrate deeply into the structure. Repairs are straightforward.
– Partial thickness cracks – These penetrate into the chimney but do not go all the way through. They require stabilization to prevent worsening.
– Full thickness cracks – These go entirely through the chimney structure. They are the most serious type and must be addressed promptly.
– Shifted/separated – Look for places where sections have become detached or misaligned. This may indicate foundation problems.
Monitor any changes
Cracks that worsen over time signal ongoing movement or deterioration. Make notes each time you inspect about size, length, and orientation. Take photos documenting the progression. Changing cracks warrant priority repairs before they jeopardize chimney integrity.
Chimney Crack Repair Materials
Once you have assessed the damage, it’s time to gather the right materials for the repair job. You’ll need:
Matching masonry
Brick, stone, or concrete that closely matches your existing chimney. Salvage pieces from a non-visible area if possible. Otherwise, order custom masonry that is an exact aesthetic match.
Mortar
Use Type-N or Type-S mortar that is appropriate for high temperature chimney applications. It must have similar strength, absorption, permeability, and coloration as the original mortar.
Hydraulic cement
A special quick-setting cement that stops running water and is heat resistant up to 2700°F when cured. It is useful for patching leaks through cracks.
Refractory cement
Used to seal interior cracks in the firebox and flue liner. Withstands temperatures above normal cement’s limits.
Sealant
Caulk or expandable foam specially formulated for the high temperatures of chimneys. Prevents outdoor air and moisture from infiltrating through cracks.
Mesh/lath
Fiberglass or metal lath and mesh provide a structural base to rebuild severely damaged sections. Look for high temperature chimney-rated products.
Tools
Trowels, jointers, brushes, mixing equipment, buckets, gloves, safety gear, and other masonry repair supplies.
Check that all materials comply with local building codes and are suitable for your chimney type. Your supplier can help guide you in selecting the right products.
Chimney Crack Repair Techniques
There are several methods available for fixing chimney cracks depending on the damage. Here are some common techniques:
Surface crack patching
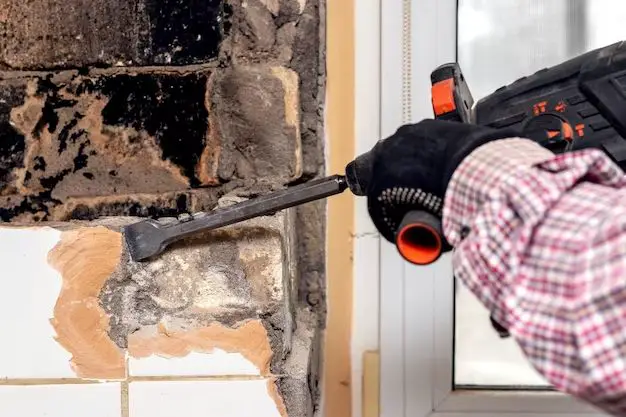
1. Widen the crack into a “V” shape using a grinder or chisel and hammer. This gives the patch material mechanical adherence.
2. Clean out any debris inside the crack with a shop vacuum and wire brush.
3. Dampen the crack with water before applying the patch to prevent excess absorption.
4. Fill or trowel high-heat mortar or refractory cement into the crack. Overfill slightly.
5. Use a rubber jointer or trowel to profile the mortar to match existing contours.
6. Cover with plastic and mist occasionally for several days as the patch cures.
Partial thickness crack repair
1. Use an angled rotary drill or chisel to open up the partial thickness crack into a square shape. Go at least 1 inch deep.
2. Vacuum and brush clean. Flush well with water.
3. Pack the back with damp hydraulic cement to seal. Let harden partially.
4. Fill remainder with refractory mortar. Overfill then tool to the original profile when partially set.
5. Mist cure for several days before allowing a full fire.
Full thickness crack repair
1. Drill stop holes at the ends of the crack to prevent spreading.
2. Rake open into a gaping “V” using masonry blades and a hammer and chisel.
3. Vacuum and flush thoroughly with water.
4. Fill backside with hydraulic cement. Let harden.
5. Pack refractory mortar into the crack. Overfill the face.
6. Wet tool excess mortar off once partially set using a jointer. Smooth to match surroundings.
7. Mist cure for several days.
Crack stitching and pinning
1. Drill at 45° angles into the chimney at both sides of the crack to depth of at least 3″.
2. Clean holes then install threaded stainless steel pins with washers and nuts. Tighten down the nuts to close the crack.
3. Apply refractory mortar over the pinned area, feathering it out. Retool when partially set.
4. Allow extended curing time before using the chimney. The pins provide structural reinforcement.
Chimney relining
If cracks have damaged the flue liner, a full stainless steel relining may be required. This entails:
1. Removing the existing liner. Inspect for other damage.
2. Cleaning the interior chimney surfaces.
3. Installing insulation wrap.
4. Lowering new stainless liner pipes. Connect and seal joints.
5. Adding a top rain cap.
Hire a professional for chimney relining as specialized tools and expertise are needed.
Chimney rebuilding
In cases of extreme damage, full or partial chimney rebuilding may be necessary:
– Damaged sections are demolished down to stable structure.
– A new reinforced foundation is poured if needed.
– The stack is reconstructed with duplicate brick, proper reinforcing, and meticulous mortar work.
– The rebuilt area is insulated and fireproofed.
– A new custom cap is installed.
Rebuilding requires architectural drawings and structural engineering consultation. Always hire certified chimney professionals for this level of chimney repair.
Preventing Chimney Cracks
An ounce of prevention is worth a pound of cure when it comes to chimney cracks. Here are some tips for keeping your chimney in good repair:
Have regular inspections
Schedule an inspection by a certified chimney sweep any time there are changes in performance or every few years. Early detection allows smaller repairs.
Perform maintenance
– Check the crown and flashing annually. Repair any cracks or gaps.
– Clean the chimney flue yearly or after every 4 cords of wood burned.
– Seal any exterior cracks as soon as they appear.
Avoid overloading
Don’t exceed the rated capacity of your chimney system. Oversizing can cause cracks from thermal stress.
Insulate properly
Make sure insulation baffles keep attic insulation away from the chimney. Don’t let exterior chimneys get cold.
Handle carefully
Take care not to bump or scrape the chimney. Damage encourages future cracking. Use padding when working on the roof.
Control vegetation
Keep trees and vines trimmed back from contact with the chimney. The movement can loosen mortar over time.
Conclusion
In summary, chimney cracks are a common issue but can be effectively repaired in most cases using the right materials and techniques. Matching mortar, refractory cement, lath, and specialty sealants allow you to patch both minor and serious cracks. More extensive chimney damage may need full relining or reconstruction by professionals. With diligent maintenance and care, costly cracks can be avoided. But when cracks do inevitably occur, understanding proper repair principles helps ensure your chimney remains structurally sound.