Page Contents
Quick Answer
Yes, you can use a drill bit to carve a pumpkin. While carving knives are the most common and ideal tool for pumpkin carving, a drill bit can also be used to create holes and designs in the surface of a pumpkin when carving. The key factors when using a drill bit for pumpkin carving are to use the proper size and type of bit, take precautions, and understand the limitations compared to using carving knives.
Using the Right Drill Bit
Not all drill bits are well-suited for carving pumpkins. Here are some tips for selecting the right drill bit:
– Size – Choose a bit that is approximately 1/4″ to 1/2″ in diameter. Larger bits will be difficult to control and may crack the pumpkin. Smaller bits don’t remove enough material.
– Shape – A spade or paddle bit with a flat end will scrape out pumpkin flesh efficiently. Avoid twist bits which are designed for drilling holes in wood or metal.
– Material – Carbide or cobalt steel bits stay sharper longer when carving. Bits coated in titanium or black oxide can also minimize friction and overheating.
Precautions When Using a Drill for Pumpkin Carving
Drilling holes in a pumpkin requires taking some safety precautions:
– Wear protective gloves to grip the pumpkin securely and avoid poking hands. Gloves also protect from scraping knuckles on the shell.
– Cut out any patterns first with a knife rather than drilling complex designs freehand. Stabilize the drill against the shell.
– Apply light pressure and don’t force the bit. Let the drill do the work to avoid cracking the pumpkin.
– Clear away pulp frequently to prevent clogging and overheating of the bit.
Limitations vs. Knives
While drills can carve simple designs into pumpkins, knives have some advantages for more detailed carving:
– Knives allow creating more complex shapes, shading effects, and cleaning up edges. Bits are limited to round holes.
– Spinning drill bits vibrate and lack precision compared to knives. It’s easier to control and guide knives.
– Drills are noisy and create pulp splatter. Knives are quieter and cleaner.
Steps for Drilling Pumpkin Carving Designs
Here is a general process for using a drill for carving pumpkin designs:
1. Wash the pumpkin and cut off the top for carving access. Scoop out stringy pulp and seeds.
2. Draw or tape a simple design onto the front of the pumpkin. Use markers or toothpicks.
3. Choose an appropriate drill bit and install it into your drill. Start with a smaller bit if uncertain.
4. Position and stabilize the base of the drill on the pumpkin. Begin drilling slowly.
5. Clear away pulp buildup frequently as you drill. Apply light pressure.
6. Drill overlapping holes to create the design elements and patterns.
7. Backlight the carved pumpkin to fully illuminate the designs.
Creative Design Ideas
Consider incorporating these creative design concepts when using a drill for pumpkin carving:
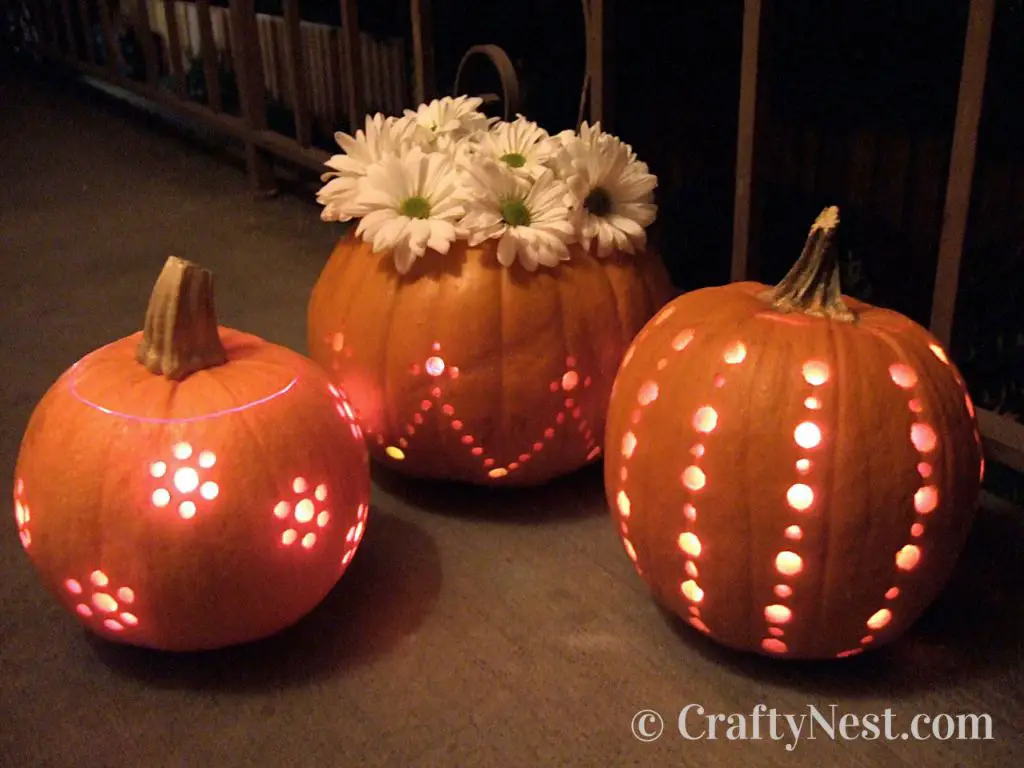
– Try a patchwork effect by drilling a grid of small holes to cover a section. This looks great when lit up.
– Make spirals by starting holes close together and circling outward. Spirals look neat when combined into one large design.
– Choose different bit sizes and make concentric rings of holes for an eye-catching pattern.
– Use a large bit to make holes for inserting LED lights or glow sticks into the pumpkin interior.
– Drill along the pumpkin ridges. The natural contours will distort the look into wavy lines.
– Outline facial features like eyes, nose, and mouth to create a fun jack-o’-lantern face.
Best Practices
Follow these best practices when using a drill for pumpkin carving:
– Inspect the pumpkin for soft spots and abrasions. Avoid drilling into damaged areas prone to cracking.
– Start holes on the surface before pressing deeper. It gives better control and reduces skidding.
– Make relief holes or slits in pattern areas to remove big sections of flesh.
– Frequently clear pulp from the bit flutes using a stick or by backing out partially.
– Work slowly with one hand steadying the pumpkin. Let the bit do the cutting.
– Dip the bit in water occasionally to reduce friction and prevent overheating.
Troubleshooting
Here are some solutions to common problems when drilling pumpkins:
Problem: The drill bit catches, jumps, and skids on the surface.
Solution: Ensure the pumpkin is stable and apply light pressure. Start holes gently before drilling deeper.
Problem: The pumpkin cracks around the holes.
Solution: Use a sharp bit and reduce the pressure. Avoid soft spots prone to cracking.
Problem: The drill bit clogs frequently with pulp.
Solution: Back the bit out more often to clear pulp. Use a larger bit or make relief cuts.
Problem: Holes appear burnt, ragged and overheated.
Solution: Dip the bit in water to cool and sharpen. Reduce drilling pressure and speed.
FAQs
Can I use a large bit to carve out eyes and mouths?
Yes, a 1-2 inch bit can be used to drill rounded openings for standard jack-o’-lantern eyes, nostrils, and mouths. Outline the shapes first and go slowly to control cracking.
What size drill bit is best?
Bits sized between 1/4 to 1/2 inches in diameter allow carving finer details than larger bits. Smaller bits 1/8 inch can be used but require more time.
Do I need a special drill or variable speed?
A standard drill will work fine. Variable speed helps control the force and RPM for cleaner cuts. Always use the lowest speed needed.
Can I drill straight into the pumpkin without marking designs?
It’s best to mark or draw guideline patterns first since freehand drilling is challenging. Tape can also stencil shapes onto the shell.
How deep should I drill into the pumpkin flesh?
Only 1/2 to 1 inch deep holes are needed for most designs. Drilling deeper risks hitting the interior wall and cracking the shell.
Conclusion
While specialized carving knives are ideal for intricate pumpkin art, using a standard drill and bit can also create interesting effects. The technique allows easily drilling uniform holes and grooves not possible by hand. With some creative thinking and proper precautions, a drill and bit can produce amazing Jack-O-Lantern faces, patterns, and illuminated designs to decorate for fall. Just be sure to use an appropriate size bit, stabilize your pumpkin, employ light pressure, and take your time when relying on power tools rather than knives for carving. With a few tries, you can discover how using a drill bit expands your pumpkin carving possibilities.