Page Contents
- 1 Quick Answer
- 2 Overview of Wiring a 3-Way Switch for an Outlet
- 3 Purposes of Wiring an Outlet to a 3-Way Switch
- 4 How 3-Way Switched Outlets Work
- 5 Cable and Wires for a 3-Way Switched Outlet
- 6 Step-by-Step Installation
- 7 Alternate Wiring for Reverse Switch Locations
- 8 Tips for Troubleshooting 3-Way Switched Outlets
- 9 Safety Tips
- 10 Conclusion
Quick Answer
Yes, it is possible to wire an outlet to a 3-way switch. This allows you to control a plug-in lamp or other appliance from two different locations, like at the top and bottom of a staircase. Wiring a 3-way switch for an outlet is more complicated than a standard wall switch, but it can be done by following basic electrical codes and using the correct cables and connections. The key components needed are: a pair of 3-way switches, a 12/3 cable to connect them, and a receptacle outlet split to hot and neutral wires that connect to the traveler wires. With proper connections and grounding, you can safely control an outlet from dual locations.
Overview of Wiring a 3-Way Switch for an Outlet
Wiring a 3-way switch for an outlet requires following a series of steps:
- Install boxes for the outlets and switches per electrical code
- Run a 3-wire 12/3 cable between the switches and outlet boxes
- Connect the hot source to the common terminal on one 3-way switch
- Connect the neutral wires and grounds
- Split the hot and neutral wires in the outlet box
- Connect the traveler wires between the switches and to the split outlet hot terminals
- Confirm proper switching operation
- Install devices, covers and test
This allows two 3-way switches to control the hot circuit to the outlet, enabling it to be turned on and off from two locations. The key requirements are using 12/3 cable, proper wire splicing, and following electrical codes for safety.
Purposes of Wiring an Outlet to a 3-Way Switch
There are a few reasons you may want to wire a switched outlet using 3-way switches:
- Control a lamp from two entrances – Have an outlet switched that controls a floor lamp, allowing it to be turned on at two doorway locations.
- Save outlet space – By wiring the outlet to a switch, you save having to use the outlet space for a lamp cord plug.
- Control appliances – Applicable for a device like a room heater or fan that you want to control from multiple spots.
- Create flexibility – Allows you to use the outlet either switched or unswitched as needed by what’s plugged into it.
So wiring an outlet to a 3-way switch provides convenience and flexibility. The most common reason is to control a lamp from two different spots in a rooms, like at the top and bottom of stairs. But it also lets you save outlet space and control appliances conveniently.
How 3-Way Switched Outlets Work
Electrically, here is how a 3-way switched outlet works:
- Power hot source connects to one 3-way switch common terminal
- 12/3 cable runs between the two 3-way switches as a hot traveler wire
- Switches swap the hot wire between common and traveler when toggled
- The traveler wire that becomes hot runs to the outlet hot terminal
- Neutral wire from outlet is connected to neutral power source
- Ground wires bonded throughout
So one switch has the hot source, which is swapped on the traveler wire to the second switch, and out to the outlet hot when flipped on at either location. The outlet neutral is connected back to the panel neutral bar directly.
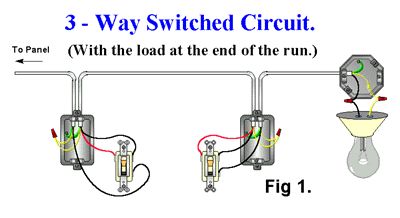
Diagram of a 3-Way Switched Outlet
| Component | Connection Points |
|---|---|
| 3-way switch #1 | Common terminal to hot (black) |
| 3-way switch #2 | Common terminal to traveler (red) |
| 12/3 cable | Travelers (red & black) connect switches |
| Outlet | Hot to traveler (red), neutral to source neutral, grounds bonded |
This basic wiring allows the switches to toggle hot power to the outlet for flexible control.
Cable and Wires for a 3-Way Switched Outlet
The proper cable and wire connections are critical for a functional and safe 3-way switched outlet. Here are the specifications:
- 12/3 Cable – Required between the switches and outlet with 3 conductors – black, white, and red for hot travelers.
- 14/2 Cable – Used between power source and switch box with black (hot), white (neutral), ground.
- Ground Wires – Bare copper or green wires connected throughout.
- Electrical Tape – For marking hot traveler as red at the outlet box.
The 12/3 cable provides the necessary third conductor between the switches to carry the hot traveler current. The ground wires should be made up at each box for safety. Make sure to tape the red traveler as hot at the outlet box.
Step-by-Step Installation
Here is a step-by-step guide to installing a 3-way switch outlet:
1. Install Switch and Outlet Boxes
– Mount two switch boxes at desired locations.
– Install outlet box where switched outlet is needed.
– Make sure boxes are properly grounded and required cable length is sufficient.
2. Run Cables
– Run 14/2 cables from power source to switch box 1.
– Run 12/3 cable between switch box 1 and 2.
– Run 12/3 cable from switch box 2 to outlet box.
3. Make Ground Connections
– Connect all ground wires and boxes using pigtails and ground screws.
4. Connect Hot Source
– Connect black hot wire from power source to common terminal on switch 1.
5. Connect Neutral Wires
– In outlet box, join white neutral wires from 12/3 cable and outlet together with a wire nut. Do not connect them to switches.
6. Connect Travelers
– In switch box 1, connect red traveler from 12/3 cable to bottom terminal.
– In switch box 2, connect red traveler from 12/3 cable to common terminal.
– Label red traveler in outlet box as “red hot.”
7. Connect Switched Hot
– In outlet box, connect red traveler wire to hot terminal on outlet.
8. Install Devices and Covers
– Install both 3-way switches and the outlet.
– Attach cover plates and turn circuit power back on.
– Test operation of switches to control the outlet.
This completes the installation. Make sure to follow local electrical codes and permit requirements.
Alternate Wiring for Reverse Switch Locations
The wiring above has the hot source connecting to switch 1. This defines switch 1 as the primary switch you want ON first. However, you can reverse this if desired:
- Connect hot to common terminal on switch 2.
- Connect switch 1 traveler to outlet hot.
- Mark switch 1 traveler as hot in outlet box.
With this wiring, switch 2 becomes the primary with hot always connected. The traveler from switch 1 to the outlet will switch hot on when flipped up.
Tips for Troubleshooting 3-Way Switched Outlets
If you wire a 3-way switched outlet and it is not working correctly, here are some tips for troubleshooting:
- Verify hot source is connected to common terminal on one 3-way switch.
- Confirm traveler wires connect between common terminals on each switch.
- Check that neutral wires are joined correctly in outlet box.
- Test that the traveler marked as hot connects to the outlet hot.
- Inspect all ground connections are completed.
- Look for any loose wire connections or shorts.
- Test operation with lamp or outlet tester.
Checking basic wiring connections and continuity is where to start troubleshooting. Also refer to manufacturer diagrams for 3-way switch wiring. Call an electrician if problems persist.
Safety Tips
When wiring a 3-way switched outlet, follow these safety recommendations:
- Turn off circuit power at the breaker before starting work.
- Use caution working inside electrical boxes.
- Make sure hands are dry when handling cables.
- Confirm no exposed copper or wires at connections.
- Use junction box cover plates.
- Test operation carefully once complete.
- Call a professional electrician if unsure of any wiring.
Always take the proper safety precautions. Ensuring the circuit is not live protects against electrical shock. Follow national and local electrical codes for required materials, box fill, and grounding requirements.
Conclusion
Wiring an outlet to a 3-way switch provides great flexibility in controlling lamps and appliances from multiple locations. By using the correct 12/3 cable, 3-way switches, and wire connections, you can safely install a switched outlet following basic electrical codes. Pay close attention to connecting the travelers between the switches and outlet hot. With good wiring technique and safety procedures, you can have an outlet controlled by dual wall switches. Consider hiring a professional electrician if you are unsure during installation.