Attaching a wood fence to an existing chain link fence is certainly possible, but it requires some planning and the right materials to do it properly. In the opening paragraphs, we’ll provide a quick overview of the factors to consider when attaching a wood privacy fence to a chain link fence and the steps involved.
Page Contents
Quick Answers
Can you attach a wood fence to a chain link fence? Yes, it is possible to attach a wood privacy fence to an existing chain link fence with the right materials and techniques.
What do you need to attach a wood fence to a chain link fence? You will need wood fencing panels, metal fence post mounts, self-tapping screws, and washers and nuts to securely attach the wood panels to the chain link.
How do you attach wood fencing to chain link? You can attach wood fencing to chain link by using metal fence post mounts secured to the chain link with self-tapping screws. The wood panels can then be attached to the post mounts using washers and nuts.
Is it hard to attach wood fencing to chain link? With the right tools and materials, attaching wood fencing is a relatively straightforward DIY project. The main steps involve mounting the post brackets, aligning the wood panels, and securely fastening them to the chain link.
Does attaching wood fence to chain link look good? Properly installed, a wood privacy fence can look seamless and attractive attached to a chain link fence. Using overlapping panels and painting to match can give a cohesive finished look.
Assessing Your Existing Chain Link Fence
Before starting this project, you’ll want to assess the existing chain link fence. Make sure the chain link itself is still in good condition without excessive rust, broken links, or posts leaning or coming loose. Repair any issues with the chain link fence first to ensure it can properly support the added weight and wind load of wood panels.
Also check that the chain link posts and framework are suitable for mounting the wood. The posts spaced 8-10 feet apart need to be sturdy and vertical. If not, you may need to add additional posts where you plan to mount the wood panels. Avoid attaching wood panels in areas where the chain link is sagging or posts are leaning.
Measuring Your Fence
Accurately measure the length of your chain link fence on each side where you want to install the wood privacy fence. Consider the height as well since the wood panels will need to match or exceed the chain link height to properly block visibility.
Chain link fences are often 4 feet high, but can range from 3 feet up to 8 feet tall or higher. Wood privacy fences commonly come in 6 foot and 8 foot heights. Make sure you get wood fence panels at least as tall as your existing chain link.
Post Spacing
Also note the spacing between the vertical chain link posts, which are usually 8 or 10 feet apart. The wood panels will need to span between these posts. Many wood fence panels come in 8 foot lengths to match typical post spacing.
Layout Planning
With your measurements, you can start planning the layout. Mark the posts where you will mount the brackets to hold the wood panels. Depending on the length needed, calculate how many full wood panels and any partial panels would be needed to span the entire distance.
Try to minimize any large gaps between the end posts and the wood fence panels. You may need an extra custom cut panel or use trim boards to close gaps larger than a few inches.
Purchasing Materials
Once you have your measurements and layout planned, you can purchase the necessary materials. This includes:
- Wood fence panels – Either pre-assembled or panels you can assemble yourself from boards. Cedar and redwood panels are naturally weather-resistant.
- Metal fence post mounts – Brackets that bolt to the chain link and support the wood panels
- Self-tapping screws
- Nuts and washers
- Wood trim boards as needed
- Exterior wood screws
- Paint or wood stain and sealer
Make sure all fasteners and hardware are corrosion resistant, either galvanized or stainless steel. Hot-dipped galvanized is the most durable option.
Here are the approximate materials needed for a 10 foot section of wood privacy fence attached to chain link:
| 1 | 8 ft. wood fence panel |
| 3 | Metal fence mounts |
| 18-24 | Self-tapping screws |
| 6-12 | Nuts and washers |
Quantities can be scaled up as needed for longer fence lengths. It’s a good idea to purchase extras such as screws and nuts/washers. Having a power drill and socket set is also recommended to make installation much easier.
Installing the Post Mounts
With your materials purchased, you can start installation. The first step is mounting the post brackets onto the chain link fence posts. Position the bracket against the post with the mounting flange on the inward side where the wood panel will attach.
Use 2-3 self-tapping screws through each mounting hole to securely fasten the bracket to the chain link post. Make sure the bracket is centered and level on the post.
Repeat this to install a post mount on every chain link fence post where you’ll be attaching a wood panel. Position the top of the bracket a few inches below the top of the fence to allow room to attach the wood panel while leaving a gap along the bottom.
Tips for Proper Post Mount Installation
- Drill pilot holes for the self-tapping screws if going into thick steel posts.
- Apply anti-seize lubricant to screw threads to ease driving.
- Use clamps to hold bracket in position while fastening.
- Check brackets for level and alignment as you go.
Installing the Wood Panels
With the brackets installed, you can move on to mounting the wood panels. Start by test fitting the panel between two brackets.
Ideally the wood panel should sit flush against the brackets. If needed, trim the panel edges so it fits properly without large gaps. Leaving small gaps of up to an inch is acceptable to allow for expansion.
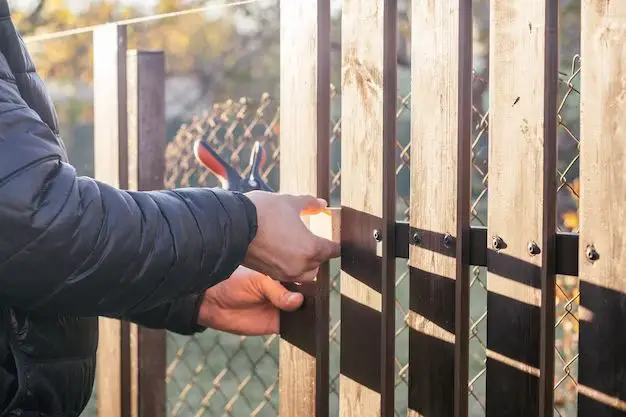
Lift the panel into position and align the holes in the side frame with the holes in the mounting bracket flanges. Insert bolts along with washers and nuts through the aligned holes to attach the panel to the brackets.
Do not fully tighten yet. Get all bolts started and panels aligned before tightening down. Make sure edges are aligned with the fence line. Tighten bolts securely, but be careful not to over-tighten as this can damage the wood, especially if it swells or shrinks.
Repeat this process to install all your full size wood fence panels between the chain link posts. For any partial panels needed at the ends, measure and cut the wood panel to the needed width. Mount as with the full panels.
Tips for Attaching Wood Panels
- Use lumber crayon to mark hole locations.
- Pre-drill holes in wood panels if necessary to prevent splitting.
- Use washers to prevent bolts from digging into wood.
- Have helper support panel while attaching.
- Check for level and plumb when tightening down.
Finishing Touches
Once all your wood privacy fence panels are securely installed, you can complete the project with final finishing touches:
- Trim boards – Install trim boards over any gaps between the end of the fence panels and posts.
- Paint/stain – Finish the wood fence with exterior grade paint, stain, or sealer to protect it from weathering.
- Landscaping – Do grading or plantings along the fence line to help its visual appeal.
Proper maintenance like occasional refinishing and checking for loose bolts will help your wood privacy fence last for years to come.
Conclusion
Attaching a wood privacy fence to an existing chain link fence is a great way to upgrade and improve the appearance of your yard and block unsightly views. With the right planning, materials, and installation process, you can have an attractive wood fence seamlessly mounted on chain link posts.
Be sure to assess your existing fence, purchase suitable wood panels and mounting brackets, and install them securely for best results. Follow the steps and tips outlined here for a successfully completed project.
So with some work, it is certainly possible to combine chain link and wood fences for a blended solution combining privacy, security, and aesthetics in your outdoor spaces.