Cutting holes in ceramic tile can be done, but it requires the right tools and techniques. Ceramic tile is a very hard material that can easily crack or break if not cut properly. With some planning and care, holes of various sizes can be cut into ceramic tiles for outlets, fixtures, pipes, and more.
Page Contents
- 1 What tools do you need to cut holes in ceramic tile?
- 2 How to cut a hole in ceramic wall tile
- 3 Cutting outlet or switch holes
- 4 Cutting holes for plumbing fixtures
- 5 Cutting holes for pipe penetrations
- 6 Cutting large holes for fixtures or appliances
- 7 Cutting recessed shelves or soap dishes
- 8 Common mistakes when cutting ceramic tile holes
- 9 Cutting holes in porcelain, granite, and natural stone tiles
- 10 Cutting rectangular holes in ceramic tile
- 11 Finishing and smoothing cut ceramic tile edges
- 12 Preventing cracks when cutting ceramic and porcelain tile
- 13 Using tile hole cutters instead of drill bits
- 14 Using an oscillating tool to cut ceramic tile
- 15 Cutting costs when cutting ceramic wall tile holes
- 16 Conclusion
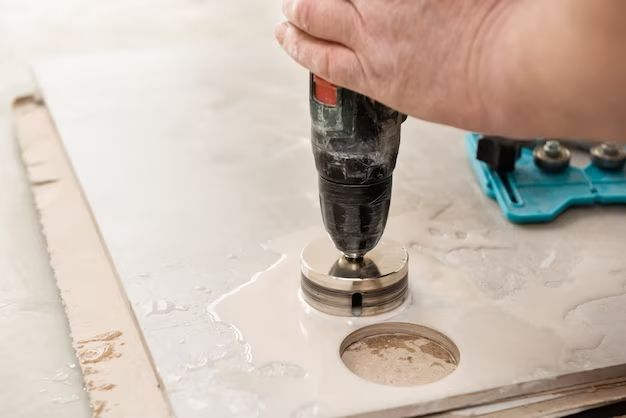
What tools do you need to cut holes in ceramic tile?
Cutting clean, precise holes in ceramic tiles requires using the proper cutting tools. Here are some of the main tools needed:
- Ceramic tile hole saw – This is a circular saw blade specifically designed for cutting into ceramic tiles. The cutting edge contains diamond grit that can grind through the hard tile material. Hole saws come in different diameter sizes.
- Electric drill – To drive the hole saw. A variable speed/reversible drill works best to control the cutting speed.
- Masking tape – To help prevent ceramic chipping when the tile is cut.
- Utility knife – For scoring the glazed tile surface before cutting the hole.
- Safety glasses – For eye protection from flying debris when cutting.
- Marking pen – To mark the center point of the hole location.
- Safety gloves – To protect hands and fingers.
- Sponge – For cleaning up water used during cutting.
Having the right hole saw size for the application is key. The diamond-edged saw blades are designed to cleanly cut through ceramic tile without cracking or chipping. Variable speed drills allow slower speeds for smooth controlled cuts.
How to cut a hole in ceramic wall tile
The basic process for cutting holes in glazed ceramic wall tiles involves these steps:
- Mark the center point of the hole on the tile. Use a pencil or marking pen.
- Place masking tape over the hole location area on the tile. Apply several overlapping layers. This helps prevent chipping.
- Use a utility knife to score the glazed tile surface. Score deeply along the hole perimeter marked.
- Set the depth of the ceramic hole saw. Don’t extend the diamond cutting edges beyond the tile thickness.
- Fill the hole saw with water. The water helps cool the blade during cutting.
- Start cutting slowly at first. Let the hole saw do the work. Apply firm pressure but don’t force it.
- Once through the tile, back the hole saw out carefully to avoid cracking the tile.
- Remove any tile chipping carefully with the utility knife.
- Smooth any rough tile edges with a file or sandpaper.
Going slowly with steady pressure yields the best results. Allowing the diamond hole saw to cut through the hard tile prevents rushed mistakes. Using water keeps the blade cooler and eliminates dust.
Cutting outlet or switch holes
One common use for cutting ceramic tile holes is creating openings for electrical boxes and fixtures. Here are some tips for clean outlet and switch holes:
- Use the correct size hole saw. Match it to the electrical box outer diameter.
- The hole center point should align exactly with the outlet box.
- Cut the hole so the box edges are concealed by the surrounding tile.
- Cut the hole in the tile before installing and thinset mortar.
- Use tile spacers around the box to maintain even grout lines.
Careful hole cutting allows the ceramic tile to sit flush with the installed electrical box. Precise alignment also provides a cleaner finish result.
Cutting holes for plumbing fixtures
Ceramic tiles around plumbing fixtures like spouts, handles, and drains also require cleanly cut holes. Here are some best practices:
- Use the fixture itself as a hole template if possible.
- Cut the minimum hole size needed for fixture clearance.
- Account for the tile thickness when aligning the hole depth.
- Use larger hole saws for fixture assemblies and escutcheons.
- Surround drain holes with linear patterns for a cleaner look.
Carefully measuring both the hole location and size helps create a neat professional appearance. Any exposed cut edges can be finished with tile trim pieces.
Cutting holes for pipe penetrations
Pipes passing through ceramic tiled walls also require neatly cut openings. Follow these guidelines when cutting tile holes for pipes:
- Choose a hole saw at least 1/4″ larger than the pipe diameter.
- Align the hole precisely where the pipe will pass through.
- Cut tile holes before installing waterproof membranes.
- Use rubber grommets around pipes to prevent abrasion damage.
- Apply color-matched caulk around pipes for a clean finish.
Leaving clearance around pipes prevents cracking pressure points on the tiles. Waterproofing before cutting prevents moisture issues. The finished openings should be caulked to look neat and blended.
Cutting large holes for fixtures or appliances
For larger openings that exceed hole saw capacities, alternatives like the following can be used:
- Use a diamond grit jigsaw blade to cut the main hole.
- Drill a starter hole first when using a jigsaw.
- Make curved cuts gradually when jigsawing.
- Use an oscillating tool with a ceramic blade for detailed cuts.
- Finish edges with files, sandpaper, or a router.
Larger holes may require cutting from both sides for the cleanest finish. Allow a margin of error for trimming irregular edges. Use sharp carbide router bits for best results.
Cutting recessed shelves or soap dishes
Recessed shelves and soap dishes also involve cutting openings in ceramic tile. Here are some tips:
- Use the item itself as a template for the hole.
- Cut the hole 1/8″ or more larger for easier fitting.
- Use several small holes saws to cut corners and edges.
- Cut gradually for greater control on curved cuts.
- Use a router or rotary tool to shape detailed edges.
Precise hole cutting allows a recessed item to fit cleanly within the tile. A tight fit prevents leakage of water and soap behind the tile.
Common mistakes when cutting ceramic tile holes
Cutting holes in tile has risks for cracks and chips if not done carefully. Here are some common mistakes to avoid:
- Not using the proper tile hole saw.
- Failing to score the glazed tile surface before cutting.
- Rushing the cut and applying too much pressure.
- Not keeping the hole saw cooled with water.
- Twisting the hole saw within the hole.
- Using a hole saw in a low-power drill.
- Cutting outlet holes too small or misaligned.
- Allowing pipes or fixtures to rub directly on cut edges.
Having patience during the cut and using the right technique prevents damaging the surrounding tile. Ceramic pieces can crack in all directions if the hole saw binds.
Cutting holes in porcelain, granite, and natural stone tiles
Porcelain, granite, and natural stone tiles require modified techniques when cutting holes:
- Use a diamond grit core drill bit made for stonework.
- Work slowly and don’t force the drill bit when cutting.
- Minimize hammer drill impact settings when drilling stone.
- Cool bits often with water to prevent overheating.
- Drill centered guide holes first before widening holes.
- Cut electrical box holes oversized in stone tile.
Stone materials lack ceramic’s uniform composition. Specialized bits and slower drilling avoid cracking. Granite and stone tiles have high thermal mass and need cooling.
Cutting rectangular holes in ceramic tile
In some cases, rectangular openings may be needed instead of circular holes:
- Use a diamond grit reciprocating saw blade for straight cuts.
- Score cut lines first and cut from center outwards.
- Make multiple passes when cutting lengthwise openings.
- Use an oscillating tool for detailed trimming and fitting.
- Cut electrical box holes slightly oversized for adjustments.
Many small holes can be merged into a larger opening. Allow extra space along the cuts for edge finishing. The blade should cut through the tile thickness gradually.
Finishing and smoothing cut ceramic tile edges
The cut edges of holes will have rough areas in need of finishing:
- Use a sharp tile file to smooth bottom hole edges first.
- Carefully file chipped areas by hand with patience.
- Wrap sandpaper around a wood block for hard-to-reach spots.
- Use fine grit sanding sponges to blend all rough areas.
- Avoid abrasive disks which can rapidly remove too much.
- Finish with a polishing compound for a glossy surface.
Filing and sanding takes practice to achieve a smooth contoured finish. The goal is to blend cuts seamlessly within the surrounding glazed tile.
Preventing cracks when cutting ceramic and porcelain tile
There are some ways to help prevent cracks from forming when cutting:
- Use a tile wet saw when possible for clean straight cuts.
- Select a hole saw or bit one size larger than the marked area.
- Don’t force tiles when scoring or cutting. Go slowly.
- Cut holes before setting tile with mortar or adhesive.
- Allow clearance around pipes, valves, and fixtures.
- Use rubber cushions anywhere tiles contacts rigid items.
- Avoid hammer drilling through brittle porcelain tiles.
Rushed or careless cuts are prime causes of cracks forming. Allowing adequate clearances helps prevent future cracking from stresses.
Using tile hole cutters instead of drill bits
Tile hole cutter tools provide an alternative to typical drill bits for some applications:
- Cutters contain tungsten carbide teeth instead of diamond grit.
- The spring-loaded cutters apply continuous pressure when turning.
- Cutters work well for holes 2″ or smaller in diameter.
- They typically cut faster than diamond hole saws.
- Cutters don’t require water cooling during use.
- They produce relatively smooth cut edges.
Tile hole cutters aren’t designed for heavy use. But they can be a quicker easier option for occasional small holes.
Using an oscillating tool to cut ceramic tile
Oscillating multi-tools provide another hole cutting option:
- Special ceramic oscillating blades allow tight curved cuts.
- Cut freehand or use guides for straight cuts.
- Plunge blades directly into tile to start interior cuts.
- Cutouts can be done in stages by connecting multiple holes.
- Oscillating tools are best for detailed trimming work.
- Diamond abrasive disks can also be fitted when needed.
Oscillating tools allow great control for precision ceramic tile hole cutting. Their vibration-free operation reduces tile cracking risks.
Cutting costs when cutting ceramic wall tile holes
Cutting holes in tile has associated costs. Here are some money-saving tips:
- Buy quality hole saws once rather than cheaper versions repeatedly.
- Use corded tools to avoid spending on batteries and chargers.
- Cut tile holes before doing thinset and grout work.
- Mark all holes at once and cut in sequence.
- Rent specialized tools like core drills instead of purchasing.
- Follow tile manufacturer’s instructions closely.
- Seal cut edges well to prevent moisture damage.
Careful planning of all tile penetrations saves time and wasted effort later. Investing in durable tools and learning proper technique also pays off long-term.
Conclusion
Cutting clean precise holes in ceramic and porcelain tiles is achievable with the right approach. Having the proper cutting tools for the tile material is essential. Carefully marking locations, drilling pilot holes, and using masking tape prevents chips and cracks. Cutting holes before installing tile avoids much frustration. Holes should be sized correctly with room for trimming and smoothing the rough edges. Patience and practice creates neat professional results able to withstand years of service. With care and persistence, quality holes can be cut in even the hardest ceramic and porcelain tiles.