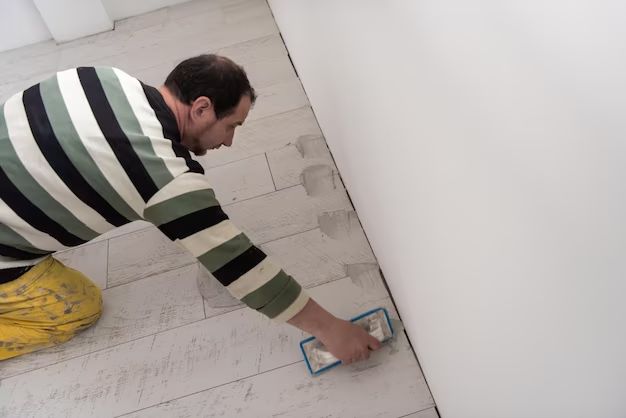
Yes, you can grout tile with a grout bag. A grout bag is a tool that allows you to apply grout into the joints between tiles in a controlled and efficient manner. Using a grout bag can make grouting tile a much easier and cleaner process compared to the traditional method of applying grout with a float or trowel.
Some key benefits of using a grout bag include:
- More control and precision when applying grout into joints
- Less mess and waste of grout compared to tools like a float
- Ability to apply consistent pressure and fill joints thoroughly
- Easier to grout hard to reach areas
- Faster grouting especially for small tile joints
- Creates a smooth, consistent grout finish
While grout bags are very useful for grouting tile, there are some limitations to consider:
- Not ideal for large joint sizes over 1/8 inch
- Can be difficult for novice DIYers to get the hang of
- Need to use caution to avoid removing too much grout from joints
- More cleanup required compared to some power grouting tools
As long as you use the right techniques and the right grout consistency, a grout bag can be an excellent tool for grouting tile successfully. The key is taking the time to practice and understand how to control the grout flow properly.
Page Contents
- 1 Choosing the Right Grout Bag
- 2 Grout Bag Technique and Tips
- 3 Grout Bag vs Other Grouting Methods
- 4 Grout Bag Maintenance and Storage
- 5 Common Grout Bag Mistakes to Avoid
- 6 Troubleshooting Grout Bag Issues
- 7 FAQ – Common Grout Bag Questions
- 7.1 Should I dampen tiles before using a grout bag?
- 7.2 Do I need to apply sealer before grouting with a bag?
- 7.3 How full should I fill a grout bag?
- 7.4 What size grout bag tip should I use?
- 7.5 Can I reuse grout bags for different grout colors?
- 7.6 How soon can I clean grout after applying with a bag?
- 7.7 What PSI should I use with a grout bag?
- 8 Conclusion
Choosing the Right Grout Bag
When selecting a grout bag to use for your tile grouting project, there are a few options to consider:
- Size of bag – Grout bags come in different sizes from 10 oz to 60 oz capacities. Choose a larger bag for big projects and a smaller one for tighter spots.
- Material – Grout bags are made from canvas, silicone, plastic or latex. Silicone or latex bags are best for smooth flow.
- Tip style – Some grout bags have a simple wide opening and others have various piping tips. Conical tips allow more control.
- Thickness – Thicker bags with durable material allow easier handling and filling of the bag.
- Brand – Trusted brands like Marshalltown, QEP and DuraTex make quality grout bags.
Make sure to select a grout bag suitable for the joint size of your tiles. A bag with a wider tip opening works better for wider grout joints. Carefully read product details and reviews to ensure you choose a high quality grout bag.
Tips for Selecting a Grout Bag
- Pick a grout bag about 1/3 the width of your tile joints
- Choose thicker bags around 20 mil for durability and handling
- Look for bags with reinforced seams to prevent breakage
- Select smooth silicone or latex material for easy grout flow
- Get a tapered tip design for maximum control
- Go for a trusted brand with good reviews and reputation
With the right grout bag, you’ll be able to smoothly fill joints and achieve a professional looking grouted tile finish.
Grout Bag Technique and Tips
Follow these key techniques when using a grout bag to grout tile:
Filling the Grout Bag
- Only fill the bag about halfway to allow room for grout to flow out.
- Squeeze out excess air before closing the bag.
- Twist or tie off the end of the bag tightly to prevent leaking.
- Place a damp cloth or plastic wrap around filled section to keep moist.
- Regularly remix grout while grouting to maintain consistency.
Applying Grout from the Bag
- Hold bag at a 45 degree angle to the joints to focus pressure.
- Squeeze bag gently and maintain consistent motion and speed.
- Move bag in a circular motion across tiles to fill joints thoroughly.
- Keep tip inserted in joint moving steadily to avoid air pockets.
- Wipe off excess grout carefully to prevent removing too much.
Cleaning and Finishing
- Allow grout to firm up slightly before cleaning.
- Use a damp sponge in a circular motion to smooth joints and clean tiles.
- Once cleaning is done, allow grout to fully cure per manufacturer instructions.
- Use a soft cloth to buff grout haze off tiles for a polished finish.
It’s crucial to allow the grout to dry properly once applied. Follow all cure times recommended for your specific grout. Using fans or heaters can help speed up the curing process.
Helpful Grout Bag Tips
Here are some additional tips for success when grouting with a grout bag:
- Lightly dampen tiles before grouting to prevent absorption.
- Ensure joints are cleared out to proper depth before grouting.
- Use consistent, firm pressure as you grout – no light dabbing.
- Keep spare bags filled and ready for quick refills.
- Try different nozzle tips to vary grout flow as needed.
- Plan your grouting path strategically around the space.
- Check for low spots and fill again to avoid hollow joints.
- Gently remove excess grout so you don’t pull it out of joints.
Mastering these techniques and tips will allow you to grout tiles efficiently and get professional looking results with a grout bag.
Grout Bag vs Other Grouting Methods
Compared to other common grouting tools and methods, using a grout bag has some notable advantages and disadvantages:
Grout Bag vs Grout Float
| Grout Bag | Grout Float |
|---|---|
|
|
Grout Bag vs Grout Squeegee
| Grout Bag | Grout Squeegee |
|---|---|
|
|
Grout Bag vs Grout Pen
| Grout Bag | Grout Pen |
|---|---|
|
|
In summary, a grout bag offers a nice balance of control, efficiency, low mess and easy handling for most tile grouting needs. For very large commercial jobs or wide joint tiles, a grout float or squeegee may work better. Grout pens are more suited for convenient minor repairs.
Grout Bag Maintenance and Storage
To extend the life and performance of your grout bags:
- Rinse bags thoroughly after each use and air dry.
- Use a stiff bristle brush to scrub off dried grout if needed.
- Check bags for damage after cleaning and discard if any leaks are found.
- Store bags upright or hanging to avoid pressure on seams.
- Keep bags out of direct sunlight to prevent premature wear.
- Consider having dedicated bags for different grout colors.
- Apply a light coat of vegetable oil to prevent bags drying out if storing long term.
Proper maintenance and storage will keep your grout bags in good working order for many tile projects. Replace bags about once a year or as needed when they start to wear and crack.
Having spare new grout bags on hand ensures you can keep grouting efficiently without having to stop and clean bags as often.
Common Grout Bag Mistakes to Avoid
When using a grout bag, there are some common mistakes that can lead to problems and poor results:
- Not fully clearing out joints before grouting – Can cause weak bond.
- Failing to dampen tiles first – Results in grout drying too fast.
- Trying to grout joints that are too wide – Causes cracking and sagging.
- Holding bag at wrong angle – Prevents fully filling joints.
- Moving bag too fast – Creates voids and air pockets.
- Not applying consistent pressure – Leads to uneven fills.
- Leaving unfilled low spots – Allows cracks from uneven curing.
- Over-washing and removing grout – Weakens joints and adhesion.
- Not allowing proper cure time – Causes soft or cracked grout.
Avoiding these mistakes takes patience and care when grouting. Rushing the process often leads to subpar results. It’s better to go slowly and carefully than having to redo grout jobs.
Tips to Avoid Grout Bag Mistakes
- Prep joints thoroughly following tile manufacturer recommendations
- Use sponges and towels to dampen tiles before starting
- Only use grout bags on joints within recommended size
- Practice on spare tiles first to master technique
- Maintain a steady, consistent sweeping motion
- Press bag nozzle firmly into joint keeping at 45 degrees
- Inspect closely and fill any low spots missed initially
- Gently clean tiles at an angle to avoid pulling grout out
- Allow 72 hours cure time minimum unless stated otherwise
Avoiding common grouting mistakes will ensure your tiles have durable, long lasting grouted joints free of cracks and flaws.
Troubleshooting Grout Bag Issues
When problems arise with grouting using a grout bag, here are solutions for some common issues:
Grout Drying Too Fast
– Dampen tiles more prior to grouting
– Check that grout mix is correct consistency
– Work in smaller sections
– Have spare bags of fresh grout mixed up
Uneven Grout Lines
– Maintain consistent bag angle and pressure
– Use a nozzle tip that fits joint width
– Check for low spots and refill
– Use smoother sweeping motions
Cracking or Crumbling Grout
– Confirm joints are cleared out to proper depth
– Replace worn grout bag with leaks
– Make sure not to over-wash joints
– Allow for full curing time before cleaning
Grout Not Bonding in Joint
– Check tiles are clean and free of dirt, oil, sealers
– Dampen tiles prior to grouting
– Make sure grout bag tip penetrates fully into joint
– Apply enough pressure keep grout in contact with sides
Efflorescence on Grout
– Mix grout correctly and do not add too much water
– Avoid grouting in very hot and dry conditions
– Seal grout once fully cured
– Use a grout that has additives to reduce efflorescence
Diagnosing and fixing any grout bag issues promptly leads to much better results. With some care and patience, you can create durable, professional looking grouted joints.
FAQ – Common Grout Bag Questions
Should I dampen tiles before using a grout bag?
Yes, it is highly recommended to lightly dampen tiles with a sponge or towel before grouting with a bag. This prevents the tiles from absorbing water too quickly from the grout which can lead to cracking and adhesion issues.
Do I need to apply sealer before grouting with a bag?
Sealer is usually applied after grouting and cleaning. In some cases, a grout release can help prevent grout sticking excessively to the tile surface but dampening the tiles is usually sufficient.
How full should I fill a grout bag?
Only fill a grout bag about halfway to 2/3 full. This leaves room for grout to be pushed out easily. Filling a bag too full can make controlling the flow very difficult.
What size grout bag tip should I use?
Choose a grout bag tip opening that is around 1/3 the size of your tile joints. Wider joints require wider tips to fill properly. Conical shaped tips allow the most control.
Can I reuse grout bags for different grout colors?
It’s best to have dedicated grout bags for each color to avoid staining lighter grouts. Bags can be reused but should be thoroughly cleaned between colors. Having extra bags for each color makes switching faster.
How soon can I clean grout after applying with a bag?
Wait for grout to firm up slightly, usually around 20-30 minutes before cleaning. Test a small area first before washing the entire surface. Don’t overwash joints before grout has cured fully.
What PSI should I use with a grout bag?
No PSI is required for standard hand operated grout bags. Some powered grout bag tools connect to an air compressor and recommend between 40 to 60 PSI for optimal grout flow. Always start low and adjust as needed.
Conclusion
Grout bags provide an efficient, low mess option for grouting tile. By following the proper techniques for filling, applying and cleaning the grout, you can achieve professional looking results. Understanding the limitations compared to other methods helps choose when a grout bag is the right tool for the job. Avoiding common mistakes and troubleshooting any issues promptly will lead to success grouting your tiles with a grout bag.