Page Contents
- 1 Quick Answer
- 2 What are the requirements for tiling over concrete outside?
- 3 How to prepare an existing concrete slab for tile?
- 4 What materials do you need to tile over concrete outside?
- 5 Step-by-step guide for tiling over concrete outside
- 6 Tips for successful outdoor tile projects
- 7 Advantages of tiling over exterior concrete
- 8 Disadvantages of tiling on exterior concrete
- 9 Cost to tile over concrete outside
- 10 Tile over concrete outside: DIY or hire a pro?
- 11 Conclusion
Quick Answer
Yes, you can install tile over an existing concrete slab outdoors. The key is proper surface preparation and using the right materials to ensure a long-lasting tile installation. The concrete needs to be clean, dry, and free of contaminants. A tile underlayment or decoupling membrane can be applied to help prevent cracks. Flexible thinset mortar and grout designed for exterior use are recommended. Making sure the tile and installation materials are suitable for freeze-thaw conditions is also important. With the right prep and products, tile can be a durable and attractive surfacing option for outdoor concrete areas.
What are the requirements for tiling over concrete outside?
There are several important requirements to ensure success when tiling over exterior concrete:
Proper substrate preparation
The concrete slab must be structurally sound, cured, and free of contaminants like paint, wax, oil, dirt, and efflorescence. Etching the surface with an acidic cleaner provides a mechanical bond. Any cracks or divots should be filled with patching compound. The surface should be swept clean.
Underlayment or decoupling membrane
An underlayment layer is recommended to prevent cracks in the concrete from telegraphing through the tile. Ditra or other polyethylene membranes provide uncoupling to allow for natural slab movement. Cement backerboards are another option. These create a new surface layer while adding structure.
Outdoor-rated thinset mortar
Use a polymer-modified thinset designed for exterior and freeze-thaw environments. A mortar with high flexibility and bond strength is ideal for the temperature changes outdoors. It must adhere to both the tile and concrete slab.
Grout suitable for exterior conditions
Epoxy or urethane grouts are best for outdoor tile. Unlike cement-based grout, epoxy is waterproof and stain resistant. It stands up to weather fluctuations better. Color options are more limited than cement grout.
Frost-resistant tile
The tile itself should be rated for exterior use. Porcelain, ceramic, or natural stone tiles that are dense with low absorption work best. Check that the tile can withstand freeze-thaw cycles without cracking, chipping, or delaminating.
Movement joints
Include expansion joints to account for movement and prevent cracking. Cut these into the tile surface above any existing joints in the concrete. The joints should go all the way through the layers to the slab.
Pitch and surface drainage
The overall slope should move water away from buildings and prevent standing water. A 2% slope is often recommended. Use a filler to create the slope if needed. Drainage mats can improve drainage underneath.
How to prepare an existing concrete slab for tile?
Getting the concrete ready is one of the most important steps. Here is an overview of the process:
1. Clean: Use a degreaser to remove any oil or dirt. Scrubbing may be required. Rinse thoroughly.
2. Etch: Apply an acidic cleaning solution to roughen the surface. This etches the concrete for better adhesion.
3. Patch: Fill any holes, cracks, divots or popouts with a polymer-modified patching compound. Flatten any raised areas.
4. Additional cleaning: You may need to repeat degreasing or etching for stubborn surfaces. Power washing can also help expose the bare concrete.
5. Check slope: Confirm the slope directs water away from buildings. Make adjustments to the slope if needed.
6. Prime: Apply a primer coat suitable for exterior conditions. This gives thinset mortar something to grip.
7. Install underlayment (optional): A decoupling membrane adds protective separation between the tile and concrete.
Once prepped, the concrete is ready for installation of the tile using a flexible thinset mortar safe for exterior use.
What materials do you need to tile over concrete outside?
Tiling outdoors requires specialized materials suited for the environment. Here are the essential supplies:
– Outdoor tile rated for freeze/thaw cycles – porcelain, ceramic, or natural stone
– Flexible polymer-modified thinset mortar for exterior use
– Waterproof epoxy or urethane grout
– Concrete primer if recommended by thinset manufacturer
– Cement backerboard, Ditra mat, or other suitable underlayment
– Notch trowel for spreading thinset mortar
– Mixing bucket for thinset and grout
– Grout float, sponge and bucket for grouting
– Flexible caulk or expansion joints
– Outdoor polyblend or epoxy grout sealer
– Safety gear – gloves, goggles, knee pads, etc.
– Concrete cleaning and preparation supplies
Shop for tile and installation products specifically designed for exterior use. Avoid vintage tiles or interior-grade materials. Getting the right supplies contributes to a durable and lasting outdoor tile job.
Step-by-step guide for tiling over concrete outside
Here are the basic steps for installing tile over exterior concrete:
1. Clean and prepare the concrete surface as outlined above.
2. Apply primer if needed based on thinset manufacturer’s guidelines.
3. Install underlayment such as cement board according to product instructions.
4. Mark layout lines on the surface to plan tile placement. Dry lay tiles if desired.
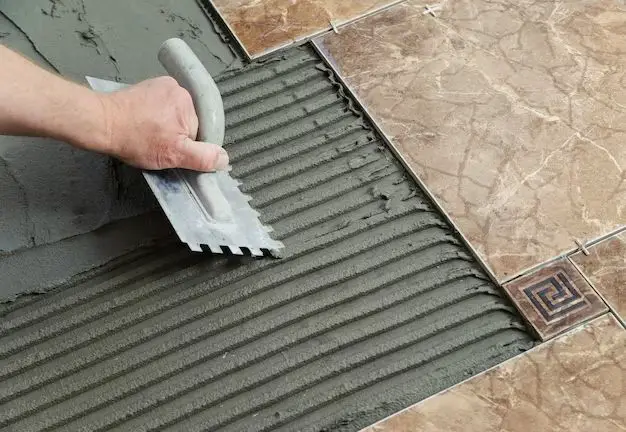
5. Mix flexible thinset mortar per product instructions. Apply to the surface using the appropriate notch trowel.
6. Set the tiles into the thinset. Use a rubber grout float to embed them evenly.
7. Let the thinset cure per manufacturer directions before grouting.
8. Mix and apply outdoor grout with a rubber float, pressing into joints.
9. Clean excess grout from tile surface with a damp sponge. Rinse sponge frequently.
10. Allow grout to cure fully before sealing or exposing to weather.
11. Apply outdoor sealer to grout joints for added water protection if desired.
Always refer to product specifications for drying times, installation temperatures, and other guidelines.
Tips for successful outdoor tile projects
Here are some additional tips to ensure your outdoor tile installation goes smoothly:
– Allow concrete slab to cure fully, generally at least 28 days.
– Cut or chisel existing concrete joints to insert expansion joints in tile.
– Include drainage slope away from structures and use drainage mat if needed.
– Avoid laying tile when rain or freezing temperatures are expected.
– Use white thinset mortar in hot climates to prevent flash setting.
– Group all tiles together and mix from several boxes to blend color.
– Apply sealer yearly to protect grout from weathering. Reseal as needed.
– Use a tile-cutting wet saw for precise cuts and less dust.
– Allow thinset and grout to cure fully before exposing tiles to rain or freezing.
– Hire an experienced tile setter if uncomfortable doing the work yourself.
With careful planning upfront and proper installation, your outdoor tile can provide years of durable, low-maintenance enjoyment. Paying attention to details like surface prep, layout, slope, and using the right setting materials avoids problems down the road.
Advantages of tiling over exterior concrete
There are several benefits to installing tile over outside concrete:
– Attractive appearance – Tile offers design versatility with endless colors, shapes, textures
– Durable surface – Stands up to heavy use, weather, and freeze-thaw cycles
– Easier maintenance – Very low maintenance compared to concrete sealing and staining
– Improved drainage – Creates slope to prevent water pooling
– Feels better underfoot – Tile is more comfortable to stand and walk on than hard concrete
– Safer traction – Textured tile provides better slip resistance, especially when wet
– Value added – Can increase appeal and resale value of the home
– Long lifespan – Properly installed tile lasts for decades outdoors
Covering drab concrete with tile is an excellent way to upgrade the function and appearance of patios, walkways, pool decks, and more. The variety of quality outdoor tiles makes it easy to match the design style of any landscape.
Disadvantages of tiling on exterior concrete
There are also some potential downsides with outdoor tiles:
– Higher cost than staining or painting concrete
– Requires substantial prep work on concrete
– Grout needs occasional sealing and maintenance
– Dropped objects more likely to break tiles than concrete
– Freeze-thaw cycles may cause cracks over time
– Not a DIY-friendly project for many homeowners
– Adds weight on top of the concrete slab
– Tile can become slippery when wet if not textured
– Loose or uneven tiles can be a tripping hazard
Proper installation and care reduce many of these risks. Going with a lower maintenance tile look can also help, such as using large format tiles with minimal grout lines. Weighing the advantages and disadvantages allows selecting the best options for your goals, budget and property.
Cost to tile over concrete outside
The cost to tile over exterior concrete typically ranges from $6 to $20 per square foot installed. The price depends on several factors:
– Type of tile – porcelain, ceramic, natural stone, etc. More expensive tiles raise costs.
– Tile size – Smaller mosaics take more time and labor. Larger format tiles reduce grout lines.
– Concrete preparation needs – Etching, crack repairs, leveling, etc. add cost.
– Tile pattern complexity – Diagonal layouts or intricate designs cost more.
– Thinset mortar and grout type – Premium products increase price.
– Amount of tile demolition and disposal fees if replacing existing tile.
– Accessibility – Adding stairs or railings can increase labor.
– Base preparation – Adding cement board, Ditra, or drainage mat adds expense.
– Local labor costs and contractor rates.
Other factors like layout, evenness of the slab, and total square footage also impact the price. Get free estimates from tile installation pros to compare bids for your specific project.
Tile over concrete outside: DIY or hire a pro?
Installing tile outside demands knowledge and skills to get professional-quality results. For homeowners new to tiling, hiring a professional installer is often worth the investment.
Benefits of hiring a tile pro include:
– Experience prepping concrete slabs for best adhesion
– Correct tools and knowledge for outdoor tile setting
– Ensures proper slope, layout, spacing for drainage
– More efficient installation with less wasted supplies
– Access to quality tile and setting materials
– Able to install tricky tile patterns perfectly
– Insured and bonded to cover any damages or mistakes
– Warranty and guarantee for completed work
DIYers with tiling experience may be comfortable tackling the project themselves. Consider a pro if you must correct major slab issues, work on a tricky layout, or lack the right tools. Doing prep work yourself can reduce labor costs. Inspect and maintain the tile regularly either way.
Conclusion
Installing tile over outside concrete opens up design possibilities while providing a durable new surface. With special attention to surface preparation, using quality exterior-grade materials, and proper installation techniques, tile achieves long-lasting beauty in outdoor spaces. Paying a professional for a quality job is often a good investment for important projects like patios, walkways, and pool decks. But a DIY approach can work for simpler designs if you have the skills. Properly maintained tile stands up well to heavy use and harsh weather compared to plain concrete.