A diverter is a common plumbing fixture found in most modern households. It allows you to redirect water from a tub faucet to a showerhead. Diverters come in many designs, but the most common type is a knob or lever on the tub faucet that you pull or turn to make the water switch directions.
Like any frequently used plumbing fixture, diverters can eventually malfunction or fail. When this happens, you’ll notice that you can’t redirect the water anymore, and it just keeps coming out of the tub faucet. Diverter repair is usually straightforward and something that even novice DIYers can tackle. With the right parts and some basic plumbing knowledge, you can often get your diverter working again in under an hour.
In this comprehensive guide, we’ll cover everything you need to know about repairing a diverter yourself. We’ll look at:
Page Contents
- 0.1 What can go wrong with diverters
- 0.2 Repair or replace?
- 0.3 Gathering supplies
- 0.4 Removing the old diverter
- 0.5 Installing the new diverter
- 0.6 Concluding thoughts
- 1 What can go wrong with diverters
- 2 Repair or replace?
- 3 Gathering supplies
- 4 Removing the old diverter
- 5 Installing the new diverter
- 6 Conclusion
- 7 Replacement vs. Repair Costs
What can go wrong with diverters
– Worn out diverter knob/lever
– Broken internal parts
– Mineral buildup and clogging
– Issues with the tub spout
Repair or replace?
– Factors to consider
– When replacement is best
Gathering supplies
– Tools needed
– Replacement parts
– Getting the right diverter model
Removing the old diverter
– Shutting off water
– Taking apart the faucet
– Cleaning mineral deposits
Installing the new diverter
– Proper positioning
– Adjusting water flow
– Checking for leaks
Concluding thoughts
– Recap of diverter repair
– When to call a pro
– Enjoy your working diverter!
Equipped with these details, you’ll be able to tackle a diverter repair with confidence. Read on to become a diverter repair expert!
What can go wrong with diverters
Diverters consist of several internal moving parts that redirect the water flow. Like any mechanical system, these components eventually wear out or get stuck. Here are some of the most common problems that can happen with diverters:
Worn out diverter knob/lever
The knob, lever, or handle that you manipulate to engage the diverter is subject to a lot of use and friction. Over time, these can wear out or become loose. You may find the diverter getting harder to turn or move into the proper position. A loose diverter knob will likely need to be replaced.
Broken internal parts
Inside the diverter, you’ll find small switches, gates, and tubes that physically move to redirect water when engaged. Plastic internal parts can get brittle and crack over time. Rubber washers and O-rings deteriorate and fail to seal properly. Any of these issues can lead to internal leaks or cause the diverter to get stuck.
Mineral buildup and clogging
Hard water is the enemy of many plumbing fixtures. Diverters are prone to mineral deposits from calcium and limescale accumulating inside. This buildup can clog small internal parts and prevent them from moving freely. Soaking and scrubbing with vinegar can remove mild buildup.
Issues with the tub spout
Some diverters rely on the tub spout to act as part of the redirection mechanism. A spout that is clogged or otherwise not functioning properly can cause problems for the entire diverter assembly. The spout may need to be cleaned or replaced along with the diverter.
Now that you know what can go awry with diverters, let’s go over how to determine if repair or replacement is the best option.
Repair or replace?
Once you’ve diagnosed the issue, you’ll need to decide whether to attempt repairing the existing diverter or replace it fully. There are a few factors to consider when making this decision:
Age of the diverter
If the diverter is decades old, any replacement parts likely won’t be available. Trying to rig an obsolete model to work will probably be more hassle than it’s worth. In that case, replacement is the wise choice.
Extent of damage
If the internal parts are cracked or corroded beyond repair, replacement parts won’t help. And if the tub spout is also non-functional, the whole setup needs replacing.
Cost of new vs. repair parts
Surprisingly, replacement diverters are fairly inexpensive, often $20-50. If you just need a new knob or lever, repair may be cheaper. But extensive repairs with many new internal parts can add up in cost.
Skill level
Those with advanced DIY skills may be comfortable rebuilding an old diverter from scratch. But for beginners, starting fresh with a new diverter that bolts on is much easier. Know your limits.
In general, if the diverter is very old or damaged, replacement is your best bet. Let’s look at the steps involved for this more common scenario.
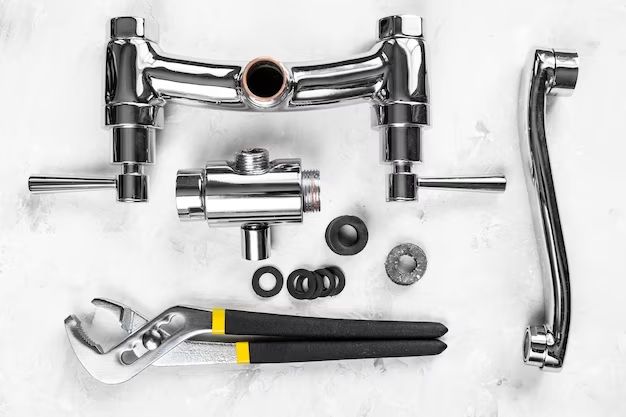
Gathering supplies
Replacing a diverter requires:
Tools
– Adjustable wrenches
– Channel lock pliers
– Pipe tape
– Rag
– Flashlight
– Safety goggles
Replacement parts
– New diverter kit (typically includes diverter, knob/handle and any gaskets or O-rings)
– Potentially a new tub spout if the old one is unusable
Getting the right model
It’s crucial to buy the diverter kit made specifically for your faucet model. Check for brand and model # markings somewhere on the tub fixtures. Plumbing sites like Delta and Moen have replacement parts look-up tools on their websites to ensure you get an exact match. If uncertain, taking the old diverter into the hardware store may help employees identify replacement parts. Buying the correct like-for-like diverter ensures it will install properly.
Okay, you’ve got your supplies – now let’s look at how to remove the old diverter.
Removing the old diverter
With the proper replacement parts on hand, you’re ready to remove the worn-out diverter. Follow these steps:
Shut off water supply
Locate the shut-off valves for the hot and cold water lines feeding the tub faucet. Turn them clockwise all the way until they stop. This prevents water from spurting out when you disassemble the faucet.
Take apart the faucet
Refer to your manufacturer instructions for detailed steps, as these vary. In general:
– Remove the diverter knob or lever by loosening the set screw and sliding it off.
– Use pliers to extract any retaining clips or nuts holding diverter components in place. Be careful not to strip threads.
– Twist and pull to work the old diverter free from the faucet body. Note its original positioning.
– Remove the tub spout if also replacing.
Clean mineral deposits
Check inside the faucet body and at connection points for any limescale buildup. Use a toothbrush and vinegar or CLR to scrub away deposits so the new diverter components have a clean mounting surface. Rinse thoroughly.
With the old diverter removed, it’s time to install the new one.
Installing the new diverter
Installing a new diverter is the reverse of removal. Follow these best practices:
Proper positioning
Consult any manufacturer diagrams and note the original orientation of the old diverter. The new one must be positioned exactly the same way so that the internal water pathways line up correctly. Improper installation can negate its ability to redirect water.
Adjusting water flow
Some diverter kits include small rubber washers that allow you to control the water pressure coming out of the tub spout vs. showerhead. Adjust and test these washers until you achieve the ideal flow balance.
Checking for leaks
Once fully installed, turn the water back on and test the diverter several times. Let the water run and check under the tub and around connection points for any drips or leaks. Fix any issues before completing the job.
And that’s all there is to replacing your diverter. Let’s recap the key steps one more time.
Conclusion
Replacing an old, worn-out diverter is usually the best repair option compared to trying to rebuild an obsolete model. Here are the key steps covered in this article:
– Determine if replacement is needed – consider age, damage, cost factors
– Obtain the correct replacement kit for your faucet make and model
– Turn off water supply and remove old diverter and spout
– Clean away mineral deposits from faucet body
– Install new diverter in proper original orientation
– Adjust water flow rates and check for leaks
– Restore water supply and test diverter
Following these steps, you can successfully install a new diverter in your tub faucet. Just take your time and refer back to directions as needed. Diverter repair is very doable for a motivated DIYer.
However, if the process seems too daunting, or you discover larger issues with valves or plumbing lines when removing the old diverter, it’s best to call in a professional plumber at that point. Repairs involving pipes and soldering are generally better left to experts.
But in most standard tub diverter replacement cases, you can definitely handle this repair yourself. Just have patience and proper parts on hand. Before you know it, you’ll be enjoying a fully functioning tub diverter once more. Never dread bath time again!
| Common Diverter Issues | Repair or Replace? | Installation Tips |
|---|---|---|
|
|
|
| Tool | Use |
|---|---|
| Adjustable wrench | Loosening nuts and connections |
| Channel lock pliers | Grabbing fixture pieces |
| Pipe tape | Sealing threaded connections |
| Rag | Cleaning fixtures |
| Flashlight | Seeing into tub faucet body |
| Safety goggles | Protecting eyes from debris |
| Supply | Details |
|---|---|
| Diverter kit | Includes new diverter, knob/lever, gaskets |
| Tub spout (optional) | Replace if old spout is damaged |
| Vinegar or CLR | Removing mineral deposits |
Replacement vs. Repair Costs
| Option | Cost Range |
|---|---|
| New diverter kit | $20 – $50 |
| New knob/lever | $5 – $15 |
| Full rebuild parts | $40 – $90 |