The quick answer is yes, you can and should use a miter gauge with a table saw. A miter gauge is an important accessory that allows you to make accurate crosscuts on a table saw. Using a proper miter gauge improves safety and precision when crosscutting boards at angles other than 90 degrees.
Page Contents
What is a Miter Gauge?
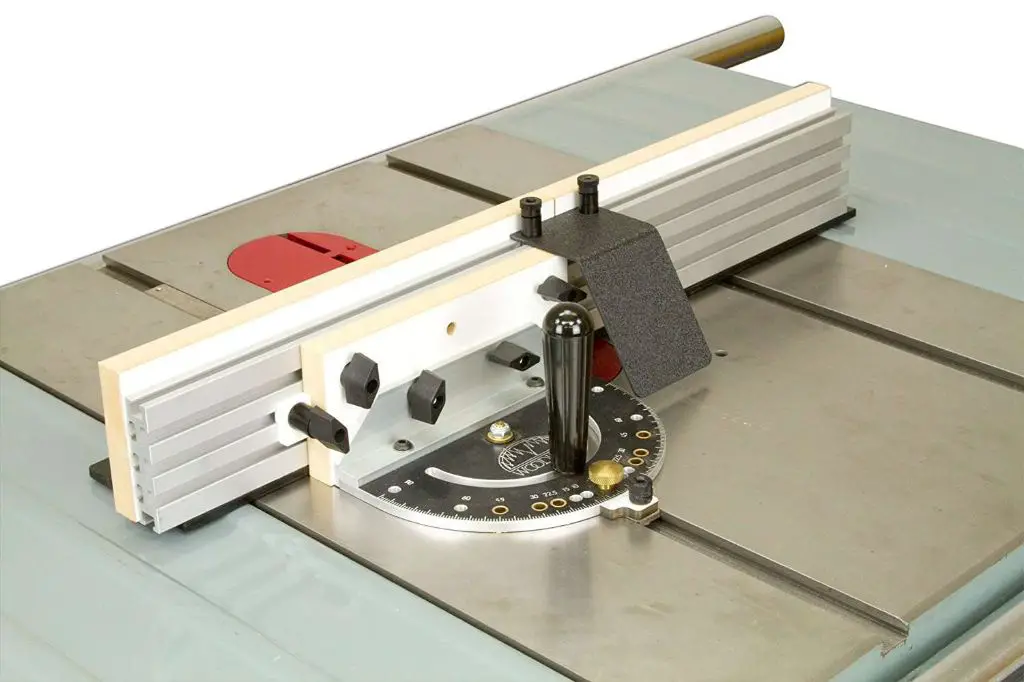
A miter gauge is a device that fits into the miter slot on a table saw. It allows you to hold and guide workpieces at various angles as you make crosscuts. A basic miter gauge consists of a bar that runs in the miter slot, a protractor scale to set angles, and a head that holds the workpiece.
The miter bar slides back and forth in the slot, allowing you to position the workpiece over the blade. The head then swivels to cut miters (angled crosscuts) or bevels at precise angles. Most miter gauges have stops to allow you to quickly return to common angles like 45 and 90 degrees.
Key Features of a Miter Gauge
- Miter bar – Runs in the slot and positions the workpiece
- Protractor scale – Allows you to accurately set angle
- Head – Holds and supports the workpiece at the set angle
- Stops – Allow quick return to common angles
- Knob – Locks head in place once angle is set
Why Use a Miter Gauge on a Table Saw?
There are a few key reasons why using a miter gauge is recommended when crosscutting on a table saw:
Safety
Using a miter gauge is much safer than trying to crosscut freehand on a table saw. The gauge holds the workpiece securely and keeps your hands safely away from the spinning blade. This reduces the chance of kickback or accidental contact with the blade.
Support
A miter gauge supports the workpiece on three sides (the fence, miter bar, and backstop). This allows better control and helps prevent binding while cutting. The extra support results in smoother, tear-out free cuts.
Accuracy
The miter bar ensures accurate 90 degree cuts every time. For angled cuts, the gauge allows precise adjustment and repeatable angles. This is essential for projects where miters must line up perfectly. Matching miters are very difficult to cut accurately without a gauge.
Versatility
A miter gauge allows you to cut a wide range of angles on a table saw. Most gauges have a range of 60 degrees left and right of center. Some extend even further for compound miters. This versatility makes it possible to create just about any angled cut on a table saw.
Types of Miter Gauges
There are a few basic types of miter gauges to consider:
Shop-Made Miter Gauges
Many woodworkers make their own gauges, often starting with a piece of plywood. A shop-made gauge allows you to customize the size and features. However, getting the miter bar to fit the slot precisely takes skill. Shop-made gauges also lack the dial indicator and stops of commercial models.
Contractor Miter Gauges
These basic miter gauges are included with most new contractor saws. They have a simple protractor head and basics stops at 45 and 90 degrees. Contractor gauges work well for simple miter cuts but lack the precision and features of more advanced gauges.
Precision Miter Gauges
Aftermarket precision miter gauges offer premium accuracy and features. Precision-machined bars ensure excellent fit in the miter slot. Large protractor dials allow precise angle settings. Extended fences support wide boards. These high-end gauges produce flawlessly matching miters.
Sliding Miter Gauges
Sliding miter gauges have extra-long bars that allow them to cut wider boards. The heads slide from side to side over a longer distance. This provides better workpiece support and reduces the chance of off-cut binding.
Specialty Miter Gauges
Some miter gauges are designed for specialty cuts like compound miters. They allow tilting the head for cutting angles in two directions. Others are made specifically for box joints or taper cuts. These specialty gauges excel at certain tasks but lack versatility.
Miter Gauge Features
When choosing a miter gauge, there are several features that affect the accuracy and ease of use:
Fit of Miter Bar
The fit of the bar in the slot is critical – a loose fit will ruin the accuracy of cuts. High-end gauges have precisely machined bars that glide smoothly without wobble. Most allow fine adjustment to take out any slack.
Positive Stops
Precisely machined positive stops allow exact repeatability when setting common angles. These are faster and more accurate than relying on the protractor scale alone.
Large Protractor Scale
A large dial makes it easier to accurately set non-standard angles. Look for a dial at least 5″ in diameter and engraved with precise degree markings.
Micro-Adjust
Some miter gauges have a micro-adjust knob that allows fine incremental adjustments to the angle. This allows dialing in extremely precise angles.
Extendable Fence
An extended fence provides better workpiece support when cutting wide boards. Look for a fence that extends up to 2 feet.
Head Lock
A cam or clamping mechanism locks the head firmly in position to prevent unwanted movement during a cut.
Using a Miter Gauge
Follow these tips for best results when using a miter gauge on a table saw:
Make Sure the Bar Fits the Slot
The miter bar should fit snugly in the slot with just enough room to slide smoothly. Any slop will ruin the accuracy. Use the adjusting screws if provided or shim the bar with tape.
Allow Space for the Blade Guard
Make sure the miter gauge is far enough back for the blade guard to function properly. The guard needs clearance so it can rise and fall unimpeded.
Use the Hold Down Clamp
Engaging the clamp on the miter gauge head reduces vibration and prevents the workpiece from lifting during the cut.
Don’t Force the Cut
Allow the blade to cut smoothly without forcing or twisting the miter gauge. Forcing it can compromise accuracy or cause binding.
Make Test Cuts to Check Accuracy
Whenever possible, check angles by cutting test pieces and measuring them with a protractor. Fine-tune the miter gauge as needed to achieve dead-on accuracy.
Use Stop Blocks for Repetitive Cuts
Adding stop blocks to the miter gauge fence ensures all pieces are cut to exactly the same length during repetitive cuts.
Cutting Tips
Here are some best practices to follow when making cuts with a miter gauge:
Crosscut Narrow Boards First
When crosscutting multiple pieces, cut narrower boards before wider ones to avoid off-cut binding between the fence and blade guard.
Watch for Binding
If the cut starts to bind, stop the saw and back the board out. Binding can happen when the off-cut gets trapped between the blade and fence.
Use a Backer Board
Using an auxiliary fence board helps support the workpiece and prevents tear out on the backside. Clamp a straight board to the miter gauge fence.
Cut Miters “Upside Down”
When cutting crown moldings and other spring angle miters, cut with the concave face down to prevent angled off-cuts from binding.
Make Compound Miters in Stages
When cutting compound miters, make the bevel cut first, check for accuracy, then cut the miter. Doing both angles at once increases the chance of error.
Miter Gauge Safety Tips
Observing basic safety measures is critical when working with a miter gauge:
- Ensure the blade guard operates properly and is kept in adjustment
- Keep hands at least 6 inches from the blade at all times
- Use push sticks when cutting narrow pieces
- Don’t force the miter gauge through the cut
- Secure the workpiece firmly in the miter gauge head
- Double check all angles before cutting
- Make sure the saw blade and miter gauge are properly aligned
- Pay attention and don’t get distracted during cuts
- Use a stop block when making repetitive cuts
Miter Gauge Maintenance
To keep a miter gauge in top working condition:
- Check the miter bar fit and adjust as needed
- Lubricate the bar occasionally with paste wax or dry lubricant
- Keep the bar and slot clean and free of resin buildup
- Verify blade/slot parallelism with a dial indicator
- Confirm the 90 and 45 degree stops are accurate
- Clean and wax the protractor scale so it moves smoothly
- Adjust the miter head clamp to provide firm workpiece support
Conclusion
Using a miter gauge unlocks the full crosscutting capability of any table saw. While non-through and 90 degree cuts can be made freehand, a gauge is essential for accurate and safe miters and bevels. A good miter gauge is also indispensable when making precise frames, boxes and other angled joinery. Matching the capabilities of a quality miter gauge would require many specialized tools – with one simple accessory, all these cuts are possible on a standard table saw. Just be sure to keep the miter gauge properly adjusted and aligned. With care and proper practices, a miter gauge makes crosscutting on a table saw safer, easier and more precise.