A router is a versatile power tool that can be used for a variety of woodworking applications, including planing. With the right router bit, a router can smooth and flatten boards, trim edges, cut dados and grooves, joint edges, and perform other planing tasks. While a dedicated planer or jointer is ideal for major surfacing projects, a router can often provide sufficient planing capability for smaller jobs.
Page Contents
What is a router and how does it work?
A router is a handheld power tool that spins a bit at a high speed in order to cut and shape wood. Routers utilize interchangeable bits that come in countless shapes and profiles, allowing for highly customizable cuts. The speed of the spinning bit provides the cutting action. Routers are typically used for edge treatments like rounded over edges, decorative edging, grooves, inlays, mortises, trimming laminates, and other profiling tasks.
A router has a motor housed in its body that spins the bit at speeds between 10,000 to 30,000 rpm. Different models offer different speed settings and horsepower ratings. The greater the horsepower, the more capable a router is at handling demanding tasks. Routers designed for table use tend to have higher horsepower ratings than trim or compact routers. The bit height is adjustable, allowing you to control the depth of cut.
Routers cut in an upward direction, with the rotation of the bit pulling the tool through the workpiece. This allows for smooth, even, and controlled cuts. Routers utilize guides like templates, rails, fence, or rings to provide stability and direction. A plunge base allows the bit to be safely lowered into the workpiece for stopped cuts like mortises.
Can routers be used for planing?
Yes, routers are capable of basic planing in the form of flattening, thicknessing, and edge jointing. Using the right bits and techniques, a router can transform rough sawn lumber into smoothly planed boards. There are some limitations to be aware of, but for general smoothing tasks, a router can often perform adequately.
Flattening
A router equipped with a straight bit or bottom cleaning bit can effectively flatten cupped or warped boards. Run the router systematically across the workpiece to incrementally remove material until the surface is uniform. Take light passes, and use a guide or jig for the best results. This can rapidly eliminate high and low spots to yield a flat work surface.
Thicknessing
Stacking multiple passes with a straight bit can allow a router to thickness and dimension lumber. Adjust the bit height incrementally to remove a small amount of material with each pass. Use a planing sled or board shearing jig to traverse the workpiece across the router and make even cuts. Thickness planers produce smoother finishes, but routers work well for smaller dimensioning tasks.
Edge Jointing
A router can also joint edges to create solid glue joints or flatten uneven edges. Run the edge across a straight bit using a guide to shave off material evenly along the length. Make light passes, gradually working closer to your final dimension. Edge guides, jointing jigs, and other accessories can aid with this. The smooth edge from a jointer is ideal, but a router can joint edges smoothly enough for many applications.
Benefits of using a router for planing
Utilizing a router for planing jobs offers some unique advantages:
- Compact size – Routers are smaller and more maneuverable than stationary jointers and planers.
- Variable speed – The ability to adjust router speed gives you more control over cuts.
- Lower cost – Routers are significantly cheaper than dedicated planing equipment.
- Versatility – Routers aren’t limited only to planing.
- Detail work – Routers excel at detailed and precise shaping work a planer cannot match.
- No machine adjustment – Router planing allows you to skip the machine setting adjustments jointers and planers require.
For smaller shops and DIYers, utilizing a router can provide sufficient planing capability without a major investment in machinery. Even shops with planers may find a router useful for quickly adjusting the fit of final pieces.
Limitations of router planing
While routers can plane boards, the results are sometimes inferior to a thickness planer or jointer. Router planing has some disadvantages and limitations:
- Inconsistent finish – Router planing can leave chatter marks and an uneven surface.
- Slow process – Planing an entire board requires taking multiple shallow passes.
- Not for major projects – Precise heavy dimensioning is better left to planers.
- Specialized bits needed – Requires expensive specialty planing bits.
- Safety hazards – Routers lack planer guards and kickback prevention.
- Hand tool finishing – Typically needs final smoothing by hand.
- Dust collection – Routers produce large amounts of dust.
For critical projects where precision is paramount, a router may not produce adequate planing results. The finish left by the swirling router bit is not comparable to the ultra-smooth knife-slice finish of a helical planer. However, routers work well for rough dimensioning and basic smoothing of edges and faces.
Types of router bits for planing
To plane boards with a router, specialized planing router bits are recommended. These large straight bits are designed specifically for surfacing lumber. Common types include:
Straight Bits
These are essentially oversized straight cutter bits. They have a flat bottom cutting edge 1 1⁄2” or greater in diameter. The large diameter allows for deeper cutting and improved smoothness. Carbide cutters provide longevity when milling wood.
Bottom Cleaning Bits
Bottom cleaning router bits feature a slight convex shape. The curved edge aids in quickly flattening cupped lumber. The shape planes high spots more aggressively than surrounding areas.
Surfacing Bits
Surfacing bits combine a straight cutting edge with a bottom cleaning bowl shape. This allows them to simultaneously flatten, smooth, and surface in a single pass. They’re ideal for producing a flat, ripple-free surface.
Flush Trim Bits
Though not specifically designed for planing, flush trim bits can also joint edges. The large cutters neatly trim edges to remove saw marks and flatten uneven glue joints.
Look for 1⁄2” shanked bits suitable for table routing work. Solid carbide micrograin cutters withstand intense wear. Bits with ball bearing guides provide stability and smoothness. Feed direction is also important – some bits must feed with the rotation, while others cut against it.
Router techniques for planing
Proper techniques are critical to achieve good planing results from a router. Follow these tips:
- Take light passes – Remove just 1/16” or less of material per pass.
- Route the entire workpiece – Cut high and low areas evenly.
- Use a guide – Guides/templates ensure a steady feed rate.
- Route across the grain – With the grain can cause tear out.
- Climb cut cautiously – Climb cutting leaves a cleaner edge but can be aggressive.
- Sharpen bits regularly – Sharp cutters are essential for smooth planing.
- Adjust speed appropriately – Faster feed rates require faster spindle speeds.
- Use dust collection – Bits throw large debris and dust quantities.
- Wear safety gear – Router bits spin dangerously fast.
Patience is also helpful. The iterative process of light passes with small cuts requires more time than power planing. But with care, routers can surface boards very smoothly.
Router jigs and accessories for planing
Certain jigs and accessories can greatly aid planing with a router:
Router Tables
Router tables support the router and workpiece to allow two-handed feed control. The stability and precision of a router table makes planing easier than freehand routing. The fence provides a consistent planing reference surface.
Surfacing Guides
Surfacing guides attach to the router to ride along a straightedge. This ensures the router base travels steadily for uniform cutting. Models like the Router Raizer work as stand-alone accessories or attach to router tables.
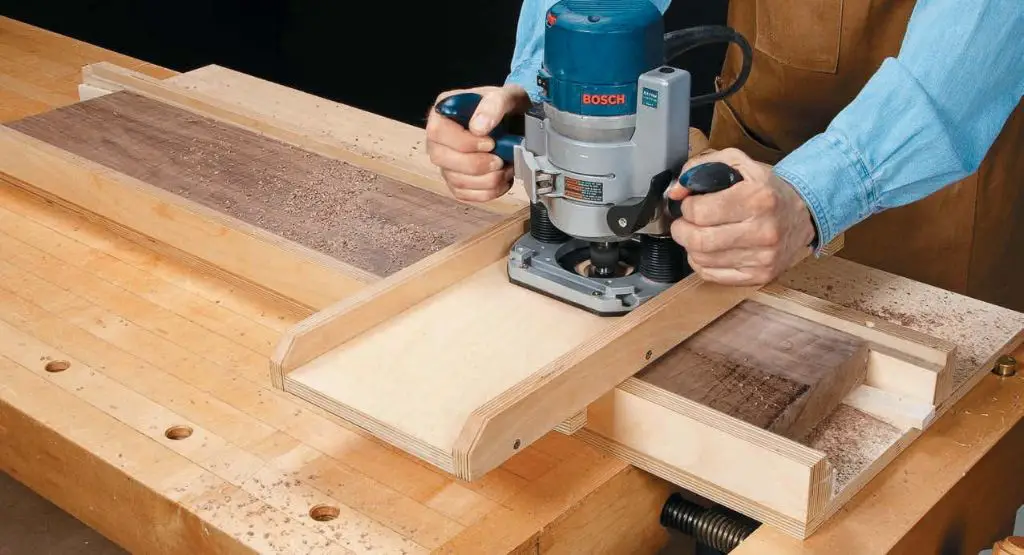
Planing Sleds
Planing sleds utilize rails to guide the workpiece across the router bit at a consistent feed rate and depth of cut. Make your own sled fitting your dimensions or purchase accessories like the Woodpeckers Planing Sled.
Jointing Jigs
Jointing jigs hold workpieces vertically for safely passing the edge across the spinning bit. Shop-made jigs can joint edges evenly by providing a sliding track perpendicular to the cutter.
Board Shearing Guides
Shearing guides progressively feed the workpiece through the router bit to remove material evenly across the face. They allow thicknessing in controlled increments to flatten faces.
Safety tips
Router planing presents increased safety challenges. Follow these precautions:
- Use push blocks and sticks to feed – Keep hands well clear of cutter.
- Guard the bit area – Prevent hands from contacting exposed cutters.
- Feed against rotation – Cut “uphill”, so bit doesn’t pull work in.
- Avoid kickback – Use sufficient backing behind routed parts.
- Beware tear out – Rout against the grain to prevent parts cracking.
- Clear chips frequently – Built-up chips can stall the bit or fly dangerously.
- Wear eye protection – Bits throw lots of debris.
- Use dust extraction – Control airborne dust to safely breathe.
Never forget the extreme cutting power and speed of a spinning router bit. Feeding workpieces requires caution and attention to prevent dangerous kickbacks or bit contact injuries. Work slowly and safely.
Conclusion
While routers lack the precision and capabilities of industrial planers, they can plane boards adequately for many woodworking purposes. The right techniques and bits allow flattening, thicknessing, and jointing operations. Routers are an affordable planing option for small DIY shops. However, expect some limitations in finish quality and dimensioning accuracy compared to dedicated planers. With care and patience, routers can be used to successfully plane lumber for projects.