Yes, it is possible to vent a kitchen exhaust fan through the roof. This is a common way to vent kitchen exhaust fans and provides an effective means of removing cooking odors, smoke, grease, and moisture from the kitchen.
Page Contents
Requirements for Venting Through the Roof
There are several requirements that must be met in order to properly vent a kitchen exhaust fan through the roof:
- The ductwork must be made of rigid metal, have smooth interior surfaces, and be sloped upwards towards the roof vent termination.
- The ductwork should be as straight as possible with minimal turns or elbows.
- The ductwork must be properly connected and sealed to prevent leaks.
- The roof vent termination must extend vertically upwards and have a backdraft damper.
- The ducting should meet local building code requirements for size and minimum ventilation rates.
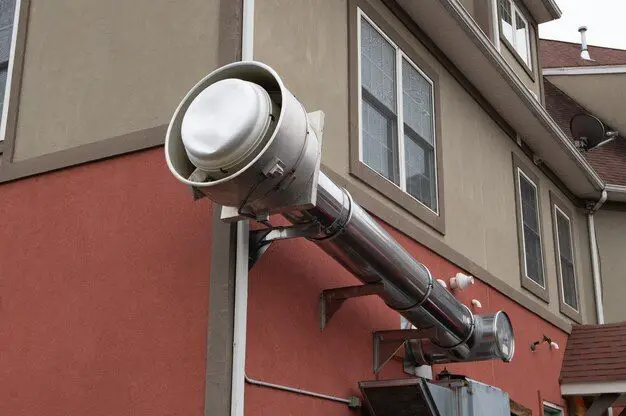
Roof Vent Styles
There are several different roof vent termination styles that can be used with a kitchen exhaust fan:
- Roof cap – A simple hood that mounts directly on the roof surface over the ductwork.
- Roof jack – A flashing piece that mounts into the roof decking and shingles.
- Roof curb – A raised roof curb installed on top of the roof decking.
The most common type used for kitchen exhaust fans is a roof cap or roof jack as they integrate with standard ducting. Roof curbs are more complex but provide greater protection from weather.
Duct Sizing
Proper duct sizing is important to allow adequate airflow and ventilation:
| Fan CFM | Minimum Duct Diameter |
|---|---|
| 50-80 CFM | 4 inches |
| 80-150 CFM | 5 inches |
| 150-300 CFM | 6 inches |
| 300-600 CFM | 7-8 inches |
As a general rule, use the shortest and straightest duct route possible for optimal performance.
Installation Steps
The basic installation steps for venting a kitchen exhaust fan through the roof are:
- Choose an appropriate roof vent termination and purchase necessary ductwork.
- Determine the route through attic and mark locations.
- Install roof flashing if using roof jack style vent.
- Mount fan and attach ductwork sections towards roof.
- Seal all ductwork connections thoroughly.
- Install backdraft damper on roof termination.
- Weatherproof around ducts and termination.
- Caulk roof holes and re-shingle if needed.
- Connect fan wiring and test operation.
Proper firestopping, insulation, and vapor barriers should be used around ductwork in attics or vented spaces.
Advantages of Roof Venting
Some of the advantages of venting a kitchen exhaust fan through the roof include:
- Gets odors, smoke, and grease out of the home quickly.
- Less likely to affect neighbors with venting.
- Minimizes moisture and grease buildup within home.
- Roof terminations have good airflow characteristics.
- Meets most building code requirements.
Disadvantages of Roof Venting
Potential disadvantages include:
- More complex installation than wall venting.
- Ductwork must penetrate unconditioned attic spaces.
- Potential for leaks where ducts meet roof.
- Exposed ductwork may allow condensation or frost buildup.
- Difficult to service or replace fan or ductwork in the future.
Alternatives to Roof Venting
The main alternative to venting through the roof is to vent through an exterior wall. Wall venting is simpler but has some drawbacks:
- Wall caps may allow backdrafts due to wind patterns.
- Venting near windows or doors can allow odors to re-enter home.
- Exterior wall penetration limits future renovation options.
- Wall venting is generally not allowed for higher CFM fans.
Conclusion
Venting a kitchen exhaust fan through the roof is an effective way to remove cooking pollutants from a home. With proper duct sizing and installation, roof venting provides good airflow and meets code requirements in most areas. The termination style can be customized based on preferences and existing roofing materials. Overall, roof venting is a recommended practice for kitchen exhaust fans despite being slightly more complex than wall venting.