Page Contents
- 1 Quick Answer
- 2 What Causes Stain to Fail on a Deck?
- 3 Importance of Proper Surface Preparation
- 4 Options for Removing Existing Stain
- 5 When Can New Stain be Applied Over Existing?
- 6 Tips for Success Restaining Over Existing
- 7 What Problems Can Occur Restaining Over Old Stain?
- 8 Maintaining a Deck with Regular Staining
- 9 Conclusion
Quick Answer
In most cases, you will need to remove old stain before applying a new coat of stain to a deck. Old stain can prevent the new stain from properly adhering and penetrating the wood. However, if the old stain is in good condition with no flaking or peeling, you may be able to apply new stain right over the existing layer. Test a small hidden area first to ensure proper adhesion.
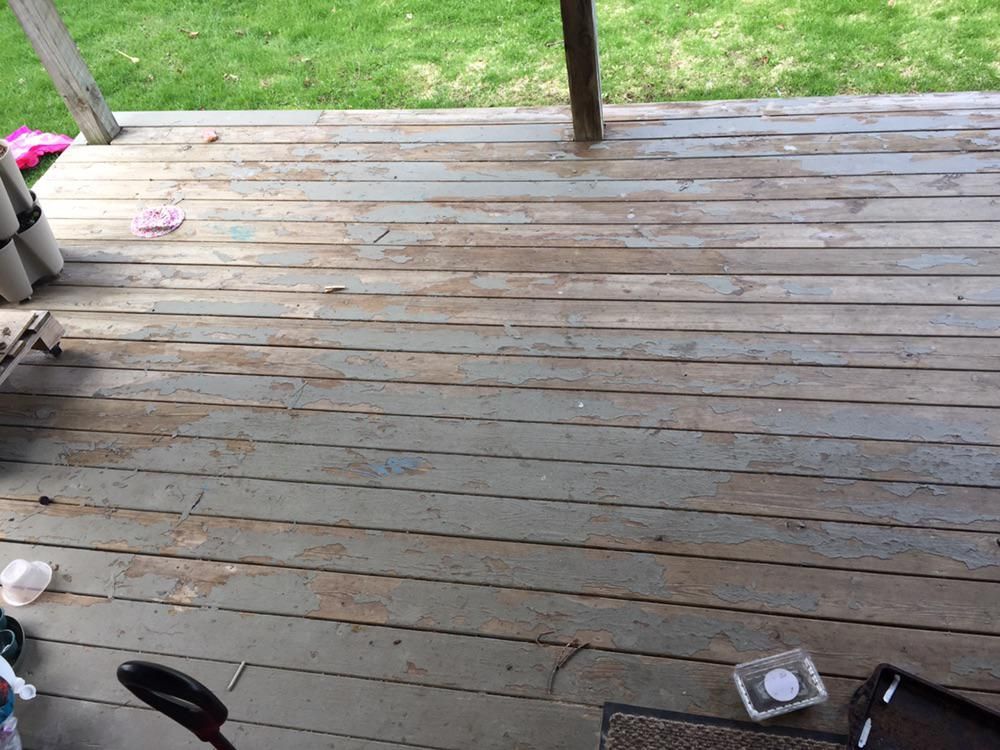
What Causes Stain to Fail on a Deck?
There are several reasons stain may fail on a deck and need to be removed before restaining:
Flaking/Peeling
Over time, the outer layer of stain can start to peel and flake off the deck boards. This can happen due to degradation from sun exposure, excessive moisture, or improper surface preparation. Once the stain begins peeling, it continues allowing moisture underneath which further accelerates the peeling.
Mold/Mildew Growth
In damp, humid environments, mold and mildew can start growing on the surface of the stain. This appears as black spotting or staining. Mold and mildew can be difficult to remove from existing stain and will likely come back quickly unless the stained boards are replaced or stripped down to bare wood.
Graying/Fading
With prolonged sun exposure, all deck stains will start to fade and take on a gray, weathered appearance. This is most noticeable with semi-transparent and transparent stains. At this point, the UV protection in the stain has broken down and it needs to be reapplied.
Warping/Cupping
Over time, poorly maintained decks can start to warp or cup as the wood absorbs moisture. This causes the stain to crack and fail. Heavily warped or cupped boards likely need to be replaced before applying fresh stain.
Previous Coats Not Removed
Failure to properly remove previous stain before recoating can lead to adhesion issues with the new stain. Multiple layers of stain prevent proper penetration into the wood. The old stain can literally peel off in sheets taking the new stain with it.
Importance of Proper Surface Preparation
Achieving a long-lasting stain job on a deck requires proper surface preparation:
Allows Stain to Penetrate
For the stain to properly penetrate and protect the wood, the surface needs to be free of old flaking finish and grayed wood fibers. Proper cleaning and light sanding allow the new stain to soak into the wood.
Enhances Adhesion
Removing contaminants like mold, mildew, dirt and dust allow the new stain to adhere tightly to the wood for maximum durability. Chemical stripping may further enhance adhesion compared to simply power washing.
Reduces Peeling/Flaking
Flaking and peeling is greatly reduced when recoating only after previous finish is completely removed from the wood surface. Any remnants are liable to let go taking new finish with it.
Evens Out Color
Stripping the deck allows the new stain to go on evenly without darker spots where old stain is still adhered. Color touch up is also simplified.
Prolongs Life of New Stain
By starting with bare wood, the deck is essentially reset for maximum life from the new stain system. Removing the failing stain extends the service life of the recoating.
Options for Removing Existing Stain
There are several good options for removing existing failing stain from a deck:
Chemical Strippers
High-alkaline chemical strippers are very effective at breaking down old stain for complete removal. Products like Defy Deck Strip quickly soften multiple layers of finish allowing them to be power washed off. Using a chemical stripper minimizes labor.
Pressure Washing
Adjusting a power washer to high pressure with a concentrated nozzle can blast away peeling stain once it starts coming loose. Pressure washing still requires sanding grayed areas. Take caution not to damage wood.
Sanding
An aggressive coarse sanding with 60-80 grit paper will quickly remove stain from a deck. Disc sanders speed this process. Be aware this generates large amounts of dust requiring containment. Some graying may still remain.
Soda Blasting
Using baking soda at high pressure is a very effective way of stripping stain while minimizing damage to wood. It nicely balances aggressiveness and control. Results are similar to sanding.
Media Blasting
Using materials like glass beads, walnut shells or sand at low pressure can remove finish. Softer medias are safer for wood. Still, this risks excessive damage to boards if not done properly.
| Removal Method | Effectiveness | Speed | Labor | Cost |
|---|---|---|---|---|
| Chemical Strippers | Excellent | Fast | Low | Medium |
| Pressure Washing | Good | Fast | Medium | Low |
| Sanding | Excellent | Slow | High | Low |
| Soda Blasting | Excellent | Fast | Medium | Medium |
| Media Blasting | Good | Fast | Low | Medium |
When Can New Stain be Applied Over Existing?
In certain scenarios, it is possible to apply fresh stain over existing stain without complete removal:
Stain in Good Condition
If the old stain has no peeling, flaking or graying, recoating over it is generally okay. The new stain adheres adequately. Color uniformity may be a concern.
Same Stain System
Applying a compatible new coat of the same stain is often possible without stripping as long as prior coats are intact. Always check manufacturer recommendations.
Fresh Wood
On brand new wood with no prior coating, staining right over a weathered mill glaze is typically fine since the wood readily absorbs it.
Test Patch
When uncertain, applying a test patch of new stain over the existing finish will quickly indicate if proper adhesion is achieved. If stain adheres and dries uniformly, full application is suitable.
Tips for Success Restaining Over Existing
Follow these tips to achieve the best results when applying new stain over existing stain without complete removal:
Lightly Sand Surface
Light sanding opens the wood grain and allows greater penetration of the new stain. Use 80-100 grit paper taking care not to cut into existing finish.
Use Same Stain Type
Applying the same type of stain (acrylic, oil etc.) over an existing layer of the same typically works better than switching chemistry.
Apply Thin Coats
Applying multiple thin coats allows deeper penetration and creates a smoother finish compared to heavy single coats when staining over old stain.
Allow Proper Dry Time
Ensure each coat fully dries before adding another. Thicker layers require significantly longer dry times. Urethane stains take longer than acrylics.
Expect Shorter Longevity
Understand that stain applied over existing will likely wear and weather faster than new stain applied to bare wood. Plan to recoat more frequently.
What Problems Can Occur Restaining Over Old Stain?
Potential issues can arise when applying new deck stain without removing the existing layer:
Flaking/Peeling
If the old stain isn’t firmly adhered, it can peel off taking new stain with it. Flaking problems resurface unless the cause is addressed.
Uneven Coloring
Variations in color and sheen can occur when coating over stain in poor condition. Grayed areas resist accepting new stain. Dark spots also appear.
Indistinct Grain
Without proper surface prep, new stain doesn’t absorb well into the wood leaving the grain pattern indistinct compared to bare wood.
Blotchy Appearance
Applying stain over sealed wood leads to an uneven, blotchy appearance as absorption varies across the surface. Some areas darken more than others.
Short Service Life
Stain applied over compromised, weathered finish has a much shorter service lifespan before showing wear and fading again.
Voiding Warranty
Manufacturers won’t warranty their stain products if not applied properly to a suitable prepared surface. Check requirements.
Maintaining a Deck with Regular Staining
When to Recoat
– Every 1-2 years for acrylic stains
– Every 2-4 years for urethane stains
– Whenever color fades or graying appears
Surface Preparation
– Remove all furniture, decor and debris
– Pressure wash to clean
– Lightly sand any damaged areas
– Let wood dry completely
Application Tips
– Always read and follow manufacturer’s instructions
– Use brush, roller or stain pad applicator
– Apply along length of boards in direction of wood grain
– Maintain wet edge to prevent lap marks
– Allow proper dry time between coats
Ongoing Care
– Keep deck surface clear of leaves and debris
– Routinely wash off dirt and winter salt residue
– Replace any damaged boards as needed
– Refinish traffic patterns more frequently if they show early wear
Conclusion
In summary, removing old failing stain down to bare wood is typically recommended before applying fresh stain to a deck. However, existing stain in good intact condition can be recoated directly in many cases. Proper preparation is the key to successful adhesion and protection from the new finish. Maintaining the deck with application of new stain layers every 1-4 years based on wear will provide lasting beauty and enjoyment. Use a quality stain product and take time to properly prepare the surface for maximum durability.