A P-trap is a curved piece of pipe that connects the drain pipe under a sink to the main waste line. The purpose of a P-trap is to hold water in the curved section, creating a water seal that prevents sewer gases from coming back up through the drain. So in short, yes, you do need a P-trap for a sink in order to prevent unpleasant odors from entering your home.
Page Contents
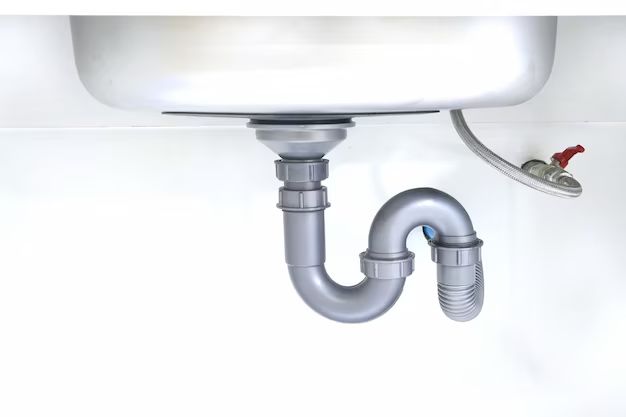
What is a P-trap?
As mentioned, a P-trap is a curved section of pipe that connects the drain pipe under a sink to the larger drain line. The “P” refers to the shape – the pipe curves down then back up in a U-shape. When water goes down the drain, it fills up the bottom portion of the “P”, creating a water seal. This water seal prevents sewer gases from passing back up through the drain. Instead, the gases vent out through the home’s main stack vent.
P-traps are installed on all drain lines that may be exposed to sewer gases, including:
- Sinks
- Showers
- Bathtubs
- Washing machines
- Floor drains
By trapping a small amount of water in the pipe, a P-trap creates a barrier between the inside air and the sewer gases on the outside. This keeps dangerous or unpleasant gases from entering the living space.
Why are P-traps important?
P-traps serve the crucial purpose of blocking sewer gas odors. Without a P-trap, gases could freely flow back up from the sewer or septic system and into the building. This can cause unpleasant sewage smells in the home, and expose occupants to harmful gases like methane and hydrogen sulfide.
Some key reasons why P-traps are so important include:
- Prevent sewer gas smells – The water seal blocks odors like rotten eggs or methane from entering the home.
- Block hazardous gases – Dangerous sewer gases contain hydrogen sulfide, ammonia, and methane.
- Stop insect entry – The water barrier helps keep bugs and insects from crawling up through drains.
- Allow proper drainage – The P-trap configuration allows water and waste to drain freely.
Plumbing codes require P-traps on all drains connected to the sewer system. They are considered a crucial protective device for good plumbing and sanitation.
How does a P-trap work?
A P-trap works by using the water in the bottom curve as a seal. Here is how it works in more detail:
- Water flows down the drain pipe from the sink above.
- The water fills the bottom portion of the “P” pipe.
- The water seals the pipe and prevents gases from rising up through the drain.
- More water enters the trap each time the sink is used, keeping the seal intact.
- Sewer gases are forced down the main drain line instead.
The water seal acts as a barrier between the inside air and the sewer gases outside. As long as the P-trap contains water, gases cannot escape into the building.
Maintaining the water seal
P-traps must maintain a water seal in order to work properly. If the water seal ever breaks, it can compromise the trap and allow odors into the home. Here are some tips for keeping P-traps sealed:
- Run water down the drain periodically if it’s not used often. This replenishes the water in the trap.
- Don’t allow complete evaporation. Add water if a trap has dried out.
- Guard against siphonage by ensuring proper venting.
- Don’t allow blockages which could empty the trap.
By following these tips, a P-trap water seal should remain intact and do its job keeping sewer gases out of the living space.
P-Trap Design and Configuration
While P-traps all serve the same purpose, they can vary in design and configuration. Here are some key things to know about P-trap anatomy:
Pipe Size
P-traps are often 1.5 or 2 inches in diameter. They should match the size of the drain line. The trap arm length should be no smaller than the drain diameter.
Trap Arm
The short portion of pipe between the P-trap and the drain line is called the “trap arm”. It should be sloped 1/4 inch per foot to allow water to flow smoothly.
Trap Seal
This refers to the vertical distance between the outlet and inlet inside the P-trap. The trap seal depth should be 2-4 inches to allow for proper drainage and prevent sewer gas entry.
Vent Connection
Code requires that the drain line be vented downstream of the P-trap. This prevents suction that could siphon water out of the trap.
Cleanout
P-traps may have a cleanout plug to allow access inside the pipe for maintenance and drain cleaning.
Material
P-traps can be made from slip-joint PVC, ABS, or chrome-plated metal. The configuration depends on the type of sink drain used.
Installing a New P-Trap
Installing a new P-trap is a straightforward DYI project for most homeowners. Here are the basic steps involved:
- Gather the P-trap kit and supplies – pipe, fittings, cement or thread tape, bucket, rag.
- Disconnect existing trap and drain connections. Unscrew slip nuts or cut out old trap.
- Clean the drain lines with a rag or brush to remove debris.
- Dry fit the new trap to measure proper sizing and configuration.
- Glue or thread the new trap connections using cement or thread tape.
- Attach the trap arm to the drain line outlet.
- Connect the lower bend to the sink tailpiece.
- Verify proper slope and trap seal depth.
- Test for leaks and proper drainage.
The process takes 30-90 minutes depending on the sink. Carefully following drain specifications for sizing, slope, and assembly is crucial.
Maintaining and Repairing P-Traps
It’s important to maintain P-traps over time. Here are some maintenance tips and troubleshooting steps for common P-trap problems:
Routine Maintenance
- Check water level to ensure proper trap seal depth.
- Pour water down unused drains to maintain water seal.
- Remove and clean trap to clear debris and buildup.
- Confirm vent line is clear.
Dried Out Trap
- Add water to refill the trap and recreate water seal.
- Repair any leaks or cracks allowing water to leak out.
- Replace trap if damaged or excessively crusted.
Odor Coming from Drain
- Refill trap seal and confirm 2-4 inch depth.
- Clear any drain blockages preventing water from filling trap.
- Check vent line for blockage.
- Remove and clean trap of sludge buildup.
Slow or Backed Up Drain
- Use a zip-it tool to clean out trap.
- Clear debris or hair tangled at bottom of P-trap.
- Make sure trap slope allows water to run off smoothly.
- Check main drain line for clogs.
With periodic maintenance and observation, most P-trap problems can be avoided before they cause major issues.
Removing an Old P-Trap
There are a few methods for removing an existing P-trap:
Unscrewing Slip Joint Nuts
Plastic PVC traps often use slip joints at connections. Loosen the slip nuts at both ends with channel locks. The trap will detach.
Cutting Trap Out
Use a hacksaw or pipe cutter to cut the trap arm and outflow pipe on either side of the trap. Remove the cut section of pipe.
Heating and Unscrewing
For stubborn plastic traps, heat the connections with a hair dryer or heat gun. This can soften the plastic so connections will unscrew.
Smashing Trap
A hammer can be used to carefully crack or smash an old lead or glass trap if other methods don’t work.
Wear eye protection when cutting or smashing traps. Repair any damage to existing drain pipes before installing the new P-trap.
Installing a Trap on a Sink Without One
It’s possible to add a new P-trap to a sink that is missing one. This often occurs with very old sinks. Here are the steps:
- Inspect below the sink to see existing connections.
- Measure distance between tailpiece and wall drain.
- Purchase a P-trap kit with proper diameter and size.
- Dry fit the trap connections to test sizing.
- Clean all drain parts with rag or brush.
- Apply thread tape or cement for watertight connections.
- Assemble the new trap in place, attaching to tailpiece and wall drain.
- Check for leaks and test drain.
The sink drain line may need to be cut if the distance between pipes is too long for a standard P-trap kit. Extenders can also be used to span larger gaps.
Cost to Install a P-Trap
A new P-trap kit for a sink drain costs $5-$20 on average depending on the material. Common options include:
| P-Trap Material | Cost Per Trap |
|---|---|
| Plastic (PVC, ABS) | $5 – $15 |
| Chrome Plated Metal | $10 – $20 |
| Brass | $15 – $25 |
Hiring a plumber to install a new P-trap typically costs $75 – $250 depending on labor time and any pipe modifications needed. The plumber may charge an hourly rate of $45-$65 per hour, with total install time ranging from 1-4 hours in most cases.
DIY vs Hiring a Plumber
Installing a new P-trap is a project a homeowner can usually DIY, especially if they have basic plumbing experience. However, there are some cases where you may want to hire a professional plumber:
- The sink has no existing P-trap at all.
- Drain line modifications are needed to accommodate a new trap.
- Hard to reach or tight spaces make the job difficult.
- Connections require soldering copper pipes.
- Old galvanized or lead traps need special handling.
For straightforward swaps of like-for-like plastic traps, a homeowner can save $100 or more doing it yourself. But for sinks requiring drain line alterations, it’s often worth hiring a plumber to ensure proper fit and functioning.
Conclusion
Installing and maintaining P-traps is an essential part of proper plumbing. All sink drains require a P-trap to prevent unpleasant and hazardous sewer gases from entering the home. DIYers can replace most modern slip-joint PVC traps by unscrewing connections. But if drain modifications are needed, it’s advisable to call a professional plumber to get the job done right. Properly installed and maintained, a P-trap provides an invaluable service keeping sewer odors at bay and your home smelling fresh.