When installing or repairing a faucet, you may need to use some type of sealant to prevent leaks. One common option is silicone sealant, which provides a watertight seal between the faucet and sink. But do you really need silicone for a faucet install? Here’s a look at when and why silicone sealant is recommended for faucets.
Page Contents
- 1 What is silicone sealant?
- 2 When is silicone sealant needed for faucets?
- 3 Pros of using silicone sealant
- 4 When can silicone sealant be skipped?
- 5 What are the alternatives to silicone sealant?
- 6 Can you use other kinds of caulk instead of silicone?
- 7 How to apply silicone sealant around a faucet
- 8 Tips for working with silicone caulk
- 9 Silicone sealant brands
- 10 Silicone sealant colors
- 11 Conclusion
What is silicone sealant?
Silicone sealant is a flexible, adhesive caulking product used to fill gaps and create waterproof seals. Though often referred to as simply “silicone,” this sealant is different from other silicone-based products like silicone baking sheets.
Silicone sealant is made from silicone polymers mixed with mineral spirits that allow it to be squeezed out of a tube or caulking gun. As the spirits evaporate, the silicone cures into a rubber-like solid. Once fully cured, silicone sealant is waterproof and provides excellent adhesion. It also remains flexible, unlike latex caulks which can crack over time.
These properties make silicone an ideal sealant for areas that need to block water. Common uses include sealing around sinks, bathtubs, showers, windows, and other fixtures prone to moisture. Silicon can adhere well to materials like metal, glass, ceramic, plastic, and wood.
When is silicone sealant needed for faucets?
Silicone sealant is commonly used to seal two main areas when installing or repairing a faucet:
– Between the faucet base and sink or countertop – Silicone creates a watertight barrier to prevent water from leaking underneath a newly installed faucet. It fills any small gaps between the irregular surfaces of the faucet base and sink.
– Around the faucet holes – Squirts of silicone seal the spaces around the faucet supply lines, mounting bolts, and spout that pass through pre-drilled holes in the sink or countertop. This prevents water from seeping down into cabinetry.
So if you’re installing a new faucet or repairing connections on an existing one, sealing with silicone is typically recommended:
Installing a new faucet
When installing a brand new faucet, silicone sealant is always a good idea around both the base and any holes. The sealant bonds the faucet in place and prevents leaks right from the start. Be sure to apply it between the bottom of the faucet and sink surface before setting the faucet.
Replacing faucet washers or cartridges
If you need to remove the faucet to repair or replace internal washers, cartridges, or seals, reapplying silicone when reinstalling is wise. This ensures everything remains watertight.
Replacing supply lines
When replacing old supply lines for a faucet, seal around the new lines with silicone where they pass through the faucet holes. This prevents moisture from dripping into the countertop or cabinet below if connections loosen over time.
Pros of using silicone sealant
Silicone sealant offers several advantages that make it well-suited for use around faucets:
Strong adhesion
Silicone bonds tightly to the porous materials faucets are typically made from like brass, plastic, and chrome. It also adheres well to non-porous surfaces like granite or glass. This creates a lasting seal.
Flexibility
The silicone sealant remains somewhat rubbery and flexible when cured. This allows it to flex slightly with the faucet as it moves, minimizing the chance of cracks forming over time.
Waterproof properties
Fully cured silicone is completely waterproof, making it an ideal barrier anywhere that sees water. It won’t dissolve or wash away once sealed against a faucet.
Mold/mildew resistance
Silicone sealant contains fungicides that prevent mold or mildew growth. Areas around sinks and faucets are prime locations for mold if not properly sealed.
When can silicone sealant be skipped?
While silicone is usually the best option, there are a few cases where it may not be strictly necessary:
– If reinstalling an existing faucet with no alterations – If simply removing a faucet for cleaning or repair and reinstalling the exact same faucet, new sealant often isn’t needed. As long as the existing beads of sealant aren’t damaged, they will typically reseal.
– Plastic or acrylic sinks – Acrylic sinks molded as one-piece units often form a tight seal around faucets. Plastic bathroom sinks also have less risk of water seeping under them.
– Faucet gaskets – Some faucets come with plastic or rubber gaskets that create a seal between the base of the faucet and sink. These specialized gaskets reduce the need for separate sealant.
– Teflon tape on supply lines – For leaks around supply line holes, teflon tape alone may seal adequately in some cases. However, combining tape with silicone provides added insurance.
If ever uncertain whether your specific faucet installation requires sealant, it’s always safer to apply it as an extra preventative measure. In bathrooms especially, the tiny gap between a faucet and sink can allow enough moisture seepage to cause hidden damage if left unsealed over time.
What are the alternatives to silicone sealant?
There are a few other decent alternatives to sealing around faucets if you prefer not to use silicone for some reason:
Plumber’s putty
Plumber’s putty is another popular waterproof sealant. It comes as a soft, moldable clay that is pressed into gaps then hardens over time. Unlike silicone, it can be easily removed later with some effort. But plumber’s putty may dry out and crack over time. It also lacks silicone’s mold fighting properties.
RTV gaskets
Specialty RTV (room temperature vulcanizing) gaskets are available to seal under some faucets, though these are not always reliable. Made of a silicone-like material, they can be messy to work with.
Teflon tape
While teflon tape alone may not adequately seal wider faucet base gaps, it works well around supply line holes. It is easy to apply and conforms well to odd gaps.
Beeswax putty
For a non-toxic natural option, beeswax putty can be used instead of plumber’s putty. It has antifungal properties but may not be as durable long term.
Can you use other kinds of caulk instead of silicone?
Technically, other types of caulking can be used to seal around faucets instead of silicone sealant. But silicone works best for a few reasons:
Latex caulk
Latex or acrylic caulks don’t adhere well to metal or chrome. They may peel off over time. Latex caulk also becomes brittle and prone to cracking.
Butyl caulk
Butyl caulk adheres well but lacks the flexibility and waterproofing of silicone once cured. It works better for roofing than plumbing needs.
In general, silicone offers the best all-around performance as faucet sealant in terms of flexibility, water resistance, and longevity. Unless you have a particular sensitivity or aversion to silicone, choosing a silicone bathroom caulk is recommended.
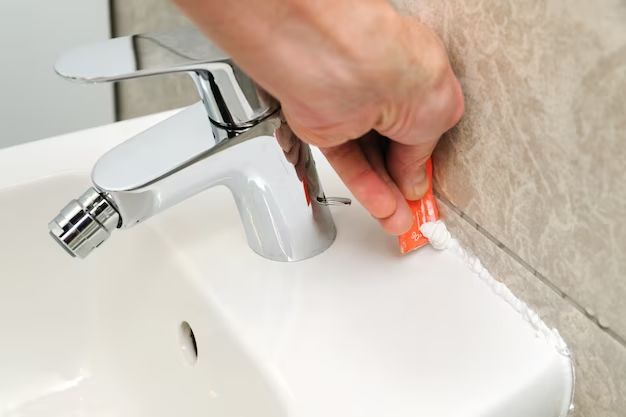
How to apply silicone sealant around a faucet
Using silicone sealant around faucets takes a few simple steps:
Prep the area
Start by cleaning the area to remove any old caulk or putty residue. Remove the faucet if reinstalling. Then wash the sink surface and faucet base with rubbing alcohol to get rid of soap film and oils for better adhesion.
Load caulk into caulking gun
Cut the tip off the silicone tube at a 45° angle to get a wide opening. Load the tube into a caulking gun. Caulk guns give much greater control than trying to squeeze by hand.
Run a bead of caulk
Run a continuous bead of silicone sealant around the faucet base lip and all holes. Try to make the bead smooth and consistent. The bead should be a little wider than the gap needing to be filled. This ensures a good seal when the faucet is set into place pressing the caulk down.
Seal with the faucet
Before the caulk fully skins over, carefully place the faucet back into position pressing it firmly into the sealant. Add sealant around the base if needed to fill any remaining exposed gaps.
Tool the caulk
Use a damp fingertip or plastic caulk tool to smooth out the caulk bead and remove any excess. Ensure there are no gaps or air bubbles trapped in the caulk.
Let cure
Silicone sealant typically becomes water resistant in about one hour but needs a full 24 hours to fully set up and cure. Avoid running or using the faucet during this time.
Seal supply line holes
Once reinstalled, also run a small caulk bead around any supply line holes if applicable. This seals around the intersection of the lines and holes. Let this silicone cure completely too before use.
If using an existing bead of caulk, simply ensure it makes continuous contact all the way around the faucet base and holes without any skips. Smooth with a fingertip to reseal any small gaps or cracks.
Tips for working with silicone caulk
To make applying silicone sealant easier, keep these handy tips in mind:
– Apply in temperatures above 50° F – Colder temperatures inhibit proper curing.
– Only apply a thin bead – Thick globs take longer to cure and do not seal as well.
– Wet your finger or caulk tool if needed – Dampening the surface helps smooth the caulk neatly.
– Use painter’s tape on edges for sharp lines – Tape off the sides of surfaces for perfectly straight caulk edges.
– Load fresh cartridges for easier flow – Old sealant in opened tubes sometimes dries up and sticks.
– Wipe away excess before it skins over – It saves cleanup time later.
– Allow 24 hours full cure time before water exposure – Rushing the cure results in leaks.
– Recaulk every few years for maintenance – Sealants wear down over time and need refreshing.
With a steady hand and proper technique, sealing with silicone caulk does not have to be messy or complicated. Take it slow and let the silicone fully cure for a long lasting waterproof barrier around your faucet.
Silicone sealant brands
Popular options for silicone bathroom caulk include:
| Brand | Features |
|---|---|
| GE Silicone II | 100% silicone; 10 year mold free product protection guarantee; Meets plumbing codes |
| DAP Kwik Seal Plus | 100% waterproof silicone; Strong adhesion; Mold/mildew resistant |
| Red Devil 0826 | 100% silicone; Stays flexible; 25 year mold free warranty |
| Loctite Marine | 100% silicone; UV and water resistant; Won’t crack or shrink |
| Momentive Aquarium | 100% silicone; Made for aquariums/wet areas; Clear finish |
These represent some of the top silicone options suitable for sealing and caulking bathroom fixtures like faucets. More specialty bathroom caulk brands also exist, some with added fungicides or anti-mildew agents. Read reviews to find one that meets your specific needs in terms of durability, flexibility, drying time, and ease of use with your desired application.
Silicone sealant colors
Silicone caulk comes available in various colors to best match or accent your fixtures:
– Clear – Translucent for an invisible look
– White – Matches most porcelain sinks and bathtubs
– Almond – For beige and almond colored fixtures
– Grey – Good for stainless steel sinks
– Black – For black basins and fixtures
– Brown – Matches dark bronze metal finishes
– Blue – Can match or accent blue glass vessel sinks
For a camouflaged look, choose a caulk color matching your sink. Clear is versatile for any style. Colored silicone can also be used decoratively around fixtures as an accent. Apply parallel beads of two complementary colors for a striking visual effect.
Conclusion
Silicone sealant is recommended for most faucet installations and repairs to prevent leaks from water seepage. It creates a reliable moisture barrier between the fixture and sink surface. Silicone also remains permanently flexible and is mold resistant. While not mandatory, it is highly advisable for bathroom sink faucets to prevent any hidden water damage. Alternatives like plumber’s putty also work but may not last as long. Be sure to thoroughly clean surfaces and let silicone fully cure before exposure to water. Follow the steps above to neatly apply caulk around your faucet. Check seals periodically and reapply fresh silicone as needed over time to maintain a watertight connection. With the right silicone caulk bead in place, you can install your faucet with confidence it will remain securely and permanently sealed.