Draining and flushing the hot water heater in an RV is an important maintenance task that should be performed at least annually. Over time, sediment and mineral deposits can build up inside the tank, which can lead to a number of problems if left unchecked. Draining the tank helps remove these deposits, extending the life of your hot water heater and keeping it running efficiently.
The process of draining a hot water heater is relatively straightforward, but it’s important to follow the proper steps. In this article, we’ll walk through the complete process of draining and flushing the hot water heater in an RV step-by-step. We’ll also cover some key safety tips and steps to take before getting started. With the right approach, you can finish draining your RV water heater in under an hour.
Page Contents
Should I Drain the Hot Water Heater in My RV?
You may be wondering if it’s really necessary to drain the hot water heater in your RV. The short answer is yes – draining your RV hot water heater on a regular basis provides several important benefits:
- Removes sediment and mineral deposits – Hard water contains dissolved minerals that can collect in the tank over time. Draining the tank helps flush out these deposits before they build up.
- Extends the life of the water heater – Sediment buildup can lead to corrosion and other damage. Regular draining helps keep the inside of the tank clean.
- Improves heating efficiency – Mineral deposits insulate the water inside the tank, making the water heater work harder. Removing deposits improves heating efficiency.
- Prevents leaks – Excess sediment buildup can eventually cause small leaks or even tank failure. Draining removes sediment before it can reach problematic levels.
- Makes winterization easier – It’s recommended to drain the tank before winterizing an RV. Starting with a clean tank makes the winterization process more effective.
Following the manufacturer’s recommendations, you should drain the hot water heater at least once a year. Doing it more frequently, such as before winter storage or after a period of heavy use, provides added benefits.
Safety Tips for Draining an RV Hot Water Heater
Before you start draining the hot water heater, keep these important safety considerations in mind:
– Let the water cool – Hot water can burn you. Only drain the tank once it has cooled down.
– Use caution when removing the plug – Built up pressure may cause hot water to spray out when the plug is removed. Stand back and open the valve slowly.
– Check for power – Turn off electrical power to the water heater to avoid electric shocks.
– Review the manual – Follow the specific instructions provided in your RV’s owner’s manual.
– Have a container ready – Have a bucket or hose attached to direct water flow away from the RV.
– No smoking – Do not smoke or have open flames nearby when draining hot water that may contain propane or butane.
Taking the proper safety precautions reduces the risks involved in this maintenance task. Always put safety first when working on RV systems.
What You’ll Need
Draining a hot water heater only requires a few basic items. Here’s a list of what you’ll need:
– Owner’s manual for your RV – Follow the specific steps for your model.
– Container or hose – Have something ready to direct the drained water away from the RV. A 5 gallon bucket or garden hose works well.
– Adjustable wrench or pliers – To remove fittings or access valves.
– Gloves – For protection when working with hot water.
– Protective eyewear – For protection from pressure spray if the valve opens suddenly.
– Cloths or towels – To clean up any spilled water.
– Water heater manufacturers approved cleaner – Using the right product helps flush out sediment.
Having these supplies ready ahead of time makes the draining process quicker and easier. Always refer to your owner’s manual since drain valves and connections can vary between RV models.
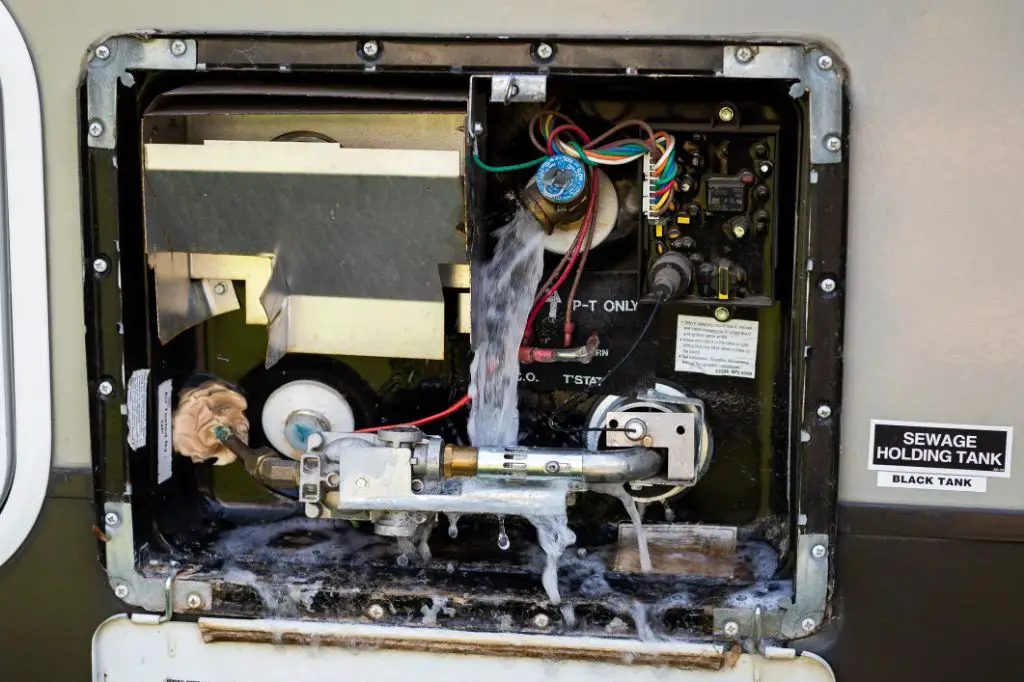
How to Drain the Hot Water Heater
With the right setup and preparations, you’re ready to start draining the hot water heater. Follow these steps:
1. Turn off power to the water heater
– Locate the circuit breaker or power switch for the water heater and turn it off. This is an important safety step.
2. Turn off the water supply
– Close both the cold water supply valve and the hot water outlet valve.
3. Connect a hose or container
– Place a bucket or hose at the drain valve location to catch the released water.
4. Open the pressure relief valve
– Carefully open the pressure relief valve on the tank to release any built up pressure inside.
5. Remove the drain plug
– Use pliers or a wrench to remove the drain plug or open the drain valve. Allow all water to drain out.
6. Open faucets inside the RV
– Turn on hot water faucets to allow air into the system and the tank to fully drain.
7. Flush the tank
– Optionally, attach a hose to the drain valve and use water pressure or a tank cleaning solution to rinse out sediment.
8. Replace the drain plug
– Once drained and flushed, replace the drain plug or close the drain valve.
9. Refill the tank
– Turn water supply back on and reopen valves to refill the tank before using again.
Following these key steps will allow you to fully drain the hot water heater and prepare it to be refilled. Always refer to your owner’s manual for model-specific steps.
Tips for Draining the Tank
Keep these tips in mind for the best results when draining your RV hot water heater:
– Drain the tank when it is cool – Letting the water cool first reduces the risk of burns.
– Drain immediately after a trip – Draining right after a trip removes sediment from the most recent water.
– Inspect the drained water – The water may have rust or mineral sediment in it, which indicates buildup in the tank.
– Flush the tank thoroughly – Use water pressure or cleaning solutions to fully rinse out the inside of the tank.
– Drain before winterizing – Remove all water from the tank before winterization to prevent damage from freezing.
– Check anode rods – Remove and inspect the anode rod when the tank is empty. Replace if worn down.
– Refill and turn back on – Make sure to refill the tank and restore power when done to put the water heater back into service.
Following a complete draining and flushing yearly helps keep your RV water heater operating safely and efficiently.
Draining a Hot Water Heater After a Freeze
If your RV hot water heater was exposed to freezing temperatures, special care should be taken when draining the tank. Follow these guidelines:
– Do not turn the water heater on – Frozen water could cause tank or line ruptures. Do not turn it on until thawed.
– Connect a blowout plug – Attach a special plug designed to relieve pressure from expanding ice. This allows the tank to drain safely.
– Drain immediately – Open valves to let out any remaining liquid and ice. Continue draining until fully empty.
– Remove and inspect the anode rod – Look for any cracks or damage from freezing temperatures. Replace if needed.
– Check fittings and valves – Inspect all plumbing components on the hot water heater for cracks or splitting from frozen water.
– Refill slowly – When ready to use again, refill the tank very slowly to avoid pressure damage.
Taking these precautions will help safely drain a frozen hot water tank and check for any damage before putting it back into service. Contact a service professional if you have any concerns.
Troubleshooting Common Draining Problems
In most cases, draining the RV hot water heater is straightforward. But here are some tips for troubleshooting common problems that may arise:
Water flows slowly or not at all from the drain valve:
– Check that all water valves are fully open
– Try opening faucets inside the RV to release pressure
– Use a tank flush cleaning tool to force water through
– Remove and inspect the drain valve for blockages
Sediment or strange odor in drained water:
– Flush the tank again to rinse thoroughly
– Refill and use a sanitizing or descaling solution
– Have the tank professionally cleaned if buildup is excessive
Water leaks from other locations when draining:
– Tighten hose connections with clamps or tape
– Inspect plumbing joints and pipes for cracks under pressure
– Listen for air escaping and tighten fittings as needed
The tank won’t fully drain:
– Elevate the end of the RV with the drain plug
– Attach a compressed air nozzle to force out remaining water
– Inspect and clean drain plug if blocked by sediment
Burner won’t ignite or hot water is too slow after draining:
– Make sure tank is full and all valves are open
– Purge trapped air by cycling burner on and off
– Check for obstructions in burner or plumbing
Following the proper draining and filling procedure carefully will prevent most issues. Pay attention to any leaks or abnormal smells and contact a professional if needed.
Conclusion
Draining the hot water heater in your RV at least annually is an important maintenance job that keeps your water heating system operating safely and efficiently. While it may seem daunting, by following the step-by-step process covered in this article you can finish draining your RV water heater in under an hour.
Just be sure to take the proper safety precautions, have the necessary supplies ready, and refer to your owner’s manual for model-specific steps. Pay attention at each stage and troubleshoot any issues that come up. Making water heater maintenance a part of your regular RV care routine provides great benefits over the long run.
