Snow blowers are essential tools for clearing snow from driveways and sidewalks during the winter. However, when the warm weather arrives, most people store their snowblowers away until the next winter. Starting your snowblower after months of inactivity requires following some key steps to ensure the machine is in proper working order when snow season returns. In this article, we will provide a step-by-step guide to preparing your snowblower for use after storage during the summer months.
Page Contents
Why Proper Storage Is Important
Properly storing your snowblower over the summer is crucial to ensure it will start up and run correctly when needed again. Here are some key reasons proper storage matters:
- Prevents fuel from gumming up – Leaving old gas in the engine over summer can cause it to oxidize and turn into gum, clogging up carburetors.
- Protects internal parts from moisture – Exposure to humidity can cause rust and corrosion on internal engine components.
- Saves battery charge – Snowblower batteries can fully discharge over months without use.
- Avoids dried up lubricants – Grease and oil can dry out over time, leading to lack of lubrication.
- Keeps mice/pests out – Rodents are attracted to the scent of fuel and oil and can damage wiring.
Following the proper storage steps, including adding fuel stabilizer, running the engine dry, and keeping the machine covered and protected, will help avoid these issues.
Getting the Snowblower Out of Storage
Once the first snowflakes start to fall, it’s time to get the snowblower out of storage. Here are the steps to take when retrieving your snowblower after summer:
- Make sure the snowblower is cleaned off from any dirt, leaves, dust or grime that may have collected on it.
- Check the tire pressure and inflate tires to the proper PSI if needed.
- Inspect any belts and tighten if loose. Replace any worn or cracked belts.
- Check the skids at base and adjust clearance if necessary.
- Add fresh gasoline with ethanol stabilizer to prevent gumming.
- Inspect oil level and top off if low – change oil if old.
- Check spark plug and replace if worn out or fouled.
- Charge battery if needed and ensure connections are tight.
- Spray lubricant on any sticky augers, chutes, cables etc.
- Clear any debris that may have collected inside auger housing.
Following this checklist will help ensure your snowblower is ready to start up and operate smoothly.
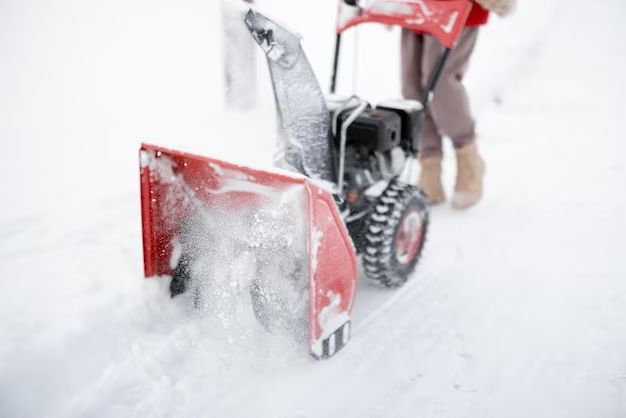
Steps to Starting the Engine
Once you’ve prepped your snowblower following the storage checklist, you’re ready to start the engine. Follow these key steps:
Step 1: Prime the Engine
– Locate the primer bulb and press it 2-3 times. This sends fuel into the carburetor and cylinders to prep for ignition. Don’t over prime.
Step 2: Engage the Choke
– Set the choke lever/knob to full choke position. This provides a richer air-fuel mixture needed for cold starting.
Step 3: Turn the Key
– Insert key and turn to the “On” position. This activates the ignition system.
Step 4: Pull the Starter Cord
– Grip cord handle firmly and pull out quickly with a full arm stroke. Repeat until engine tries to start or fires up.
Step 5: Let the Engine Warm Up
– Give the engine 2-3 minutes to warm up before disengaging the choke.
Step 6: Increase Throttle
– Once warmed up, gradually increase the throttle to full speed setting for operation.
Following this starting sequence is key for getting your snowblower’s engine up and running after storage. Taking your time and not rushing the process will ensure the most success.
Troubleshooting Issues When Starting
Sometimes an engine may not start properly right away after sitting. Here are some common issues and solutions to check:
| Problem | Potential Cause | Solution |
|---|---|---|
| No ignition or turnover | Dead battery | Recharge battery and check connections |
| Blown fuse | Check main fuse and replace if needed | |
| Faulty ignition switch | Test switch continuity and function | |
| Engine turns over but won’t start | Insufficient fuel | Confirm tank has fresh fuel mix |
| Clogged fuel filter | Check and replace filter if dirty | |
| Faulty spark plug | Inspect, clean, gap or replace plug |
Other troubleshooting tips:
- Check for broken or disconnected spark plug wire
- Make sure the fuel shutoff valve is open
- Try spraying quick start fluid into the carburetor
- Ensure the oil level is correct – low oil can prevent ignition
- Check for clogged fuel lines or stuck float in carburetor
- Remove spark plug and check for excess fuel flooding
Following proper troubleshooting procedures will help identify and fix any issues getting the engine started after storage.
Preparing the Snowblower for First Use
Once you’ve successfully started your snowblower after its summer storage, there are a few final preparations to make before using it to clear snow:
Check Auger and Drive Function
– With the engine running, test that the auger spins properly when engaged. Ensure the drive wheels or treads propel the snowblower when engaged.
Inspect Shear Pins
– Examine all shear pins to confirm they are installed and intact. These pins are designed to break and prevent gear damage.
Adjust Skid Height
– Adjust the skid shoes lower for gravel or uneven surfaces to avoid scuffing. Raise for paved surfaces.
Lubricate Moving Parts
– With engine off, lubricate augers, cables, linkages etc. with silicone spray or similar lubricant.
Let Engine Fully Warm Up
– Allow engine to run for 5 minutes before use to bring it up to full operating temperature.
Do Test Run
– Do a test run on level ground to ensure all systems run correctly before tackling the snow.
Taking these final preparatory steps will ensure your snowblower is truly ready for winter and minimize chances of issues later on.
Safety Tips
When operating your snowblower after storage, keep these important safety precautions in mind:
- Wear safety glasses or goggles to protect eyes from debris.
- Avoid loose clothing or accessories that could get caught in moving parts.
- Handle fuel carefully – fill outdoors and avoid spills.
- Adjust the discharge chute direction to avoid spraying people or objects.
- Look behind you when moving in reverse to avoid obstacles.
- Exercise caution on slopes or uneven terrain.
- Keep hands and feet away from intake and discharge areas.
- Shut off engine before doing any adjustments, unclogging, etc.
- Beware of possible hidden objects like rocks under snow surface.
Following snowblower safety best practices will help prevent injuries or accidents after startup.
Maintenance Tips
Proper ongoing maintenance is crucial for peak snowblower performance all winter. Follow these maintenance tips:
Check Shear Pins Frequently
– Replace any broken shear pins immediately to avoid gear damage. Have extras on hand.
Change Oil After First 5 Hours
– New oil after first 5 hours of use removes any debris from startup wear.
Lubricate After Each Use
– Lubricate auger, gears, cables etc. after each use while metal is warm.
Touch Up Paint
– Touch up any scratches to prevent rusting.
Adjust Skids as Needed
– Keep skids adjusted to proper height for surface type.
Clean After Each Storm
– Remove snow, slush and ice buildup after each use. Allow to dry in warm area.
Check Belt Tension
– Examine drive and auger belts for proper tension. Adjust as required.
Replace Fuel Filter
– Change fuel filter mid-season for optimum fuel flow.
Keeping up with proper maintenance while the snowblower is in use ensures it will perform reliably all winter long.
Off-Season Storage Tips
Once snow season wraps up, proper storage is key to preserve your snowblower over the off-season:
Remove Remaining Fuel
– Drain any remaining stale fuel from the tank and lines to avoid gum buildup.
Run Carburetor Dry
– Run the engine until it uses all fuel in the carburetor and stalls out.
Clean the Machine
– Wipe down the exterior, remove dirt and debris. Clear snow and ice from internals.
Touch Up Any Damage
– Sand down scratches, prime and paint any areas prone to rust.
Lubricate Components
– Coat augers, drive parts, cables etc. with lubricant to prevent seizing.
Check Belts and Parts
– Inspect belts, change oil, replace or repair worn parts for next season.
Store Indoors
– Keep the snowblower in a dry, covered area away from elements and pests.
Taking these end-of-season steps will ensure your snowblower is protected and ready for quick starting when next winter arrives.
Conclusion
Preparing a snowblower after summer storage involves properly getting the machine out of storage, starting the engine, making final preparations, and practicing safe operation. Following troubleshooting tips if the engine won’t start allows identification and repair of any issues. Ongoing maintenance and proper storage at the end of the season will keep a snowblower in peak operating condition year after year. With the right process, your snowblower will be prepared and ready to clear heavy winter snowfall whenever it strikes.