A leaking backflow preventer can be a nuisance and lead to higher water bills, property damage, and contamination of drinking water. Thankfully, most backflow preventer leaks can be fixed with some basic maintenance and repairs. Here is a step-by-step guide to troubleshooting and fixing a leaking backflow preventer.
Page Contents
- 1 What is a Backflow Preventer?
- 2 Why is My Backflow Preventer Leaking?
- 3 How to Troubleshoot a Leaking Backflow Preventer
- 4 How to Fix a Leaking Double Check Valve Assembly
- 5 How to Fix a Leaking Reduced Pressure Principle Assembly
- 6 When to Call a Professional for Backflow Preventer Leaks
- 7 Preventing Backflow Preventer Leaks
- 8 When to Replace a Backflow Preventer
- 9 Conclusion
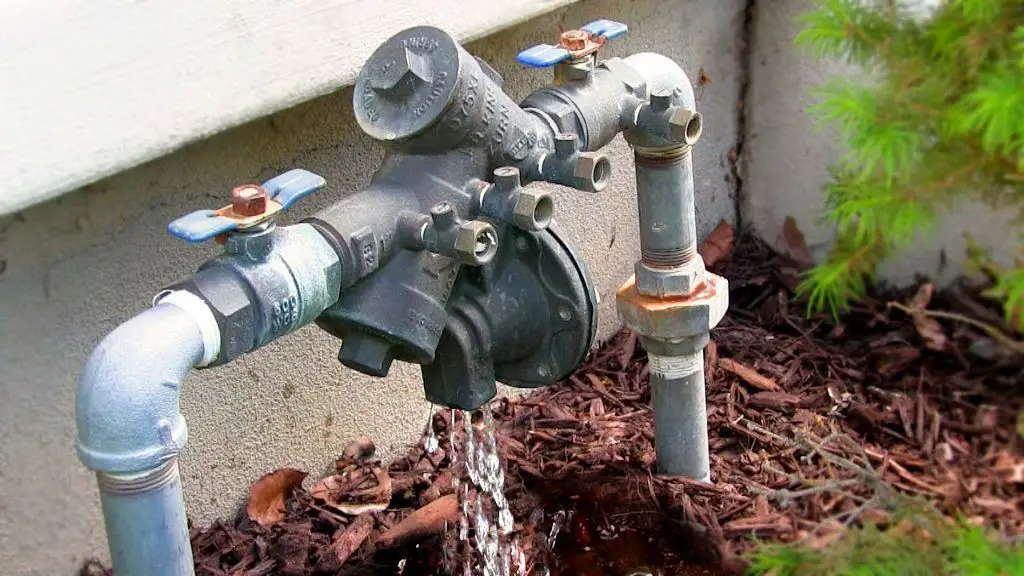
What is a Backflow Preventer?
A backflow preventer is a mechanical valve installed on water lines to prevent backflow – the unwanted reverse flow of water in the drinking water system. There are several types of backflow preventers including:
- Reduced pressure principle assembly (RP)
- Double check valve assembly (DC)
- Pressure vacuum breaker (PVB)
- Atmospheric vacuum breaker (AVB)
Backflow preventers contain check valves, relief valves, and shut-off valves to stop backflow. They are often installed near water meter connections, irrigation systems, boiler systems, and other cross-connections between drinking and non-drinking water sources.
Why is My Backflow Preventer Leaking?
There are several potential causes for backflow preventer leaks:
- Failed check valve seals – The rubber check valve seals wear out over time and can crack and leak.
- Stuck relief valve – Scale, sediment, or corrosion can prevent the relief valve from sealing fully.
- Damaged O-rings – O-rings around the check valves or relief valve pistons can become brittle and leak.
- Frozen components – Freezing temperatures can damage internal components and hinder proper sealing.
- High water pressure – Excessive water pressure can force water past worn seals.
- Improper installation – Leaks may indicate the backflow assembly was installed incorrectly.
How to Troubleshoot a Leaking Backflow Preventer
Follow these steps to troubleshoot and diagnose why your backflow preventer is leaking:
- Inspect the location of the leak -Leaks typically occur from the bottom of the relief valve, check valve test cocks, or the main shut-off valves. The source of the leak gives clues to the issue. For example, a relief valve leak often indicates a stuck valve.
- Check valve test – Perform a check valve test by running water through the preventer. Open and close shut-off valves and test cocks to see if water leaks when they should be closed. This can identify leaking check valves.
- Inspect valve seals and O-rings – Open up the backflow preventer and inspect the rubber seals and O-rings around the check valves and relief valve piston. Cracked, worn, or swollen seals are likely the cause of leaks.
- Test relief valve operation – An improperly operating relief valve that gets stuck open or closed can cause leaks. Testing relief valve functioning will help diagnose issues.
- Consult manufacturer literature – The user manual or manufacturer website can provide troubleshooting tips specific to your model of backflow preventer.
- Contact a backflow tester – A certified backflow assembly tester can perform a full diagnostic test and pinpoint the exact cause of any leaks.
How to Fix a Leaking Double Check Valve Assembly
Double check valve assemblies have two positive-sealing check valves. Here are steps for fixing leaks from a double check:
- Shut off inlet and outlet shut-off valves.
- Open check valve test cocks to release pressure.
- Unscrew check valve covers using a wrench.
- Inspect check valve seals for cracks or swelling. Replace leaking seals.
- Clean check valve seats of debris using a rag.
- Reassemble check valves and components.
- Slowly open inlet shut-off valve to pressurize preventer.
- Open outlet shut-off valve and test cocks to purge air.
- Close everything and check for leaks. Repeat check valve testing.
The check valves seals are the most common point of failure. Replacing cracked or worn seals should fix most leaking double check valve backflow preventers.
How to Fix a Leaking Reduced Pressure Principle Assembly
Reduced pressure principle (RP) assemblies contain check valves like double checks but also have a relief valve that opens if either check valve fails. Follow these steps to fix an RP leaking from the relief valve:
- Shut off inlet and outlet shut-off valves.
- Open check valve test cocks to release pressure.
- Unscrew relief valve cover using a wrench.
- Check piston and seals for cracks or fouling. Clean piston. Replace damaged seals.
- Inspect relief valve seat for debris. Clean any dirt or buildup.
- Reassemble relief valve components.
- Slowly open inlet shut-off valve to pressurize preventer.
- Open outlet shut-off valve to purge air.
- Close everything except first check test cock. Bleed air from relief valve vent.
- Open first check test cock. Open and close relief valve vent to purge air from piston.
- Close everything and check for leaks. Repeat check valve and relief valve testing.
Issues with the relief valve not sealing properly are the most likely cause for RP leaks. A thorough cleaning and seal replacement should solve the problem in most cases.
When to Call a Professional for Backflow Preventer Leaks
In some cases, significant backflow preventer leaks or failures require a certified professional:
- Complete check valve or relief valve failure requiring component replacement
- Leaks originating from main shut-off valve bodies or connections
- Preventer does not pass diagnostic testing after repairs
- Water contamination occurs from a backflow incident
- The leak causes significant property damage
- The assembly fails annual testing and certification
A licensed plumber or certified backflow tester has the skills, tools, and expertise to fully overhaul or replace a failed backflow preventer and restore protection against backflow incidents.
Preventing Backflow Preventer Leaks
Taking preventative measures can reduce the chances of your backflow preventer leaking or failing:
- Have the assembly tested annually or biannually by a certified technician.
- Install the preventer in an accessible location protected from freezing.
- Keep shut-off valves fully open when in use.
- Avoid excessive water pressure and water hammer.
- Flush the line to remove debris after plumbing work.
- Lubricate valves and components during testing.
- Insulate relief valve vents in cold climates.
Well-maintained backflow preventers can provide decades of reliable protection against backflow events and water contamination.
When to Replace a Backflow Preventer
If your backflow preventer assembly is over 10 years old or fails repeatedly, replacement may be required. Other signs it’s time for a new one include:
- The preventer does not pass annual testing and certification.
- Replacement parts are no longer available for your model.
- Shut-off valve bodies are leaking or corroded.
- You need a different type of backflow preventer.
- Your water meter or service lines are being upgraded.
Replacing your faulty or outdated backflow preventer restores full protection against backflow and ensures compliance with plumbing codes.
Conclusion
Stopping leaks from a backflow preventer requires diagnosing the source of the issue through testing and inspection. In many cases, replacing worn seals and o-rings or cleaning stuck relief valves resolves the problem. Preventative maintenance and testing is key to maximize the lifespan of your backflow preventer. If DIY repairs are unsuccessful, or the leaking is severe, calling a professional plumber or technician ensures proper fixing of the issue and protection of your water supply from contamination.