If your refrigerator’s ice maker has suddenly stopped producing ice, there are a few different parts that could be causing the issue. One of the most common culprits is a faulty ice maker inlet valve. This valve controls the flow of water into the ice maker, and if it fails, the ice maker won’t receive the water it needs to make ice cubes. In this article, we’ll walk through the steps for testing your ice maker inlet valve so you can determine if it needs to be replaced.
Page Contents
What is the ice maker inlet valve?
The ice maker inlet valve is a small electric solenoid valve located at the rear of the refrigerator that controls water flow into the ice maker. When the ice maker calls for water, a signal is sent that opens the inlet valve and allows water to flow through a small tube from the refrigerator’s water supply line into the ice maker mold. Once the ice maker has received the right amount of water, the signal stops and the valve closes, shutting off the water supply. The inlet valve acts as a switch, turning on the water supply when needed and off when not.
Why does the inlet valve need to be tested?
There are a few common reasons why an ice maker inlet valve can fail and require testing:
Clogged or restricted valve
Mineral deposits from hard water can build up on the small mechanisms inside the valve over time. This prevents the valve from fully opening and allowing the proper amount of water to flow through.
Wear and tear
The inlet valve may contain small rubber seals and parts that can wear out after years of use, causing the valve to not open and close properly.
Voltage issues
A lack of power reaching the inlet valve can prevent it from opening when it should. This could be due to a problem with the ice maker module or a disrupted electrical connection.
Faulty solenoid coil
The coil is the part of the valve that moves it into the open or closed position when energized. If this coil becomes damaged or burns out, the valve won’t operate.
By testing the valve, you can determine if water flow is being hindered by one of these issues and if the valve needs to be replaced or repaired.
How to test an ice maker inlet valve
Testing the ice maker inlet valve is a fairly straightforward process that can be done in a few simple steps:
1. Unplug refrigerator
The first thing you should do is unplug the refrigerator from the power source. This cuts off electricity to the valve and allows you to safely test it.
2. Turn off water supply
Locate the water supply shut-off valve behind the refrigerator and turn it clockwise to shut off water to the refrigerator. This stops any water from potentially flowing out during the test.
3. Remove access panel
On the back of the refrigerator, remove the thin metal panel covering the ice maker supply lines and valve. This gives you access to the inlet valve.
4. Disconnect inlet tube
Locate the plastic water tube that runs from the inlet valve into the ice maker. Disconnect it from the valve by pressing in the collar around the tube and pulling it straight off.
5. Check for debris
Examine the inlet valve visually and feel around it with your fingers to detect any dirt, mineral deposits or debris that could be obstructing water flow. Clean the valve if needed.
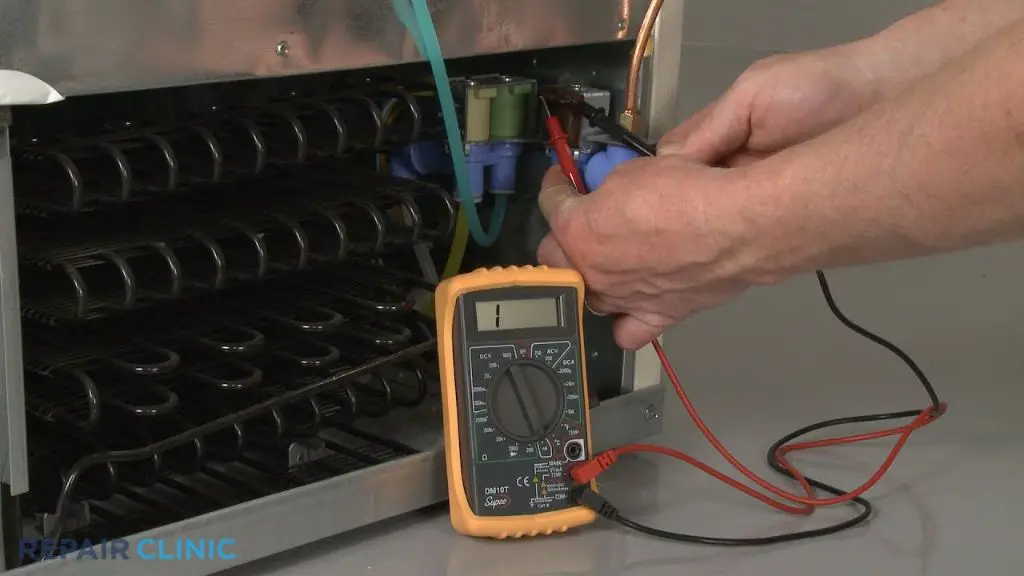
6. Check coil resistance
Use a multimeter to test the electrical resistance of the valve coil. Set the multimeter to the ohms setting. Place the probes on the two pins or terminals on the inlet valve. A normal reading is between 30 to 300 ohms. Infinity or OL indicates a bad coil.
7. Apply voltage
To test water flow, you’ll temporarily apply voltage to the valve to see if opens. Unplug the connector on the ice maker module or use jumper wires. Apply 120V AC power directly to the inlet valve terminals. CAUTION: Only apply power for 1-2 seconds to avoid overheating.
8. Check water flow
With power applied, the valve should open and release a burst of water through the inlet tube, indicating proper operation. No or slow water flow means the valve needs replacing.
9. Reconnect and turn on water
Reconnect the inlet tube, reattach the access panel and turn the water supply back on once testing is complete.
What if the valve tests bad?
If your test reveals problems with ice maker inlet valve function – infinite resistance, no water flow when powered, etc. – then replacement of the valve is needed. Here are a few tips for installing a new valve:
– Locate model number sticker inside fridge to get proper replacement part
– Shut off water supply and disconnect refrigerator power before replacing
– Transfer any tubing, fittings and mounting hardware to new valve
– Make sure to install valve with arrow pointing in direction of water flow
– Restore power and water supply once new inlet valve is installed
– Initiate ice maker test cycle or wait 24 hours for ice production to resume
Replacing a malfunctioning ice maker inlet valve is usually a quick fix to get your ice maker functioning again.
Troubleshooting ice maker issues
While a defective inlet valve is a common cause of malfunctioning refrigerator ice makers, there are a few other problems that could be preventing ice production that are good to check:
Frozen or clogged water line
Check refrigerator water lines for any blockages from frozen water or obstructions that could stop water getting to the inlet valve.
Jammed ice maker mold
Look for ice cubes stuck in the ice maker mold or ejector arms that aren’t rotating properly to release new ice.
Broken water filter
See if water flow improves after removing or replacing the refrigerator water filter. A clogged filter can reduce water to the valve.
Ice maker control issues
Test components like the ice maker module, motor, thermostat and wiring for problems preventing the valve from opening.
Low water pressure
Inadequate house water pressure can result in the valve not receiving enough water. Check pressure at other faucets.
When to call a repair technician
If testing shows the ice maker inlet valve itself is functioning properly, then a more complex issue may be preventing ice production. In that case, it’s best to contact an appliance repair technician who can fully diagnose the ice maker and water supply system. A technician can:
– Use advanced diagnostics to test components and electrical circuits
– Assess water pressure issues originating outside the refrigerator
– Thoroughly clean mineral buildup or debris from water valves and lines
– Identify leaks, damaged tubing or incorrect installations
– Replace complex parts like the ice maker mold or control module
While a malfunctioning inlet valve is one of the most DIY-friendly ice maker repairs, calling a technician is advised if you encounter any issues beyond the valve itself.
| Ice Maker Problem | Possible Causes |
|---|---|
| Not making any ice | Inlet valve failure, obstructed water lines, failed ice maker module, faulty water filter, poor water pressure, condenser issues |
| Small or hollow ice cubes | Low water pressure, partially clogged valve, defective water filter |
| Excessively loud operation | Mounting issues causing vibration, problems with water valve or fill tube |
| Ice clumping/sticking in mold | Low water pressure, mineral deposits in mold, melted then re-frozen cubes |
| Unusual ice cube shapes | Damaged ice mold, debris blocking mold |
| Water leaking | Failed or misaligned water valve, cracked water lines, Fill tube issues |
Conclusion
Testing an ice maker inlet valve is a useful first step in diagnosing why a refrigerator’s ice maker may not be receiving the water needed to function. With a few simple electrical and water flow tests, you can determine if voltage issues, a bad solenoid, or debris buildup are causing the valve to malfunction before replacing the part. If the valve checks out, further troubleshooting will be needed to pinpoint problems elsewhere in the ice maker or water supply. Calling a technician for support on more complex repairs may be required. But confirming the inlet valve is working properly or needs replacing is an easy DIY first check that may get your ice maker making ice again.