Installing outdoor lighting on a fence is a great way to enhance the ambiance and safety of your outdoor space. With the right materials and a bit of handiwork, you can easily attach lights to a wooden, vinyl, or chain link fence.
Page Contents
- 1 What You’ll Need
- 2 Choosing Lighting
- 3 Choosing Mounting Hardware
- 4 Planning the Layout
- 5 Choosing a Power Source
- 6 Installing String Lights
- 7 Installing Individual Spotlights
- 8 Attaching Rope and Post Lights
- 9 Installing Uplighting
- 10 Running and Securing Wires
- 11 Adding Decorative Touches
- 12 Maintaining Fence Lights
- 13 Safety Tips
- 14 Conclusion
What You’ll Need
Here’s a list of materials you’ll need to attach lights to a fence:
- Outdoor string lights or individual spotlights
- Power drill and drill bits
- Exterior wood screws, zip ties, plastic clips, or metal hooks depending on your fence material
- Plastic cable clips or hooks to run wiring
- Outdoor-rated extension cord
- Wire strippers
- Voltage tester
Choosing Lighting
First, decide what type of lighting you want to install. Here are some popular options:
- String lights: These are sets of mini bulb lights connected by wire. They create a soft, decorative glow. Choose LED string lights for efficiency and longevity.
- Spotlights: These direct light downward to highlight plants or architectural elements. Opt for LED or solar-powered versions.
- Post cap lights: These fit over fence posts to provide directed lighting. Go for solar options to avoid wiring.
- Rope lights: Flexible LED rope lights can be wrapped around posts or woven through fence slats.
- Uplights: These point light upward to create ambient lighting. Place them on the ground alongside the fence.
Consider the amount of light coverage, spacing, lumens, and brightness you need. Measure the length of your fence to determine how many lights to get. Buy extra lights to allow for mistakes or later replacements.
Choosing Mounting Hardware
The mounting hardware you use will depend on your fence type:
- Wood: Use exterior wood screws. Predrill holes to prevent cracking or splitting.
- Vinyl: Use plastic zip ties or clips that won’t scratch or pierce the vinyl.
- Chain link: Use metal S-hooks to hang lights from the links.
- Wire: Use plastic wire or cable ties threaded through the holes.
- Metal: Use magnetic clips or hooks to hang lights.
If running wiring, also buy plastic cable clips or hooks to neatly run the cords along the fence top and bottom. Outdoor-rated zip ties also work for attaching cords.
Planning the Layout
Think about how you want the lighting arranged before installing. Here are some layout tips:
- Space string lights evenly for a continuous glow.
- Alternate spotlight heights and directions for variety.
- Highlight architectural elements like posts with post cap lights.
- Outline the top or bottom of the fence with rope lighting.
- Group uplights together at intervals to light up plants.
- Aim some lights up and some down for multidirectional lighting.
- Light up both sides of the fence for double the glow.
Make a simple sketch or mark locations with tape to plan out your lighting layout. This will make installing go smoothly.
Choosing a Power Source
Outdoor lighting requires an exterior-rated power connection. Here are some options:
- Outdoor receptacle – Hardwire lights to connect to an outdoor outlet.
- Low voltage transformer – These convert high voltage to 12V for safety.
- Solar panel – Solar lights store power from the sun in built-in batteries.
- Battery pack – LEDs can run on battery packs for portable power.
- Extension cord – Use an outdoor-rated cord to run lights to an outlet.
For most permanent installations, connecting to an outdoor receptacle or using a low voltage transformer are the best options. Place your power source on the side of the fence you’ll access lights from.
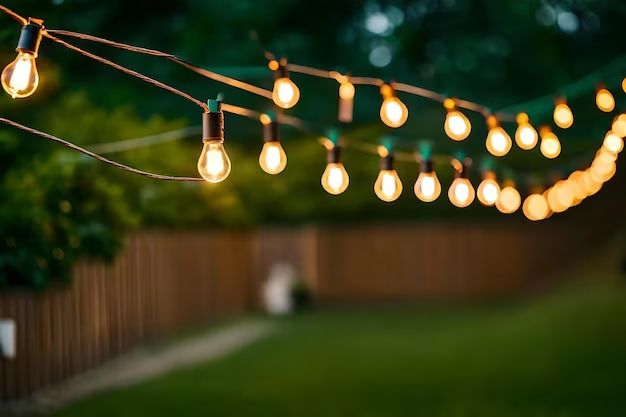
Installing String Lights
Follow these steps to install string lights on a fence:
- Plan your light spacing. Common spacing is 12-18 inches between bulbs.
- Mark the screw, clip, or tie locations with tape based on your plan.
- Drill pilot holes for screws in wood fences to prevent cracking.
- Attach clips, hooks, or ties to the fence at the marked locations.
- Unroll the string light strand and attach the base to the fence with screws, zip ties, or magnetic clips as applicable.
- Working from the base, loosely clip each bulb socket in place in sequence down the fence.
- After attaching the whole strand, go back and firmly tighten all clips.
- Plug in the lights to test. Make any adjustments needed.
For extra hold, attach a second clip on the opposite side of each bulb socket. This prevents the weight of the bulbs from dragging the lights down over time.
Installing Individual Spotlights
Follow these steps to install individual spotlights on a fence:
- Decide on spotlight spacing based on the illumination pattern you want.
- Mark the screw or clip placement points with tape.
- Drill pilot holes if screwing into wood.
- Screw or clip each light base in place using your marks for consistent spacing.
- Angle the spotlights to point in the desired directions. Tighten any adjustment joints.
- Attach any front shields or lenses if the fixtures have them.
- Run wiring neatly between lights using clips or ties.
- Connect to power and turn on lights to test.
Aim lights at trees, architectural elements, or other focal points in the yard. Angle them up or down to vary the lighting effects.
Attaching Rope and Post Lights
Rope lights and post cap lights involve wrapping the fixtures themselves around the fence. Follow these tips:
- To install rope lights, start at the base and neatly wrap the flexible rope around pickets, posts, or wire fencing.
- Avoid kinks and bends smaller than the light’s minimum bending radius.
- Use plastic cable ties to affix rope lights every 12-18 inches.
- For post lights, fit the cap over the top of each fence post and tighten any fastening screws.
- Wrap any excess cord around the post beneath the light.
- Use outdoor-rated caulk or sealant to seal any gaps around the post cap edges.
- Make sure post caps are snug but avoid cracking the posts by overtightening.
Proper alignment and consistent spacing will ensure post caps and rope lights look neat and orderly when lit.
Installing Uplighting
Uplights work best placed on the ground and aimed up at the fence from below. Here are some tips:
- Space uplights 2-3 feet apart for continuous lighting.
- Dig small trenches to bury any low voltage wiring between uplights.
- If using receptacle power, ensure cords are rated for outdoor wet locations.
- Place each uplight on a sturdy outdoor base like a plastic deck block or metal stake.
- Angle the light heads upwards towards the bottom of the fence.
- Run lighting tests at night and adjust angles and heights as needed.
Aim uplights to graze the fence for a subtle glow. Pointing them upwards into trees also creates nice effects.
Running and Securing Wires
Follow these tips for neatly running lighting wires:
- Use exterior-rated extension cords for all outdoor wiring.
- Only run low voltage landscape wiring underground.
- Clip cords to fence tops and bottoms using UV-resistant zip ties or clips.
- Wrap excess wire lengths around fence posts and use zip ties to secure.
- For low voltage systems, staple smaller gauge wire to posts or attach with cable ties.
- Keep wires clear of soil and sprinkler spray to avoid damage.
- Seal any drilled wire holes into posts using caulk to keep moisture out.
Proper wire management will keep your lights looking neat and professional.
Adding Decorative Touches
Beyond just illumination, you can use lights to decorate your fence. Try these fun ideas:
- Wrap string lights intertwined with artificial vines or greenery for a festive look.
- Outlight decorative elements like trellises or arbors attached to the fence.
- Attach colored lenses over spotlights to make colorful effects on the fence or ground.
- Hang lanterns, paper globes, or glass jars along the lights for added decoration.
- Paint or stain your fence a color that complements the lighting.
- Use lighting to highlight yard art, garden features, or water fixtures placed by the fence.
Get creative with the lighting design to fully decorate and transform your fence.
Maintaining Fence Lights
Follow these tips to keep your fence lights looking their best:
- Check lights periodically for burned out bulbs and replace as needed.
- Wipe down fixtures with a damp cloth to remove dirt and grime.
- Adjust any sagging or crooked lights to keep them evenly positioned.
- Check for chipped paint around screws or mounting holes and touch up as needed.
- Make sure wire connections are secure and corrosion-free.
- Clean solar panels and lenses periodically to maximize light output.
- Test lights every season to ensure all circuits are working properly.
With regular maintenance, your fence lighting should provide years of performance and enjoyment.
Safety Tips
Keep these safety tips in mind when installing fence lights:
- Turn off power at the breaker before wiring lights to avoid shock.
- Use GFCI-protected receptacles or circuits for all outdoor electrical.
- Make sure all wiring connections are sealed against moisture.
- Don’t overload extension cords with too many lights.
- Keep all low voltage wiring at least 6-8 inches below ground level.
- Direct lights away from windows, streets, or anything that could cause glare.
- Don’t look directly into LED lights to avoid damage to eyes.
- Use fiberglass ladders and insulated tools for any electrical work.
Observe all local electrical codes for outdoor lighting installations.
Conclusion
Installing lights on a fence is an easy DIY project that can completely transform your outdoor space. With the right materials and safety precautions, you can successfully illuminate a wood, vinyl, chain link, or other fence type. Make sure to plan out your lighting layout and power source ahead of time. Use sturdy mounting hardware suited for your fence that will withstand the weather. With creativity and attention to detail, your newly lit fence will provide both decoration and functionality to your yard.