Installing corner beads is an important step when doing drywall finishing work. Corner beads provide clean, crisp 90 degree angles at wall intersections and openings. Using paper faced metal corner beads is a common method for achieving professional looking corners. Attaching paper faced corner beads properly takes some technique, but can be mastered with a few simple steps.
Page Contents
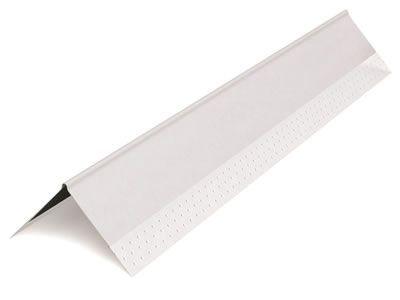
What are Paper Faced Corner Beads?
Paper faced metal corner beads are thin galvanized metal or plastic corner beads that have paper laminated to the flanges. The paper facing serves two purposes:
- It provides a surface for the joint compound to adhere to.
- It prevents the metal corner from showing through the finished drywall surface.
Paper faced corner beads come in plastic and metal varieties. Plastic corner beads are more flexible and damage resistant. Metal paper faced corner beads provide more structure and hold up better under impact. Both work well when installed correctly.
The paper flange section is perforated so fasteners can be driven through the flanges into the wall framing or substrate behind. This secures the corner beads in place.
Benefits of Using Paper Faced Corner Beads
There are several benefits to using paper faced metal corner beads rather than uncoated metal corner beads:
- The paper surface allows for better adhesion of joint compound.
- It covers the corner framework completely, preventing shadowing of the metal corner through the drywall.
- Paper faced beads are easier to finish and feather out for a seamless look.
- They provide durable and straight 90 degree drywall corners.
- Paper faced corner beads come in different styles for various applications.
The paper finish results in professional looking corners that blend in seamlessly with the surrounding drywall. This gives walls, ceilings, and finishes a clean finished appearance.
Supplies Needed
Installing paper faced corner beads will require the following supplies:
- Paper faced metal corner beads. Make sure to get beads long enough to span the wall lengths.
- Drywall screws, 1 5/8″ length, bugle head.
- Power drill with Phillips head bit.
- Utility knife or tin snips.
- Drywall hammer.
- Joint compound.
- Joint compound pan and taping knives.
- Sandpaper.
The screw size may vary depending on the thickness of the drywall layers and substrate material. Bugle head screws are best as they sit flush with the corner bead surface.
Preparation
Proper preparation is key to achieving good results:
- Inspect corners and ensure framing and drywall are solidly in place. Repair any issues.
- Check that corner framing is plumb and square. Shims may be needed to correct corner alignment.
- Cut pieces of paper faced corner beads to length using a utility knife or snips. Each piece should be 1/2″ longer than the wall height.
- Pre-drill screw holes through the flanges spaced 8″-12″ apart and at least 1/2″ from the ends.
Having screws spaced evenly and pre-drilled will make fastening the corner beads much easier. Now you’re ready to attach the beads.
Installation Steps
Follow these steps to properly install paper faced corner beads:
- Apply a thin layer of joint compound to the corner area where the bead will be mounted using a 3″ taping knife. This fills any gaps and improves adhesion.
- Press the corner bead flanges firmly into place so the nose is centered on the corner. The paper flange should abut the drywall evenly on both sides.
- Drive drywall screws through the pre-drilled holes into the framing or substrate, spacing them 8″-12″ apart. Ensure screws seat flush with the paper surface and do not strip out.
- Use a drywall hammer to lightly tap the flanges flat against the wall surface. Look for any pops or gaps behind the paper and correct as needed.
- Apply a layer of joint compound over the flanges on both sides, extending it 2-3 inches wide. Feather the edges and let dry completely.
- Apply a second thin coat of joint compound over the first layer, feathering it out another 2 inches. Let dry thoroughly.
- Lightly sand any ridges or tool marks to achieve a smooth corner. Be careful not to scuff the paper surface.
- Finish by applying drywall primer and paint. This seals and provides a uniform surface color.
Take care to not damage the paper surface at any point during installation and finishing. Screws should seat flush and hammer taps should be light. The joint compound layers should be smoothly feathered out from the center to prevent cracking.
Tips for Proper Installation
Here are some helpful tips to get great results from your paper faced corner beads:
- Cut beads slightly longer than needed. Having an extra 1/2″ at the ends allows for adjustment.
- Use a fast setting joint compound for the first layer to allow quicker drying time.
- Stagger the placement of the screw holes slightly between flanges to prevent bulges.
- Drive screws slowly and stop immediately if any spinout or stripping occurs.
- Apply the thinnest possible layer that fully covers the flange with each coat.
- Inspect finished corners for cracks and missed spots, repair as needed before painting.
Properly installing paper faced corner beads takes attention to detail, patience, and practice. But it is a skill worth learning to achieve flawlesslooking drywall corners.
Troubleshooting Common Problems
Here are some common problems that occur with paper faced corner beads and how to fix them:
Popped Screws
This happens when screws are driven too aggressively or hit framing imperfections. Remove any popped screw heads and reseat new screws about 1” over. Fill popped holes with joint compound.
Paper Tears
This occurs if flanges get bent too sharply or hammered too hard. Smooth any tears and fill the gap behind it with joint compound before applying finish coats.
Gaps Behind Paper
Gap show up as shadows along the edges. Fill any gaps with joint compound and feather it out onto the flange 2-3 inches to prevent this.
Cracked Joint Compound
Cracking results from not properly feathering out each coat, setting too quickly, or applying too thick. Prevent cracks by feathering thin coats 2-3 inches beyond flange.
Flanges Not Adhered Tight
Make sure to press flanges firmly to the wall and fill any popped gaps with compound to ensure proper adhesion along entire surface behind the paper.
Conclusion
Attaching paper faced corner beads takes attention to detail but provides superior, seamless looking drywall corners. Preparing corners properly, pre-drilling holes, driving screws correctly, applying thin feathered coats of compound, and proper drying are key to success. With practice and care taken at each step, you can achieve professional looking results. Crisp, clean corner beads will give your drywall project a finished look.
Summary of Steps
- Inspect corner framing and drywall substrate
- Cut paper faced corner beads to length
- Pre-drill screw holes
- Apply thin layer of compound to corner
- Press corner bead into place
- Drive screws through flanges 8-12 inches apart
- Tap flanges lightly with drywall hammer
- Apply first feathered layer of compound over flanges
- Apply second thin, feathered coat of compound after first coat dries
- Lightly sand ridges and tool marks
- Prime and paint
Following these steps carefully will result in perfectly installed paper faced corner beads and crisp, clean looking corners.