Dog gates are a great way to keep your furry friends safe while allowing them the freedom to enjoy your deck. Building a custom dog gate for your deck is an easy DIY project that can be customized to perfectly fit your space.
In this article, we will walk through the entire process step-by-step, covering planning and design, materials and tools needed, construction, installation, and tips for modifications. We will also provide answers to common questions about building deck dog gates.
Whether you want to keep your pup contained while you’re entertaining, prevent access to unsafe areas, or just give them their own play zone, a deck dog gate is a must-have addition for any dog owner. Let’s get started!
Page Contents
- 1 Planning and Design
- 2 Constructing the Gate Frame
- 3 Applying the Gate Material
- 4 Installing the Gate
- 5 Finishing Touches
- 6 Tips for Modifications
- 7 FAQs
- 7.1 How much weight can a deck hold for a dog gate?
- 7.2 What height should a deck dog gate be?
- 7.3 How do you secure a dog gate to a deck?
- 7.4 What kind of latch should I use on a deck dog gate?
- 7.5 Should deck dog gates have spacing between boards?
- 7.6 How much does it cost to build a deck gate for dogs?
- 8 Conclusion
Planning and Design
The first step when taking on any DIY project is proper planning and design. This will ensure you end up with a functional, customized dog gate that meets your needs. Here are some key factors to consider:
Measure Your Deck
You’ll need accurate measurements of your deck space to determine the appropriate size and placement for the gate. Measure the full width and depth of the deck where you plan to install the gate. Make sure to account for any railings, stairs, or built-in benches when taking measurements.
Gate Placement
Consider where you want the gate positioned on your deck. Do you want to block off a section for your pup to play? Prevent access to stairs? Or gate the entire deck? Measure and mark the exact spot you want the gate installed.
Also factor in which direction the gate will swing when opened so it doesn’t collide with other objects like potted plants.
Gate Size and Type
Now that you know where the gate will go, the next key decision is what size gate you need. Measure the width of the opening where you’ll be installing the gate. For ease of use, you generally want a gate that is a minimum of one foot wider than the opening. A 30-36 inch wide single gate is suitable for most deck openings.
You’ll also want to decide on a gate style. Some common options include:
- Single swing gate – Hinges on one side to open and close
- Double gates – Two gates that meet in the middle and swing in opposite directions
- Lift out gate – Removes completely by lifting up and out of brackets
The style you choose depends on your specific space and needs. Just make sure any hinges and latches are sturdy and secure.
Materials
Wood and metal are common materials used to build deck dog gates. Consider which complements your deck best. Some popular options include:
- Cedar – Provides a natural look that resists rotting
- Redwood – Also ages nicely outside and is insect resistant
- Composite wood – Won’t rot, warp, or splinter
- Aluminum – Lightweight and rust resistant
- Steel – Sturdy and weather-resistant
Make sure any wood you choose is rated for outdoor use. Cedar and redwood do not require additional waterproofing or stain. Also factor in the cost of materials for your budget.
Tools and Hardware
Building a deck dog gate is mostly straightforward carpentry. You’ll need basic tools like:
- Circular or miter saw
- Power drill/driver
- Carpenter’s square
- Measuring tape
- Wood glue
- Sandpaper
- Safety glasses and gloves
For hardware, you may need:
- Gate hinges
- Latch and gate handle
- Stainless steel screws
- Bolts and washers
Purchase hardware that is rated for outdoor use so it won’t corrode. Stainless steel and galvanized steel are good options.
Constructing the Gate Frame
Once your design is mapped out, it’s time to start construction. We’ll go over the key steps to build the basic gate frame:
Cut the Wood Pieces
Use your measurements to cut the wood for the gate frame with a miter or circular saw. You’ll need two vertical posts cut to the height of your deck railing. Then cut horizontal crosspieces that are 1-2 inches shorter than the width of your planned gate to allow room along the edges.
Join the Frame
Arrange the cut wood pieces on a flat surface. Align the posts and crosspieces into a rectangular gate frame. Use wood glue and screws to secure the joints, making sure the frame is square. Clamp pieces together while fastening for best results.
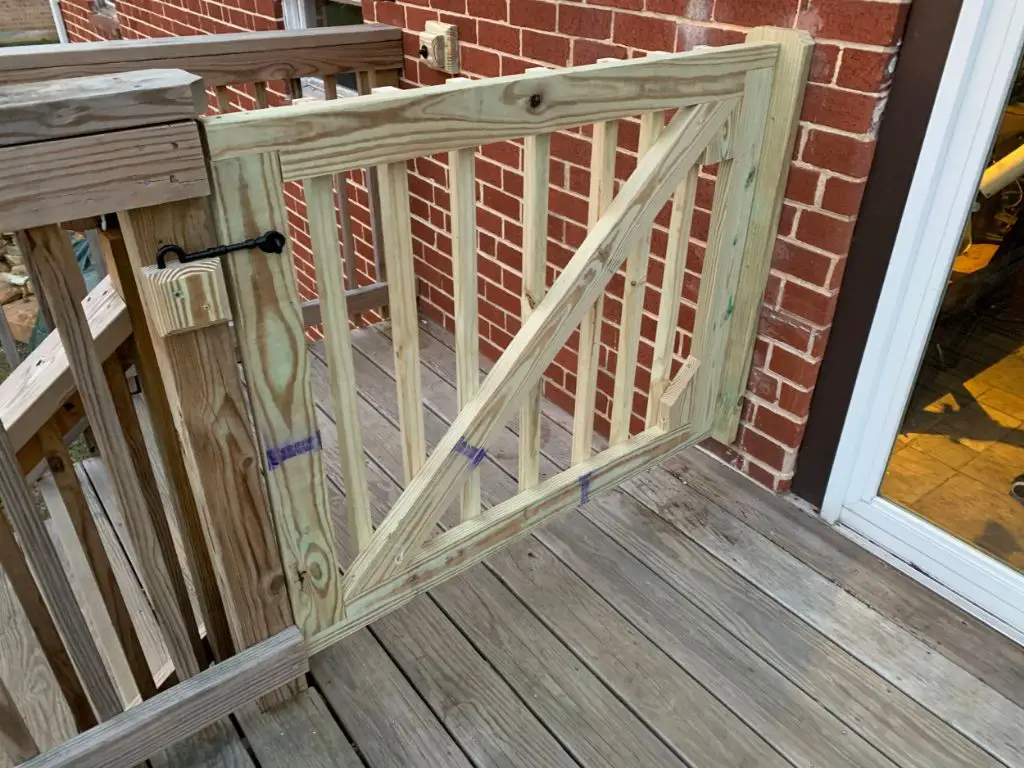
Add Diagonal Braces
For maximum strength and durability, cut and install angled brace boards on the back of the gate frame from corner to corner. Glue and screw these diagonal supports in place.
Hang the Gate
Install heavy duty gate hinges on one post of the gate frame using the provided screws. Position the hinges about 6-12 inches from the top and bottom. Then mount the other post to your deck with hinges.
Add Latch and Handle
To keep the gate closed, install a sturdy gate latch on the front side of the free-swinging post, lined up with the catch on the fixed post. A gate handle on the other side completes the gate frame.
Applying the Gate Material
Now that you have a structurally sound gate frame built, the next step is applying the material that fills in the frame. Here are some great options:
Wood Boards
Spaced out vertically, horizontally, or diagonally, wood boards make a nice natural-looking gate. Use exterior-rated boards in cedar, redwood, or composite. Cut them to fit between posts, leaving small gaps for drainage.
Welded Wire Fencing
For a see-through look, cut panels of galvanized welded wire fencing to attach to the back of the frame. Use sturdy zip ties or metal clips to secure the mesh fencing.
Metal Bars
Iron or aluminum bars spaced a few inches apart create a modern industrial vibe. Cut metal rods to size and use brackets to screw them into the gate frame.
Wood Lattice
For a decorative touch, cut sections of wooden lattice in your desired size and attach them to the gate frame backing for an airy, open feel.
Whatever material you choose, make sure it is weather resistant and installed securely to withstand your pup’s paws!
Installing the Gate
You’re ready to mount your completed gate onto the deck. Follow these tips for proper installation:
Attach Gate Stops
Gate stops on the deck surface prevent the gate from swinging too far in either direction. Install them approximately 12 inches from the posts where gate hinges will mount.
Mark Hinge Positions
Measure and mark where you’ll attach the gate hinges to your deck frame or railing post. Make sure they align with the hinges on the gate itself.
Mount the Gate
Using your marks, screw the gate hinges into place on the deck. Lift the gate into position and attach to the hinges. Test opening and closing to make sure it swings freely without resistance.
Test Latch and Stops
Latch the gate and ensure the mechanism aligns and engages correctly. Then fully open the gate in each direction to confirm the stops prevent over-swinging.
Seal the Hinges
Protect hinges from water and rust by applying silicone sealant around the edges. Let this dry fully before allowing your pup onto the deck.
Finishing Touches
Add some final touches to complete your DIY deck dog gate installation:
Weatherproofing
Use exterior wood sealant or stain if desired to protect wood gates from sun and rain. Allow any finishes to fully cure before use.
Add Safety Signs
On latch side of gate, attach a “Caution: Close Gate” sign as a friendly reminder for humans. And add “No Jumping” signs for your pup!
Protective Bumpers
Affix soft foam bumpers on vertical posts to cushion your dog from impact if they leap against the gate. Protect their snouts!
Fun Add-Ons
Personalize with your pup’s name, attach storage bins for toys, or string up a wind chime for a homey touch!
Tips for Modifications
Customizing your deck dog gate is easy. Here are ideas for modifications:
Change the Size
Extend gate width by replacing crosspieces with longer boards. Or increase height by swapping vertical posts for taller ones.
Add a Pet Door
Install a built-in dog door so your furry friend has their own private entrance. Choose plastic or aluminum flap doors.
Try Double Gates
For wider openings, build two gates that latch in the middle. Add gate stops on deck for each one.
Build a Half-Wall Section
Frame in the lower portion to block pets while keeping the upper half open for light and views.
Change the Material
Replace WOOD boards with metal rods or wire fencing for a new look. Or swap in polycarbonate panels.
FAQs
Let’s answer some frequently asked questions about building deck dog gates:
How much weight can a deck hold for a dog gate?
Most residential deck frames can safely support a gate up to 50 lbs without issue. Heavier metal gates may require adding supportive blocking underneath to spread out the load.
What height should a deck dog gate be?
Deck gates typically match the deck railing height of 36-42 inches. Make sure it’s high enough to contain your dog’s breed. For short or elderly dogs, 30 inches could work.
How do you secure a dog gate to a deck?
Use sturdy gate hinges rated for outdoor use to hang the gate from deck framing or posts. Follow with weather-resistant screws and water-tight silicone around edges.
What kind of latch should I use on a deck dog gate?
Look for latches made specifically for gates that have a catch plate to line up with. Spring or magnetic latches work well. Ensure it’seasy for humans to operate but secure against dog paws.
Should deck dog gates have spacing between boards?
It’s smart to leave 1-2 inch gaps between vertical or horizontal boards for drainage. This prevents rainwater from pooling on the gate and deteriorating the wood.
How much does it cost to build a deck gate for dogs?
A DIY deck dog gate costs $50-$150 on average for materials when using basic pine or cedar boards. Prefab metal gates cost $200+. Custom wood gates are $400-$800 installed.
Conclusion
Installing a deck dog gate is a fun weekend project for any pet owner and a great way to safely contain your furry friends. With proper planning and construction, you can build a custom gate tailored exactly to your space. Use weather-resistant and durable materials to create a gate that blends beautifully with your deck while keeping your pets secure.
Be sure to measure carefully, assemble a sturdy frame, and install outdoor-rated hardware. Add your choice of fencing material to match your style. Include safety extras like bumpers and signs to complete your project. Your pup will adore having their own gated play area on your deck! With these tips, you are ready to start building.