An A frame is a simple and popular design for a swing set that provides a lot of play value without taking up too much space. With two A frames and a swing seat suspended between them, kids can enjoy hours of swinging fun. Building your own A frame for a swing is a straightforward DIY woodworking project that can be customized to fit your space.
Page Contents
What You’ll Need
To build an A frame swing, you will need the following materials:
- 4 wood boards – Typically 2×4 or 2×6 lumber is used, in 8 ft lengths
- Wood screws – 3-4″ exterior screws, qty depends on size/number of boards
- Power drill and drill bits
- Saw – Circular saw, jig saw or hand saw
- Sandpaper – Optional, for smoothing cut edges
- Exterior wood stain/sealer – Optional
- Tape measure
- Carpenter’s square
- Swing set brackets and hardware
- Rope, cable or chain – For suspending the swing
- Swing seat or glider
Pressure treated lumber is ideal for outdoor A frame swings, as it will resist rotting and insect damage. Cedar and redwood are other good options. For added longevity, choose galvanized steel swing hangers and hardware.
A Frame Swing Dimensions
Standard dimensions for DIY A frame swings are:
- Height – 6 to 8 feet tall at peak
- Width – 4 to 5 feet wide at base
- Leg angle – Roughly 45 degrees
- Swing height – Adjustable, typically 12″ to 18″ below peak
The exact measurements can vary based on your space and preferences. Taller A frames allow for more swinging area, but require longer boards. Wider bases provide more stability.
How to Build the A Frame
Follow these steps for constructing a basic DIY A frame swing:
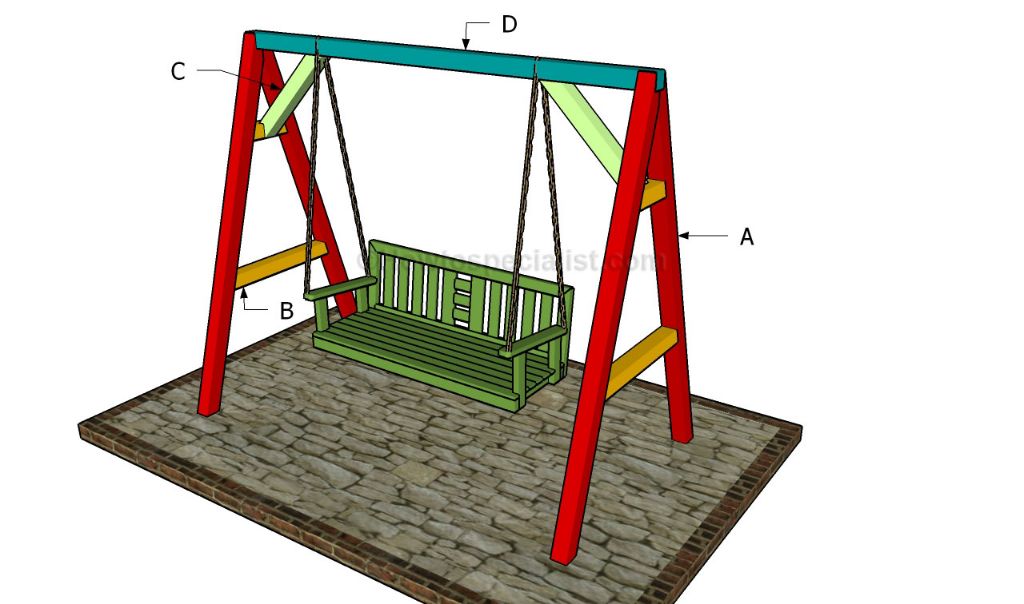
- Cut side boards – Cut two boards to the desired height, such as 6 or 8 feet long. These will form the legs.
- Cut crossboards – Cut two boards to the desired width, such as 4 feet long. These will connect the legs.
- Mark leg angles on side boards – Lay the side boards on the ground in parallel, overlapping the ends. Prop one end up at the desired angle, such as 45 degrees. Use a carpenter’s square to mark the angle cut across each board. Allow for a few extra inches to attach the crossboards.
- Cut leg angles – Use a circular saw or handsaw to cut along the angle lines marked on each side board. Smooth any rough edges with sandpaper.
- Assemble A frame – Lay the legs flat on the ground with angle cuts facing up and overlap the ends again. Center the crossboards across the ends, perpendicular to the legs. Attach using several 3-4″ wood screws driven through the crossboards into the legs. Flip over the A frame.
- Attach swing hangers – Position swing hanger brackets evenly spaced along the peak crossboard, aligned with where you want the swing to hang. Follow manufacturer instructions to securely bolt the hangers in place.
- Add swing rope/chain – Run your length of rope, cable or chain through the end holes in the swing hangers. Use clasps or knots to securely connect the ends.
- Hang swing seat – Connect the swing seat or glider to the center of the rope/chain using provided hooks, clamps or rings. Adjust length to get the desired swing height.
- Secure A frame -Anchor the legs with stakes or concrete in the ground to prevent tipping over.
- Apply finish – Paint or stain the A frame swing if desired. Allow proper drying time before use.
Always check that the A frame feels sturdy and swing hardware is tightened properly before use. Periodically inspect for wear or loose fasteners, retightening or replacing as needed.
A Frame Swing Variations
There are many ways to modify the basic A frame swing design:
- Size – Adjust height and width measurements to fit your space or activities. Go taller for more thrill or shorter for younger kids.
- Board size – Use larger 3-4″ thick boards for a chunkier look. Or use multiple 2x boards stacked together for each leg.
- Board quantity – Add side or diagonal bracing between the legs with 1-2 extra boards for a sturdier frame.
- Leg spreaders – Connect the bottoms of the A frame legs with an additional board to spread them farther apart for more stability.
- Swing hangers – Use heavy duty swing hangers rated for adults if older kids or adults will be users.
- Swing type – Replace a regular swing with a porch swing, glider swing, or multi-child swing for more options.
- Roof – Attach a triangular shade roof across the top for shade.
Tips for Building an A Frame Swing
Follow these tips to help your DIY A frame swing project go smoothly and safely:
- Select weather resistant lumber rated for outdoor use.
- Pre-drill holes for screws to prevent splitting boards.
- Use 3-4 screws per crossboard connection for maximum strength.
- Check corners for squareness as you assemble the A frame.
- Make sure swing hangers are installed in the center and spaced evenly.
- Add diagonal bracing between legs for extra stability.
- Anchor legs securely in concrete for permanent installs.
- Consider safety surfacing like mulch or mats under the swing area.
- Supervise children and limit the number of users at one time.
- Inspect hardware and wood periodically for deterioration.
Conclusion
With just a few boards and some swing hardware, you can make your own DIY A frame in a weekend for hours of swinging enjoyment. Customize the measurements and features to perfectly suit your backyard. And take advantage of pressure treated lumber plus protective finishing to extend the play life of your swing for years to come. Just follow safe building practices and provide adequate supervision for a fun and safe swing set the whole family will love.