Cutting perfect circles in tile can seem daunting, but with the right tools and techniques, it’s easier than you think. Whether you’re installing a mosaic backsplash, creating decorative accents, or setting tile around pipes and fixtures, clean circular cuts are essential for a professional-looking finish.
Page Contents
- 1 What You’ll Need
- 2 Step 1: Mark the Circle on the Tile
- 3 Step 2: Score the Tile
- 4 Step 3: Use the Wet Saw to Cut the Circle
- 5 Step 4: Snap Off the Waste Pieces
- 6 Step 5: Smooth and Clean the Cut Edge
- 7 Professional Tips for Cutting Tile Circles
- 8 Cutting Circles in Different Tile Materials
- 9 Cutting Holes and Notches in Tile
- 10 Conclusion
What You’ll Need
To cut circles in tile, you’ll need:
- Tile nippers – Handheld pliers-like tool for snapping off small pieces of tile.
- Wet saw – Power tool with a diamond blade for precise tile cutting. Ensure it has a sliding table for angled cuts.
- Tile – Ceramic, porcelain, glass, or natural stone. Check the material specs for cutability.
- Circle cutter guide – Plastic template that attaches to the tile saw for perfect circles.
- Marker – To draw the circle on the tile before cutting.
- Safety gear – Gloves, goggles, ear protection, etc.
Step 1: Mark the Circle on the Tile
The first step is using a marker to draw the circle on the tile where you want to make the cut. Here are some tips for marking perfect circles:
- Use a compass with an adjustment wheel to control the radius. Measure carefully to get the circle size exactly right.
- For large circles, tie a marker to a string. Keeping the string taut, use a nail or pen in the center as an anchor while drawing the arc.
- Trace a can, bucket, or other circular object. Outline the shape with a marker.
- Print and cut out a circle template if you need multiple identical cuts.
Take your time marking the circle so it is perfectly round and the proper size. This will ensure the finished cut is accurate. Don’t forget to account for the width of the blade during marking so the circle doesn’t end up too small after cutting.
Step 2: Score the Tile
Once your circle is marked, it’s time to start cutting. First, you’ll want to score the tile along the circle line. This is done using your tile nippers. Here’s how to score the tile properly:
- Adjust the nipper jaws so they are just wider than the tile’s thickness.
- Position the nippers along the edge of the circle mark you drew.
- Gently squeeze the handles to apply pressure and create a score line in the tile surface.
- Keep the nibblers perpendicular to the tile so the score line is straight.
- Work slowly and carefully around the entire marked circle to score all the way around.
Scoring creates a weakened line in the glaze so the tile is easier to snap. Be sure to score on the waste side of the line so the mark gets removed during cutting. Don’t score too deeply, as this can cause the tile to crack prematurely.
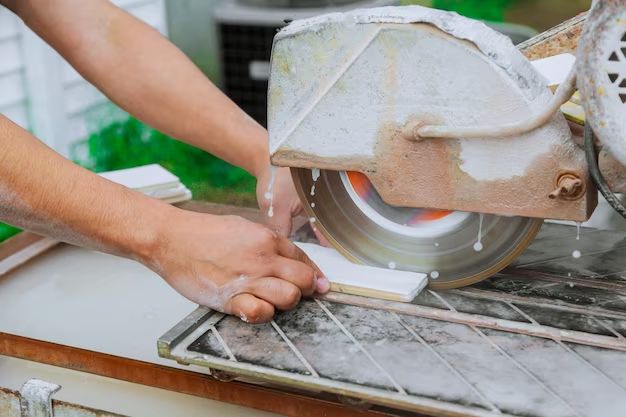
Step 3: Use the Wet Saw to Cut the Circle
With your circle scored, you’re ready to use the wet saw. This power tool with a diamond blade will give you a precise, clean cut. Follow these steps when wet saw cutting circles:
- Fill the saw reservoir with water.
- Attach the circle cutter guide if you have one. Typically these clamp onto the saw table.
- Adjust the blade depth so it extends just below the tile thickness.
- Optional: Run a test piece first to check blade depth.
- Turn on saw and allow blade to reach full speed.
- Align your marked tile over the blade, using the cutter guide edges as a reference.
- Slowly feed the tile through the blade path to cut the circle.
- Take your time, keeping the tile properly aligned as you cut.
- Turn off saw when finished and allow blade to stop spinning.
The wet saw makes it easy to accurately follow your marked cutting line. Let the tool do the work by feeding the tile slowly. Rushing increases the chance of slips and errors.
Step 4: Snap Off the Waste Pieces
After wet sawing, it’s time to snap off the waste portions of the tile with your tile nippers. Here are some tips:
- Start by removing larger fragments, working toward the center.
- Position the nippers right over the scored line for each piece removed.
- Hold the tile firmly and snap pieces off with a light squeeze and twist.
- Work carefully near the circle edge so pieces don’t chip off.
- Smooth any rough spots by slanting the nippers and lightly biting small fragments.
Take your time removing the waste pieces. Rushing increases the likelihood of cracks and chips, ruining your cut. If needed, score lines again to make snapping easier.
Step 5: Smooth and Clean the Cut Edge
For a perfect polished edge, you’ll need to smooth and clean up your tile after cutting. Here are some recommendations:
- Use a rubbing stone or emery board to smooth any slight chipping on the cut edge.
- Carefully file down and round over any sharp points left from snapping off fragments.
- Rub a specialty gritty rubber tile file along the edges to remove debris and smooth.
- Clean your tile with water and a scrub brush or sponge to remove cutting dust and residue.
- Inspect the circle cut from all angles looking for any imperfections that need touch up.
Take your time with edge finishing for the cleanest look. For cuts that will be grouted, edge perfection is less critical since grout will fill and hide minor chips or scratches.
Professional Tips for Cutting Tile Circles
With practice you can become adept at perfectly cutting circles in tile. Here are some additional pro tips:
- Go slowly when scoring and cutting to prevent slips, chips, and cracks.
- Keep your wet saw blade sharp for maximum precision.
- Use a handled circle cutter guide for best results over bare templates.
- Cut curves in multiple passes, lowering the blade between each pass.
- For mosaic sheets, score and snip individual tiles before removing paper.
- Invest in quality tile tools. Cheap nippers and blades cause frustrating breaks.
And most importantly, take your time and don’t rush the process. Precision cutting requires patience and care. With the right techniques, you can achieve perfect circular cuts in tile every time.
Cutting Circles in Different Tile Materials
The techniques for circular tile cutting generally apply across various tile types:
Porcelain and Ceramic
Standard glazed wall and floor tiles are relatively easy to cut using the wet saw and nipper method. The trick is to score porcelain tiles before cutting, as they can chip without this step.
Glass
Glass mosaic tiles require sharp nippers and light scoring. Use a fine blade on the wet saw. Support the tile sheet during cutting to prevent cracking pieces.
Natural Stone
Softer stones like marble and travertine need a well-lubricated saw to avoid burning the edges. Scoring should be very light. Chipping is common, so allow extra material.
Metal
Metal tiles can be cut with a dry saw using special blades. Annealed metals require minimal feed force. Support the pieces near the blade during cutting.
Cutting Holes and Notches in Tile
In addition to full circles, it’s also possible to cut partial shapes like holes and notches by modifying the technique:
- For a hole, mark the center point and then align the cutter guide inside the circle mark.
- Cut an inner circle to create the desired size hole.
- For a notch, tape tiles together and mark the angle and depth required.
- Slowly feed into the blade at an angle to cut the notch shape.
Test on scrap pieces first when learning partial shape cuts. And take your time, keeping the tile properly aligned as you feed it through the blade.
Conclusion
Cutting clean, precise circles in tile is very achievable with some practice. Having the right tile saw, cutter guide, and nibbling tools makes the process much easier. Remember to mark circles carefully, score tiles before cutting, snap off waste slowly, and take time smoothing the edges. With the right techniques, you can install beautiful circular tile accents on any project.