Having your trailer lights not work properly can be a frustrating and dangerous issue. Being able to quickly diagnose and fix the problem is important to keep you and other drivers safe on the road. There are a few key things to check when troubleshooting trailer lights that are not working.
Page Contents
- 1 Check That the Trailer Is Properly Connected
- 2 Inspect the Wires and Connections
- 3 Test for Voltage at the Trailer
- 4 Check the Trailer Light Ground
- 5 Inspect Trailer Light Assemblies
- 6 Test and Replace the Trailer Light Relay
- 7 Troubleshoot By Plugging Into Different Vehicle
- 8 Conclusion
- 9 Summary of Trailer Light Diagnosis Steps
- 10 Common Trailer Wiring Problems
- 11 Safety Issues With Trailer Lights Not Working
- 12 How To Prevent Future Trailer Light Problems
- 13 When To Call a Professional
- 14 Trailer Wiring Diagram
- 15 Trailer Wiring Repair Costs
Check That the Trailer Is Properly Connected
The first thing to check is that the trailer is properly connected to the tow vehicle. Make sure the trailer plug is fully inserted into the vehicle tow package wiring harness. Check that the clip or lock is engaged to secure the connection. Wiggle the connector to see if it feels loose. A loose connection can cause intermittent contacts resulting in flickering or non-working lights.
Visually inspect the plugs and sockets on both the trailer and vehicle for dirt, corrosion or damage that could be preventing a solid connection. Clean the contacts gently with electrical contact cleaner or fine sandpaper if dirty. Replace any damaged or badly corroded connectors.
Inspect the Wires and Connections
The next step is to inspect the actual wiring and connections. Check for loose, corroded or broken wires in the harness leading from the tow vehicle to the trailer plug. Wiggle the wires while the lights are on to see if making and breaking connections causes the lights to flicker.
Follow the wiring harness along its entire length on both the vehicle and trailer looking for possible problem areas. Pay particular attention to spots that undergo motion or vibration which can cause broken wires. Places to inspect closely include:
- Near hitch connections
- Under chassis mounting points
- Through grommets or pass-throughs
- At wheels or suspension components
Repair any corroded or loose connectors with electrical crimps or solder. Add dielectric grease to prevent future corrosion. Wrap wires with electrical tape if the insulation is damaged. Replace wires or sections of harness that are badly broken or damaged.
Test for Voltage at the Trailer
The next step in diagnosing trailer lights is to test for voltage at the trailer itself. This will tell you if power is making it from the tow vehicle to the lights. You’ll need a basic multimeter to perform these checks.
With the lights switched on, place the black probe on a ground such as the trailer frame. Touch the red probe to each of the contact pins at the rear of the trailer plug corresponding to the running lights, turn signals, and brake lights. You should measure approximately 12 volts at each pin.
If voltage is lower than 12 volts or non-existent, there is likely an issue with the wiring between the tow vehicle and trailer plugs. Recheck the harness for damage and the connections for corrosion or looseness.
Check the Trailer Light Ground
Trailer lights require a solid chassis ground in addition to the power feed from the tow vehicle. Use a multimeter to check that the ground pin has continuity by touching the probe to a metal grounding point on the trailer frame. You want the resistance to be as close to 0 ohms as possible.
Clean any dirt, rust or corrosion from the grounding mounting point to ensure a solid connection. Inspect the ground wire for damage and tighten any loose connections. Run a dedicated ground wire to a different spot on the frame if you’re still getting high resistance readings.
Inspect Trailer Light Assemblies
If voltage is present at the rear trailer plug but some or all lights still don’t work, the problem may be with the light assemblies themselves.
Remove the lenses or covers to gain access to the bulbs and wiring. Check for any moisture or water intrusion which can cause shorts and non-working lights. Look for broken wires or loose connectors inside the assembly housing. Wiggle the wires while watching the lights to reveal any breaks causing flickering.
While apart, test the light socket terminals for 12v power coming from the plug during operation. Swap bulbs between working and non-working lights to isolate bad bulbs or sockets. Ultimately, you may need to replace the entire lamp assembly if damage is found. Reinstall everything tightly to ensure good electrical connections.
Test and Replace the Trailer Light Relay
Many trailers use a relay near the plug to amplify the signals coming from the tow vehicle. This relay clicks on and off as you operate the turn signals and brakes. If you can hear this relay making noise but the lights don’t work, it may need replacement.
Use a multimeter to test for power at both the input and output sides of the relay. No power at the output side indicates a bad relay that needs replacement. Make sure to get an automotive grade relay matched for the trailer voltage. While replacing the relay, inspect the wiring in the box for any corrosion or damage.
Troubleshoot By Plugging Into Different Vehicle
One shortcut to diagnosing trailer light problems is to connect the trailer to a different tow vehicle. Hook it up to another truck, SUV, or even just run jumper wires to a car battery. If the lights now work, it points to an issue with the original tow vehicle wiring versus a problem with the trailer itself.
This can save you time chasing down issues on the trailer if the root cause is on the vehicle side. Before reconnecting to the original vehicle, re-check the plug, wiring harness, fuses, and any controller modules related to the lights.
Conclusion
Troubleshooting faulty trailer lights involves methodically working through each part of the system from the tow vehicle connection through the wiring and grounding to the light housings themselves. Using a few basic electrical tools along with visual inspection and wiggling components to recreate problems will help identify the root cause. With patience and care, you can diagnose and repair most trailer lighting issues.
Summary of Trailer Light Diagnosis Steps
Here is a quick summary of the steps covered to diagnose trailer lights that are not working properly:
- Check trailer plug and socket connection to vehicle
- Inspect wiring harness for damage
- Test for voltage at trailer plug pins
- Check trailer light ground connection
- Inspect individual light assemblies for issues
- Test or replace the trailer relay
- Plug trailer into different vehicle to test
Following these troubleshooting steps will help identify and fix most trailer lighting problems to get you safely back on the road. Be patient, take your time, and work methodically to ensure you catch the actual root cause versus just a symptom of a larger underlying issue.
Common Trailer Wiring Problems
While specific issues can vary widely, there are some typical problems that can cause trailer lights to malfunction. Being familiar with these can help speed up diagnosis and repair. Common causes include:
- Corroded plugs and sockets – Green crusty buildup on connections interrupting electrical current flow.
- Damaged wires and connectors – Cracks, fraying, pinches, and breaks in harness wires.
- Bad ground connection – Dirt, rust, and loose ground points resulting in intermittent contacts.
- Moisture intrusion – Water getting into light housings causing shorts.
- Blown trailer light fuse – An overloaded circuit blowing the fuse which protects the lights.
- Burned out bulbs – Old age or vibration causing bulbs to burn out.
- Faulty light relay – The relay clicking but not properly switching power on and off.
- Cross-wired circuits – Turn signals wired into brake lights causing crazy operation.
- Loose connections – Vibration rattling wires and connectors loose over time.
Paying attention to these common problems during diagnosis can help speed up pinpointing the issue.
Safety Issues With Trailer Lights Not Working
When trailer lights are not working properly, it creates serious safety issues both for you and other drivers. The most hazardous problems include:
- No Brake Lights – Greatly increased risk of rear-end collisions if lights don’t warn of you stopping.
- No Turn Signals – Other drivers won’t know you are turning or changing lanes.
- Lights Cutting Out – Intermittent connections cause sudden loss of critical lights while driving.
- Wrong Signal Operation – Cross-wired lights confusing other drivers and causing accidents.
- No Running Lights – Lack of trailer visibility at night and dusk making it dangerous.
It is critical to diagnose and repair any trailer lighting issues before hauling a trailer at highway speeds or in traffic. Take your trailer to a shop if you cannot resolve the problem yourself. Towing with malfunctioning lights puts yourself and others at risk.
How To Prevent Future Trailer Light Problems
While it may not help your current trailer light issues, taking preventative measures can help avoid problems down the road:
- Use dielectric grease on all electrical connections to prevent corrosion.
- Install mounting grommets and wire loom to reduce vibration issues.
- Seal any light housings to prevent moisture intrusion.
- Support wires to avoid sagging and pinching.
- Solder or heat shrink key wiring joints.
- Replace old bulbs and harness sections proactively.
Taking the time for preventive maintenance will help avoid many common trailer wiring problems. Check all lights before each trip and address any small issues before they leave you stranded on the road.
When To Call a Professional
Some trailer light issues may require taking your vehicle and trailer to an electrical repair shop if you can’t resolve them yourself. Common times to seek professional help include:
- Complete harness replacement or re-wiring needed.
- Electrical short or melted wires present a fire risk.
- Advanced testing like voltage drop is needed.
- The source of the problem is elusive after troubleshooting.
- Repairs require soldering or splicing into multiple circuits.
- Problem keeps returning quickly after fixing.
- Brake light switch or other vehicle-side issues.
Electrical problems can be tricky, especially when they involve both a tow vehicle and trailer. Seeking professional help can save hours of frustration and ensure all repairs are done correctly.
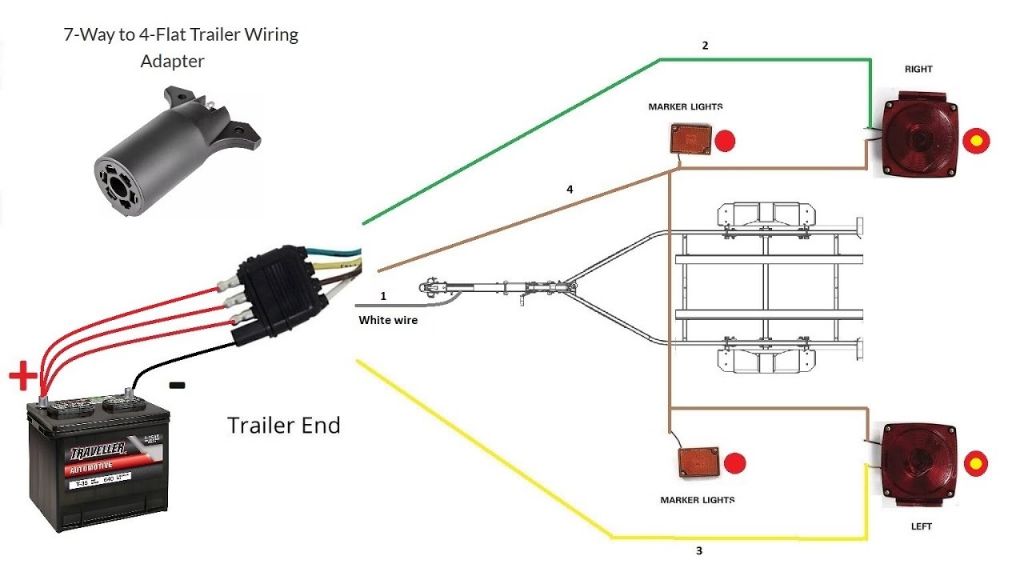
Trailer Wiring Diagram
A wiring diagram is invaluable when troubleshooting electrical problems. Having a reference that shows what each wire does and where it runs allows you to much more quickly pinpoint issues.
Here is a typical 4-wire flat trailer wiring diagram:
| Color | Function |
| White | Ground |
| Yellow | Left Turn / Brake / Tail |
| Green | Right Turn / Brake / Tail |
| Brown | Running Lights |
Many trailers follow this standard 4-wire scheme. However, older or more complex trailers may have a different wiring layout. Having the correct diagram for your specific trailer helps avoid errors during troubleshooting. Consult the trailer documentation for a wiring diagram or look up its year/make/model online.
Trailer Wiring Repair Costs
The cost to repair trailer wiring depends on the specific problem and repairs needed. Minor issues like a bad ground or broken wire can often be fixed for $50-$150 in labor. More complex issues requiring full re-wiring or shop diagnostic time can run $200-$800 or more.
Here are some typical trailer wiring repair costs:
| Service | Typical Cost |
| Fix loose ground | $50 |
| Replace corroded connector | $75 |
| Repair one broken wire | $100 |
| Replace wiring for 1 light | $125 |
| Install new wire harness | $350 |
| Re-wire entire trailer | $600 |
| Diagnose complex issue | $150/hr shop rate |
Keep in mind your actual repair costs may be higher or lower depending on your trailer type, labor rates, parts needed, and complexity of repairs. Troubleshooting issues yourself using the steps outlined here can help minimize repair costs.