Flashing is a critical component of exterior waterproofing for any structure. Flashing prevents water from getting behind siding, stucco, and other exterior finish materials and causing rot, mold, and structural damage. While flashing straight runs of siding is relatively straightforward, properly flashing outside corners can be more challenging. Outside corners are particularly vulnerable to water intrusion because they are exposed on two sides. In this article, we will walk through the step-by-step process for flashing an outside corner. Proper flashing installation takes time and care, but is essential for the long-term durability and weather-resistance of your home.
Page Contents
What is flashing?
Flashing is thin sheet material installed to prevent water entry and divert it away from vulnerable areas. Flashing is commonly made from galvanized steel, copper, aluminum, or various plastic composites. The main purposes of flashing are:
- Form a weatherproof barrier so water cannot get behind exterior cladding
- Provide a pathway for drainage so water is directed away from openings
- Allow water vapor to escape and prevent condensation buildup behind cladding
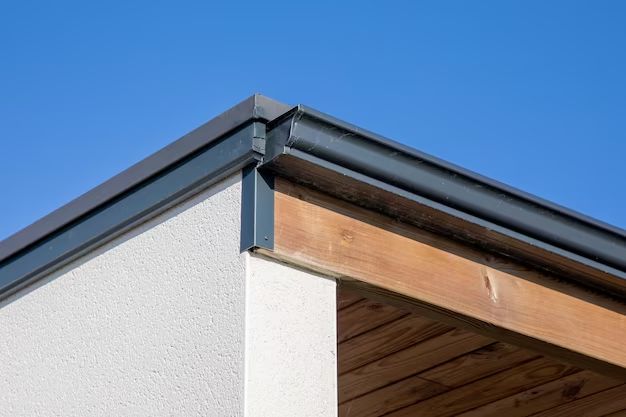
On outside corners, flashing serves the critical function of covering the seam where the two exterior wall surfaces meet. This seam is vulnerable to water intrusion without proper flashing.
Where is flashing needed on outside corners?
Flashing should be installed at any outside corner transition where two finished exterior surfaces meet in your home. Common locations where properly flashed outside corners are essential include:
- The transition between stucco walls and wood, vinyl, or fiber cement lap siding
- Where a porch or deck attaches to the exterior wall
- Columns, posts, or other architectural details at outside corners
- Chimneys, fireplaces, or other masonry elements transitioning to exterior walls
- Bay windows, bump outs, or other protrusions from the main exterior walls
Anywhere that water could potentially get driven behind exposed edges of exterior materials, flashing is needed to provide protection.
Preparing the surface
Proper surface prep is the first step to flashing an outside corner:
- The area should be free of any dirt, loose paint or coating, oil, or other debris that could interfere with adhesion.
- Use putty knives, wire brushes, sandpaper, solvents, or other means as needed to clean the surface down to bare wood or material.
- Check the surface for any cracks, holes, or gaps and fill with exterior caulk or repair compound if needed.
- The surface should be as smooth as possible to allow the flashing to sit flat and tight.
Taking the time to correctly prep the corners will provide the cleanest finish and best sealing from the flashing.
Measuring and cutting the flashing
Once the surface is prepped, the next step is measuring and cutting your flashing material to size:
- Measure the height of your outside corner from top to bottom. Add 2-3″ to this length to allow for overlap at the top and bottom.
- Measure the width of each side of the corner. Add at least 4-6″ to each side to allow material to wrap around the corner.
- Transfer these dimensions to your flashing material and cut out your piece using tin snips, shears, or a utility knife.
- The flashing should be L-shaped with equal side lengths for easiest installation.
Aim to cut the flashing approximately 1-2″ wider and longer than your tightest measurements to provide enough material for bending, fastening, and sealing.
Bending the flashing
With the flashing cut to size, it’s time to bend it to fit the outside corner:
- Measure and mark a line across the flashing where the corner bend will be located.
- Clamp the flashing in a vise or other secure holder with the marked line aligned with the edge.
- Using a rubber mallet, hammer the flashing over the vise edge to make a 90° bend along your marked line.
- Take care to make the bend as crisp and straight as possible for proper corner fitting.
- A folding tool can also be used on thinner metal flashings to make an accurate bend.
The bent flashing should now have an L-shape with equal length sides to wrap your corner.
Securing the flashing
With the measured, cut, and bent flashing complete, it’s time to install it on the corner:
- Run a generous bead of exterior sealant along the bending line on the backside of the flashing. This will provide adhesion and seal the corner seam.
- Press the flashing firmly into place, bedding it down into the sealant. The sides should wrap equally around the corner.
- Drill pilot holes through the flashing sides approximately every 4-6 inches and secure with exterior screws.
- Focus fasteners near the top, bottom, and ends but evenly space them across the flashing sides.
- Seal over all fastener heads with additional exterior sealant.
Pressing the flashing into a continuous sealant bed provides a superior seal compared to just fastening alone. The sealant waterproofs while the fasteners provide constant tension.
Sealing the edges
The final step is sealing the edges of the installed flashing:
- Apply a continuous bead of sealant along the top and bottom edges, sealing them to the wall surfaces.
- Tool the sealant with a putty knife or spatula for a smooth finish.
- Seal the vertical seams at both ends where the flashing sides meet the walls.
- Fill any gaps, holes, or spaces where the flashing meets the wall with sealant.
Carefully sealing all flashing edges waterproofs the installation and provides secondary protection from moisture intrusion. Periodically check for cracks or deterioration and re-seal as needed. Properly installed and maintained flashing provides long-lasting protection from water damage on outside corners.
Helpful tips
Here are some additional pointers to get great results flashing an outside corner:
- Use an exterior sealant like polyurethane that remains flexible and waterproof.
- For metal flashings, coating sides with bituminous paint improves corrosion resistance.
- Flashing wider than 4-6″ may require intermediate fasteners or seams to prevent buckling.
- Prefabricated corner flashing with adhesive backing can simplify installation.
- Different materials like copper, galvanized steel, aluminum require different cutting tools.
- Allow proper overlap with weather barriers and adjacent flashings for full waterproofing.
Proper surface prep work, taking exact measurements, and carefully sealing all seams are the keys to successfully flashing an outside corner. With attention to detail and the right materials, an effective corner flashing can be installed by any motivated DIYer.
Common problems and troubleshooting
Even properly installed corner flashings can sometimes develop issues:
| Problem | Potential Causes | Troubleshooting Tips |
|---|---|---|
| Leaking at seams or edges | Insufficient sealant; Sealant cracks; Poor adhesion | Clean seam areas; Apply fresh sealant; Ensure flashing is pressed flat and tight to surface |
| Flashing loose or buckled | Insufficient fasteners; Oversized flashing; Expansion & contraction | Add more fasteners; Relieve tension by shortening flashing; Use smaller piece of flashing |
| Exposed nail heads | Sealant failure; Sealant not applied | Apply new sealant over exposed nails; Seal all nail heads during initial install |
| Water trapped behind flashing | Flashing not bedded in sealant; Gaps at seams & edges | Ensure continuous sealant layer before installing flashing; Thoroughly seal all seams and edges |
Catching and remedying issues early prevents more extensive repairs later. Inspect corner flashing regularly, especially after major storms. Promptly resealing opened seams or fastening loose corners keeps the flashing waterproof.
Conclusion
Installing effective flashing is one of the most important weatherproofing steps for a building’s exterior. Taking the time to properly flash outside corners guards against water infiltration and structural damage. With the right materials and proper technique, flashing an outside corner is a straightforward process any homeowner can complete successfully. Following the surface prep, measuring, bending, fastening, and sealing steps outlined above results in long-lasting protection from the elements. Properly flashed outside corners not only prevent damage but also maintain the beauty and value of your home.