Getting a broken screw out of wood can be a frustrating challenge, but with the right tools and techniques, it is possible to remove it successfully. In this article, we will explore some quick solutions and step-by-step methods for removing broken screws from wood.
Page Contents
- 1 Try Extractor Screws
- 2 Use a Screw Extractor Tool
- 3 Use Vice Grips or Pliers
- 4 Use a Dremel or Rotary Tool
- 5 Use a Hammer and Punch
- 6 Drill Out the Screw
- 7 Preventing Screws From Breaking
- 8 Choosing the Best Extraction Method
- 9 Removing Broken Screws: A Process
- 10 Tips for Avoiding Damage
- 11 Dealing with Stubborn Screws
- 12 Common Challenges and Solutions
- 13 Signs It May Be Time to Call a Professional
- 14 Preparing the Area for Repair
- 15 Replacing the Original Hardware
- 16 Preventing Future Breakage
- 17 Alternatives to Traditional Wood Screws
- 18 Using Adhesives and Alternate Fasteners
- 19 Conclusion
Try Extractor Screws
Extractor screws, also known as easy-outs, provide one of the quickest and easiest methods for removing a broken screw. These specialty screws are tapered and have cutting threads designed to grip the threads of the broken screw and back it out as you turn the extractor. Here is a quick rundown of using an extractor screw:
- Select an extractor bit that is slightly smaller in diameter than the original screw.
- Use a center punch tool to make an indent in the center of the broken screw’s head to keep the extractor bit centered.
- Drill a pilot hole into the screw head using a drill bit matched to the size of the extractor screw.
- Insert the extractor bit into the pilot hole and turn it counterclockwise to back the broken screw out.
Extractor screws usually do the trick, as long as the head of the screw is accessible and there is enough of the screw protruding to grip. Be sure to start slowly and maintain firm pressure as you turn counterclockwise to keep the extractor screw seated in the broken screw head.
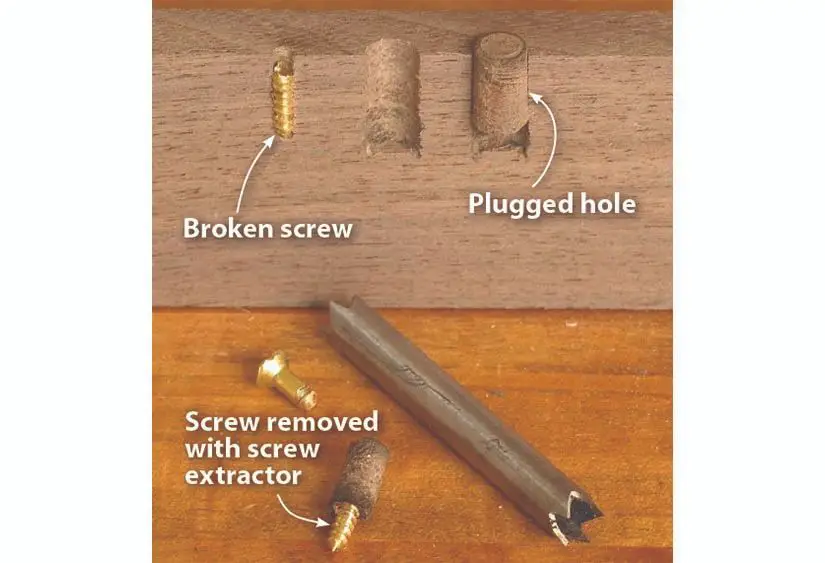
Use a Screw Extractor Tool
A screw extractor tool provides another quick way to remove a broken screw. It works similarly to an extractor screw but comes in the form of a specialty drill bit. Here are the basic steps for using a screw extractor tool:
- Select an extractor bit that matches the size of the damaged screw.
- Use a center punch to make a divot in the center of the screw head.
- Drill into the screw head about 2/3 of the way with a standard twist drill bit matched to the extractor bit size.
- Place the extractor into the hole and gently turn it counterclockwise using firm pressure.
- The extractor’s tapered flutes will bite into the damaged screw and back it out as you reverse the tool.
This method works great as long as you can center the extractor bit and there is enough of the visible screw head remaining to grip. Take it slow and let the tool do the work.
Use Vice Grips or Pliers
If you’re dealing with a screw with an exposed head, locking pliers or vice grips can sometimes work to back it out. Follow these steps:
- Clamp the pliers or vice grips tightly onto the screw head.
- Turn counterclockwise to unscrew the fastener.
- Apply penetrating oil if needed to help loosen the threads.
- Maintain constant downward pressure as you turn to keep the pliers or vice grips seated.
Pliers are most effective on slotted screw heads and vice grips can lock onto Phillips or other head types. Just be careful not to strip the head if the screw won’t budge.
Use a Dremel or Rotary Tool
If you have a Dremel rotary tool available, the grinding or cutting discs can be used to slot the screw head for a flat head screwdriver or remove the head completely.
Here is the basic process if going this route:
- Use protective eyewear and gloves for safety.
- Attach a reinforcement cutting disc to the Dremel.
- Carefully grind a slot into the screw head perpendicular to the threads.
- Insert a flat head screwdriver into the cut slot to back the screw out.
Alternatively, you can just use a cutting disc to grind off the entire screw head. Then you can pull or pry out the threaded screw portion from the hole.
This method works great when you have limited access to the fastener head but allows you to slot it or remove it completely.
Use a Hammer and Punch
When you have access to the screw head, tapping it lightly with a hammer and punch can help break the screw loose from corrosion or thread lock. Follow these basic steps:
- Center the punch tip on the screw head.
- Tap the punch several times with the hammer applying moderate force.
- Try turning the screw with a screwdriver between taps.
- Repeat the process until the turning loosens the threads.
The key is not to hit so hard that you damage the screw head or threads. Gentle taps are often sufficient to break the screw free.
Drill Out the Screw
If all else fails, drilling out the damaged screw is an option. You will need the following for this method:
- Variable speed drill
- Center punch
- Small diameter twist drill bits
- Larger bit matched to screw diameter
Follow these steps to drill out a broken screw:
- Make a divot with the center punch in the screw’s center.
- Use a small drill bit to drill into the screw about 1/2 inch deep.
- Increase drill bit sizes gradually until reaching the screw’s shaft diameter.
- Drill into the screw enough to remove the threaded portion.
Take it slow to avoid drilling too large a hole in the host material. Flushing the hole with penetrating oil helps prevent binding.
Preventing Screws From Breaking
Prevention is the best medicine when it comes to broken screw headaches. Here are some tips to help avoid screws breaking in the first place:
- Use the right size screwdriver for proper fit.
- Start screws carefully avoiding cross threading.
- Tighten screws to the proper torque specifications.
- Lubricate screws with penetrating oil prior to driving them.
- Avoid forcing or over tightening the fastener.
Additionally, consider using threaded inserts instead of driving screws directly into materials like particle board that have a tendency to break screws.
Choosing the Best Extraction Method
When evaluating your broken screw removal options, consider the following factors:
- Screw head accessibility – Can you get above it with a tool?
- Screw composition – Is it hardened steel or a softer metal?
- Host material density – Is it a hardwood, softwood, or composite?
- Screw length – Is most of the screw still engaged in the hole?
- Tool availability – Do you have specialty extractors and bits?
Ideally, select a method that engages the screw head directly like extractors or pliers. For screws broken below the surface, drilling may be your only option.
Removing Broken Screws: A Process
Reviewing the screw removal process from start to finish can help ensure you have an effective plan before getting started:
- Evaluate – Assess the screw head, composition, and engagement depth.
- Select – Pick the ideal removal method based on the screw specifics.
- Prepare – Have the necessary tools ready and take safety precautions.
- Engage – Use your extraction tool properly by centering it and maintaining firm pressure.
- Extract – Turn counterclockwise and use patience and care as the screw loosens.
- Clear – Completely back out the remnants of the damaged screw once loosened.
Following these steps helps ensure a smooth removal process with minimal collateral damage.
Tips for Avoiding Damage
Removing a broken screw always risks some material damage, but you can reduce the likelihood with a few precautions:
- Use a punch and hammer gently – Hard hits risk cracking the host material.
- Start with a small extractor drill size – Gradual bit increases often work best.
- Brace materials to limit vibration – Helps prevent cracking near the screw hole.
- Drill at low speeds – High rpm can cause overheating and host material burning.
- Use a depth stop with drill bits – Prevents drilling too deep once the screw is out.
Patience truly is a virtue throughout the screw extraction process. Avoid applying excessive torque or force at any step, and let your tools do the work.
Dealing with Stubborn Screws
Not all broken screw extractions go smoothly. Rust, corrosion, over-tightening, and cross-threading can all make screws stubborn. Here are some tips if dealing with a particularly stubborn stuck screw:
- Use penetrating oil and let it soak for maximum effect.
- Try tightening the screw initially before loosening to break any thread lock.
- Work the screw back and forth gradually with your extractor tool.
- Consider using heat from a soldering iron to expand and loosen the screw.
- For corrosion, apply rust removal solution and let it work before re-attempting extraction.
Getting stubborn screws moving again may take multiple techniques and patience over time. But perseverance usually pays off in the end.
Common Challenges and Solutions
Reviewing some of the typical challenges and solutions can prepare you for the most common issues that arise during broken screw removal:
| Challenge | Potential Solutions |
|---|---|
| Limited access to screw head | Use Dremel to slot the head or remove completely |
| Extractor tool slips in soft metal | Reinforce with cyanoacrylate glue before re-attempting |
| Drilling burns host material | Use lower speed, cooling fluid, and brace to limit vibration |
| Threads too damaged to grip | Consider drilling out the remainder of the screw |
Having contingency plans for issues like stripping, slipping, and burning helps you react on the fly when problems crop up.
Signs It May Be Time to Call a Professional
While DIY screw removal is ideal, there are certain situations where calling a professional may save you time, frustration, and damage. Consider getting professional help if:
- The screw is in a sensitive electronic device
- You lack the specialty tools and expertise for safe extraction
- The fastener is in a dangerous location to work around
- You have damaged the fastener head and threads beyond repair
- The screw composition is unknown and prone to snapping
Professionals have specialized extraction tools, training, and experience to remove problem screws efficiently. The cost of professional help is often worth avoiding liability or further damage in tricky situations.
Preparing the Area for Repair
Once you have conquered the broken screw, a few steps can prepare the area for permanent repair:
- Clear any debris and vacuum dust from the hole.
- Rinse or wipe away drilling fluid and lubricant.
- Spot fill any overtly large damaged areas with wood filler.
- Plug the hole with a dowel for re-drilling a pilot hole.
Taking these simple cleanup steps helps create clean access to drive in a replacement fastener. Then you can complete your repair as intended.
Replacing the Original Hardware
When replacing the broken screw, you have a couple options depending on your exact needs:
- Purchase a screw of the same diameter, length, and head type.
- Substitute with slightly larger diameter screw in same length.
- Consider using a threaded insert instead of driving screw directly.
Matching the original screws makes for straightforward replacement. However, stepping up a size or using threaded inserts prevents the problem from recurring.
Preventing Future Breakage
To avoid dealing with another broken screw in the same location, keep these tips in mind:
- Use hand tools carefully to avoid over torqueing.
- Reduce driving speed as you near full depth.
- Dip threads in wood glue before driving for added holding power.
- Use stop collar on your driver bit to limit screw depth.
- Consider pre-drilling smaller pilot holes for dense host materials.
Slowing down as you near full screw depth is key to prevent over torqueing. And piloting dense materials like hardwoods reduces strain on the threads.
Alternatives to Traditional Wood Screws
Beyond standard wood screws, consider alternatives designed to avoid breakage:
- Trim screws – Thinner shafts and finer threads resist snapping.
- Inserter screws – Tapered tip and wide threads grab better.
- Sheet metal screws – Harder material and machine rolled threads.
- Thread cutting screws – Creates own thread pattern in host material.
For problem materials, experiment to find a screw type that holds securely but avoids breakage. This may take some trial and error.
Using Adhesives and Alternate Fasteners
In some cases, you can avoid screw fasteners entirely. Consider these alternate options:
- Construction adhesives like liquid nails to bond materials.
- Super glue or epoxy to set small items.
- Specialty fasteners like molly bolts for hollow walls.
- Through bolts with large washers to distribute load.
Construction adhesive provides powerful holding strength without the risks of screws breaking in dense woods. Explore alternatives to find the right fastening method for your project.
Conclusion
Removing broken screws from wood can be challenging but is certainly not impossible. With the right tools, techniques, and a systematic approach, extraction is usually achievable. Key things to remember include:
- Assess the specifics of the screw and environment.
- Select a removal method that engages the screw securely.
- Work slowly and gently to avoid collateral damage.
- Persevere through stubborn screws with added techniques.
- Call in a professional if the situation is beyond your experience and toolkit.
- Take steps to prep for permanent repair once extracted.
With some care, patience, and the proper process, you can conquer the most stubborn broken screws and achieve a lasting repair. Just stay calm and focused, and let your tools do the work until that pesky broken screw is finally out!