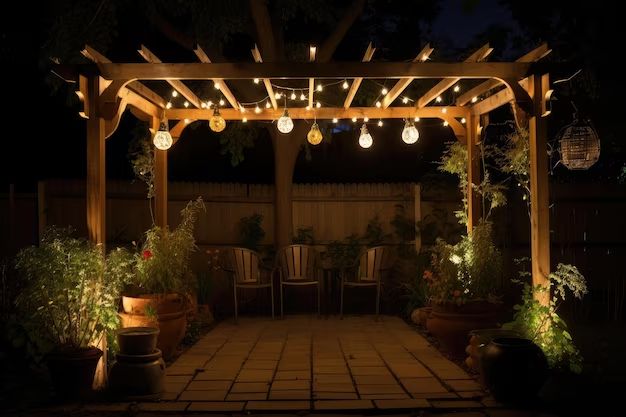
String lights, also known as fairy lights or twinkle lights, are a charming way to decorate a gazebo. When hung properly, they can create a magical atmosphere perfect for special events or cozy gatherings. Here is a step-by-step guide on how to hang fairy lights in a gazebo.
Page Contents
Things You’ll Need
Before getting started, make sure you have the following materials:
- Fairy lights or string lights
- Extension cords and power source
- Zip ties, hooks, clips, or command strips for securing lights
- Ladder or step stool
- Scissors or wire cutters
The quantity needed will depend on the size of your gazebo and amount of coverage desired. Make sure the lights are suitable for outdoor use.
Plan the Layout
Take measurements of the interior ceiling and plan how you want the lights arranged. Here are some popular options:
- Perimeter Outlining: Run lights along the outer roof edge and/or vertical posts to define the gazebo’s shape.
- Ceiling Grid: Create a grid pattern by running lights from side to side and front to back.
- Centered: Concentrate lights in the middle of the ceiling in a circular, square, or starburst pattern.
- Focused Areas: Highlight specific zones like over seating or dining areas.
Sketch out your design on paper first to determine how much lighting is needed. Allow extra length for connecting wires and attaching to power sources.
Test the Lights
Before hanging up the lights, plug them in and test that all bulbs are working. Replace any burnt out bulbs to ensure your design looks complete once installed. Checking the lights ahead of time makes troubleshooting easier.
Run Extension Cords
Fairy lights typically do not have very long cords to reach power outlets. You’ll need to use outdoor-rated extension cords to run power to your gazebo. Here are some tips:
- Use heavy-duty 12 or 14 gauge extension cords for safety.
- Position cords out of high-traffic areas to prevent tripping hazards.
- Use multiple smaller cords instead of one overly long cord.
- Hide cords against walls, under eaves or buried underground for a cleaner look.
- Use outdoor mounting clips to secure cords in place.
- Connect cords properly using outdoor covers to prevent water exposure.
Position your power source in the most convenient, accessible location. Test that extension cords are laid out properly by connecting the lights before permanent installation.
Mounting Options for Lights
There are several techniques you can use to hang fairy lights on a gazebo:
Zip Ties
Plastic zip ties, also called cable ties, are inexpensive and easy to use for mounting lights. Wrap them around roof beams, handrails, or posts and tightly secure light strings in place.
Hooks
Adhesive hooks that stick onto surfaces work well for light hanging. Look for exterior rated hooks that can withstand weather and won’t peel off easily. Position hooks at least every 2-3 feet along the installation area.
Clips
There are specific fairy light clips designed to discretely grip onto light strands and attach to eaves, rafters, railings, and more. Use with screws or adhesive for durable mounting.
Command Strips
Command strip velcro picture hangers can be used in some applications. Stick one side to roofing and the other to light strands. Ideal for temporary installations indoors.
Nails/Screws
Using small nails or screws is a very secure permanent method for installing lights. This may leave visible holes when removed, so use caution and avoid damaging gazebo roofing.
Choose the method that works best for your gazebo type and how frequently you’ll change up your lighting display. A combination of techniques can be used as needed.
Safety Tips
Keep these safety guidelines in mind when hanging fairy lights:
- Use a ladder or step stool to reach high areas safely.
- Do not overload extension cords with too many light strands.
- Keep all electrical connections dry by covering with plastic bags.
- Use GFCI protected outlets near wet areas.
- Check for overhead power lines and maintain safe distance.
- Do not staple or nail through electrical cords.
- Follow all manufacturer instructions carefully.
Permanent vs. Temporary
You can either permanently install fairy lights in your gazebo for long-term use or temporarily put them up for special occasions. Here’s an overview of the pros and cons of each approach:
| Permanent | Temporary |
|---|---|
|
|
Consider your own needs and preferences when deciding between permanent or temporary installation.
Installing the Lights
Once you have your game plan in place, it’s time to start hanging up the fairy lights!
Begin by mounting the first string of lights in your desired start position according to your layout. Use your chosen attachment method to firmly secure the lights in place every 2-3 feet or as needed.
Slowly work your way outward from the start point, positioning the next line of lights based on your design. For straight lines across roofing, use a laser level to ensure even spacing and alignment. Connect light strand extensions as needed to reach far ends.
For perpendicular lines, carefully measure out equal distances between rows and columns for clean uniformity. For circular or organic layouts, loosely follow your sketched pattern while visually checking even coverage as you go.
When two light strands meet at corners or intersections, wrap the excess cord together and hide behind beams or boards. Continue securing the lights across the entire installation zone until your gazebo is fully illuminated.
Connecting Wires and Power
Once all the lights are hung in position, you can start connecting the wires back to your power source.
- Group all light strands together, binding cords with zip ties to keep organized.
- Run cords neatly along edges down to the ground outlet or extension cord.
- Plug each strand into an extension cord connection.
- Bundle and secure all loose extension cords.
- Connect main extension cord to power source.
- Turn lights on and check for any issues.
Make any final adjustments needed for full light coverage. You may need to add lengths of light strands in dark areas or rearrange placement in certain spots.
Extra Decorating Ideas
Once your fairy lights are hung, you can further decorate your gazebo with these fun additions:
- Layer strings of pendant lights at lower levels
- Wrap leafy garlands around posts
- Add lanterns, decorative balls, or tissue paper pom poms
- Hang flower wreaths, signs, or banners from ceiling
- Place potted plants, vases, candles or centerpieces on tables
Get creative with additional lighting, soft decor elements, and seasonal or event-specific embellishments. The fairy lights will magically pull the entire look together!
Maintenance
Follow these tips for maintaining your fairy light installation:
- Check lights periodically for burned out bulbs and replace as needed.
- Wipe down fixtures with cloth to remove dust and bugs.
- Test extension cords for frays, cracks or cord damage.
- Remove lights before high winds or major storms.
- Adjust mounting clips or fasteners that become loose.
Take lights down and carefully store indoors after the holiday season or before snow if temporarily installed. Proper maintenance will keep your lights shining brightly for many years.
Conclusion
Hanging fairy lights in a gazebo creates a gorgeous, whimsical setting for entertaining or just everyday enjoyment. By planning out your design, preparing needed supplies, safely installing lights, and adding decorative accents, you can transform your gazebo into a magical oasis. Just follow the steps and safety tips outlined above for foolproof results. Get creative with your fairy light display and enjoy the dreamy ambiance under the twinkling lights!