Hanging heavy pictures on drywall can seem daunting, but it’s very doable with the right techniques and hardware. The key considerations when hanging heavy items are:
- Using anchors and screws that are designed for drywall rather than standard nails or screws
- Finding and marking the wall studs so you can anchor into them whenever possible
- Distributing the weight appropriately by using two or more anchors for large items
In this article, we’ll walk through the entire process step-by-step, covering how to find the studs, choose the right hardware, use anchors safely, and hang pictures level and secure. We’ll also provide some tips to make the job easier. With the right approach, you can decorate with confidence no matter how heavy the item.
Page Contents
- 1 How Much Weight Can Drywall Support?
- 2 Finding the Wall Studs
- 3 Choosing the Right Hardware
- 4 Using Drywall Anchors Properly
- 5 Hanging the Item Level and Secure
- 6 Tips and Tricks
- 7 Choosing Appropriate Picture Hangers and Accessories
- 8 Troubleshooting Hanging Heavy Items on Drywall
- 9 When to Call a Professional
- 10 Safety Tips When Hanging Heavy Items
- 11 Conclusion
How Much Weight Can Drywall Support?
Before hanging anything, it’s important to understand the weight limits of drywall itself. Drywall panels are relatively brittle and prone to crumbling and cracking when weight is applied directly to the surface. Here’s a quick overview of how much weight drywall can support:
- 1/2 inch drywall: 30-50 lbs per anchor
- 5/8 inch drywall: 50-70 lbs per anchor
- 1/4 inch drywall: 15-20 lbs per anchor
These numbers assume you are using high-quality drywall anchors and screws. The quality of the drywall itself also factors in. Thicker, denser boards can hold more weight. Moisture damage, cracks, and age can decrease strength. Whenever possible, aim to keep pictures and objects within recommended limits.
Finding the Wall Studs
Wall studs are the vertical boards behind drywall that provide structure and framing. Hitting a stud provides maximum strength for heavy items. Unfortunately, studs are often not conveniently spaced where you want to hang something. Here are some tips for locating them:
- Use a stud finder – electronic stud finders detect and mark studs through drywall.
- Check around windows and doors – studs are often alongside openings for structural support.
- Knock and listen – a dull thud indicates a stud while a hollow sound means just drywall.
- Use a strong magnet – the nails/screws in studs attract magnets.
Be sure to mark the stud locations lightly in pencil so you can use them when drilling and mounting hardware. Having at least one side of a heavy item anchored into a stud is ideal.
Choosing the Right Hardware
With your studs marked, now you can select the right hardware. Using specialty drywall anchors and screws is a must for heavy items. Avoid standard nails, screws, or plastic expansion anchors which can easily rip out of drywall. Here are the best options:
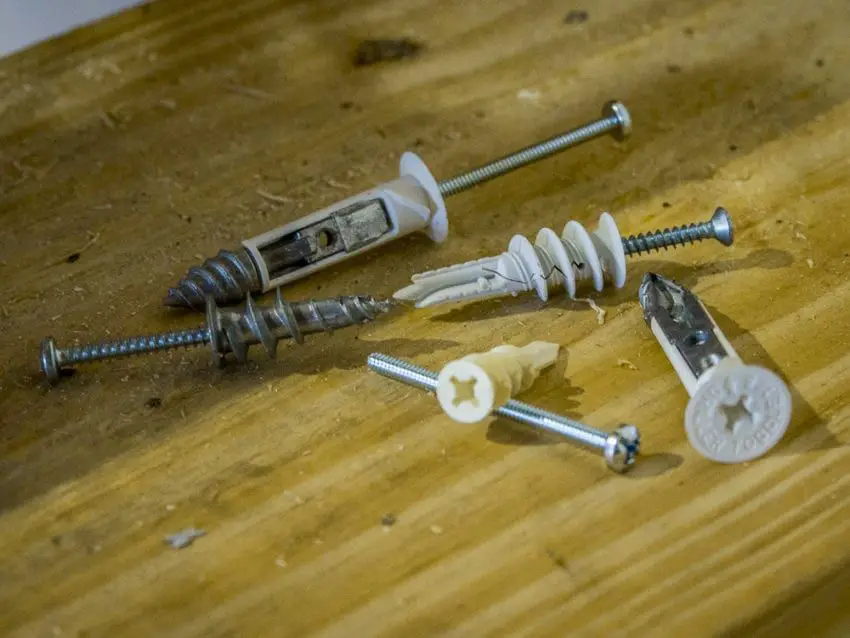
Heavy Duty Drywall Anchors
- Toggle bolts – grip tightly when opened behind the wall.
- Hollow wall anchors – slide into pre-drilled holes and expand when the screw is inserted.
- Drywall screws – wide threaded design grips tightly.
- Screw-in molly bolts – stronger version of expansion anchors.
Screws
- 2 to 2.5 inches long
- Match screw size to anchor size
- Coarse high-thread count
- Phillips or square drive head
Using the right anchors and screws for the weight you are mounting prevents torn drywall and items falling off the wall.
Using Drywall Anchors Properly
With the hardware selected, now we can get into the proper techniques for using anchors in drywall. Here are some tips:
- Drill pilot holes for anchors slightly smaller than the anchor diameter.
- Insert anchors gently – do not pound them into the holes.
- Allow space between the wall and item for the anchor wings or toggles to open.
- Tighten screws carefully – over-tightening can damage the anchors.
- Use two anchors minimum per heavy item, ideally into studs on both sides.
Correct drilling, spacing, and setting of the anchors ensures maximum holding strength. Don’t rush the process or take shortcuts.
Hanging the Item Level and Secure
With your anchors in place properly, now you can mount the picture or other heavy item. Here are some tips for getting it level and secure:
- Use string and a line level to mark a guide line for perfect horizontal alignment.
- Position hanging wire/hardware to balance the weight evenly on all anchors.
- Hang the item and check level – adjust as needed.
- Take your time screwing into the anchors – do not strip the screws.
- Add extra anchors if needed for very heavy items.
- Check that the item is secure on the wall before letting go!
Rushing the final mounting can lead to crooked pictures or loose heavy objects. Take it slow and double-check your work.
Tips and Tricks
Follow these handy tips and tricks to make hanging heavy items on drywall even easier:
- Use self-drilling drywall anchors to skip the drill pilot hole step.
- Invest in a powerful drill for smooth anchor installation.
- Pick up a pack of assorted drywall anchors to have all your options on hand.
- Use painter’s tape rather than pencil to mark studs for a cleaner look.
- Hang a piece of plywood across multiple studs first for extremely heavy items.
- Swap thick art books or magazines for empty frames during positioning to avoid mishaps.
With the right mindset and techniques, you can decorate your home with all your favorite pictures, shelves, mirrors and more – regardless of the drywall. Just focus on finding the studs, using specialized hardware, and working slowly and carefully. Get your level out and feel confident to hang away!
Choosing Appropriate Picture Hangers and Accessories
Once you have properly installed your drywall anchors, it’s time to select the right picture hangers and accessories to mount your art and frames securely. Here are some of the most common options to consider:
Picture Wire
- Choose the right gauge (thickness) of wire for the weight – thicker for heavier items
- Use d-rings or o-rings on the back corners to attach the wire cleanly
- Leave enough slack for the wire to rest in the hanger, but not too loose
Picture Hanging Kits
- Contain wire, d-rings, hooks, nails – everything you need
- Available in different weight capacities
- Let you hang multiple frames with a consistent look
Individual Picture Hangers
- Adhesive or nail/screw-in options
- Can be used with picture wire or sawtooth hangers
- Variety of weight capacities and styles
Sawtooth Hangers
- Attach directly to the back of the frame
- Hang on a nail or screw driven into the wall anchor
- Best for smaller, lighter items
Mixing and matching hangers and hardware allows you to display art professionally no matter the size and weight. Remember to double-check ratings and not exceed recommended weight limits. With quality hangers anchored securely, you can appreciate your pictures worry-free.
Troubleshooting Hanging Heavy Items on Drywall
Despite your best efforts, sometimes pictures or shelves come loose from the wall over time. Here are some troubleshooting tips for heavy items that won’t stay up on drywall:
Problem: Anchor pulls out of the wall
- Causes – cheap anchors, anchors not centered in stud, too much weight
- Solutions – Use higher weight capacity anchors, ensure screws are centered in studs, move anchor to stronger stud or into drywall seam
Problem: Drywall cracks around anchor
- Causes – improper pilot hole size, poor quality drywall, weight too heavy for single anchor
- Solutions – Drill proper pilot holes for anchors, use two anchors minimum per item, switch to heavier drywall or plywood backing
Problem: Picture slips down over time
- Causes – Insufficient wire slack in hanger, cheap thin wire, frame back uneven
- Solutions – Leave 1-2″ wire slack, use higher gauge picture wire, add bumpers to frame corners
Don’t get discouraged if you have to re-hang something multiple times. Taking the time to analyze the issues and using the right hardware will lead to success. Consider calling in a handyman if problems persist in your home’s drywall.
When to Call a Professional
While hanging most pictures and mirrors yourself is certainly feasible, there are some situations where you may want to pass the job off to a professional:
- Massive or extremely heavy items like chandeliers or artwork
- Situations requiring complicated wiring or electrical work
- Items being mounted very high up like tall mirrors or art
- Homes with plaster walls rather than standard drywall
- Condo or apartment buildings that require special permits
Professionals have specialized tools, lifts, and expertise hanging awkward heavy objects up high or drilling into delicate materials. They can also assess if your home’s walls can safely support very heavy items.
Consider pros for:
- Hanging chandeliers
- Mounting large bathroom mirrors
- Installing ceiling-high shelving
- TV mount installation
Your walls and valuables are in the best hands with experienced contractors. Get quotes to find affordable help for challenging hanging jobs.
Safety Tips When Hanging Heavy Items
Working on ladders and handling large awkward items presents some safety hazards. Follow these tips to hang objects safely:
- Use sturdy ladders and step stools – do not stand on chairs or tables
- Have someone steady the ladder for you
- Wear closed toe shoes and soft gloves to avoid cuts and smashes
- Get help lifting big mirrors, artworks or shelves
- Never hang over your head – use lifts for ceilings
- Work slowly on ladders moving up a little at a time
- Let adhesive anchors cure fully before loading weight
- Double check items are secure before letting go
Rushing causes most accidents, so take your time. Pay attention to manufacturer instructions for curing times. Heavy falling objects can damage more than just your walls, so putting safety first avoids trips to the doctor or ER.
Conclusion
Hanging substantial mirrors, art, shelves or TVs on drywall is very doable with the right hardware and techniques. Carefully finding studs, choosing quality anchors, using screws properly, and distributing weight evenly allows heavy items to stay put. A few handy accessories like wire and levels complete the professional looking finished product. Don’t shy away from decorating with weighty favorites. Just be patient, use the correct hardware, and get help lifting or mounting anything truly massive. Your walls will make a beautiful sturdy backdrop for all your heavy masterpieces.
| Picture Size | Recommended Wire Gauge |
|---|---|
| 8″ x 10″ | 14 gauge |
| 11″ x 14″ | 12 gauge |
| 16″ x 20″ | 10 gauge |
| 20″ x 24″ | 8 gauge |
| Drywall Thickness | Weight Capacity Per Anchor |
|---|---|
| 1/4 inch | 15-20 lbs |
| 1/2 inch | 30-50 lbs |
| 5/8 inch | 50-70 lbs |