Hiding wires and cables can help make any room look cleaner and more organized. Using wire molding is an easy and affordable way to conceal unsightly wires against walls or along baseboards. Here are some tips on how to hide wires with molding.
Page Contents
What is Wire Molding?
Wire molding, also called raceway or wire channel, is a long, thin plastic or metal strip that snaps open lengthwise to create a channel for running wires inside. Moldings come in various widths to accommodate different numbers and thicknesses of cables. They have a back adhesive or nails for securing them to surfaces.
Benefits of Using Wire Molding
- Conceals messy wires and cables for a neater look
- Safer than exposed wires that can get damaged or pose tripping hazards
- Easy to install on walls, baseboards, ceilings, under cabinets
- Adaptable system allows for moving or adding wires
- Affordable, with plastic versions starting under $10
Tips for Hiding Wires with Molding
1. Measure and map out your wire run
Determine the start and end points of your wiring project. Measure the length you’ll need and sketch out the path to determine the direction, turns, corners etc. This will tell you how much molding to buy. Get extra to allow for errors and future additions.
2. Choose appropriate molding
Molding is available in different material (plastic, aluminum, steel) and various widths from 1/2 inch to 5 inches. Choose a size that will fit your cable thickness. Plastic types are easy for DIY, while metal lasts longer in high traffic areas.
3. Clean and prepare the mounting surface
Ensure the wall or other surface is clean and smooth. Paint if needed to help the molding blend in. Run cables before mounting the molding for easier handling. Use cable ties and hooks to organize the wires.
4. Cut molding to required lengths
Measure and cut pieces of molding to proper lengths using a hacksaw or wire cutters. Cut such that there are no gaps between molding joints. For turns and corners, miter cut the ends at 45 degree angles for a smooth seam.
5. Affix molding with adhesive, nails or screws
Plastic molding will have a self-adhesive backing to stick onto surfaces. Use additional construction adhesive for stronger hold. For metal molding, use nails, screws or double-sided tape depending on the material. Affix carefully to avoid damaging existing walls.
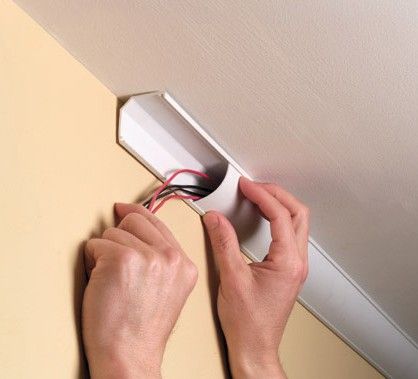
6. Snap the wire cover open and insert cables
Once mounted, open the molding seam and lay the wires inside neatly, leaving some slack. The channel opening lets you add, remove or change wiring easily later on. Snap the cover closed to conceal the cables.
7. Join pieces and seal edges
Where molding meets at corners or ends, trim any excess length for flush seams. Plastic trim pieces are available to bridge gaps for neater joints. Seal edges with silicone caulk to hide imperfections and gaps.
Choosing the Right Wire Molding
Many types of wire molding exist to suit different needs. Some key considerations when selecting:
| Factor | Options |
|---|---|
| Material | Plastic, aluminum, steel |
| Width | 1/2″ to 5″ channels |
| Mounting method | Self-adhesive, screw-mount, clip-on |
| Style | Low profile, surface-mounted, crown molding |
| Joints | 45° mitered corners, plastic joiners, end caps |
Consider cable thickness, number of wires, surface material, and visibility when selecting the right wire molding. Consulting an electrician can be helpful for large or complex wiring jobs.
Tips for a Professional Looking Install
- Keep wire runs short, straight and close to corners/edges
- Maintain a consistent gap between molding and trim/ceiling
- Minimize bends for smoother wire pulls
- Label cables at terminals for easy identification
- Use white molding on light walls, or paint to match
- Seal all openings to prevent dust and pests
Conclusion
Installing wire molding lets you conceal unsightly cables for a clean, professional look in any room. Measure carefully, map your wire run, select appropriate molding, and affix securely to surfaces. Maintain neat wire organization inside. Join pieces properly and seal edges for seamless results. With some planning and care, it’s easy to hide wires the clean, efficient way.