Hooking up a thermostat to a wall furnace is a fairly straightforward process, but there are some important steps to follow. In the opening paragraphs, we’ll provide a quick overview of the requirements and procedure, then go into more detail in the sections below.
Page Contents
Overview
Here are the basic steps required to hook up a thermostat to a wall furnace:
- Turn off power to the furnace at the circuit breaker
- Remove the old thermostat from the wall
- Identify the wires coming from the furnace
- Match the wires to the corresponding terminals on the new thermostat
- Screw the wires into the terminals on the new thermostat
- Mount the new thermostat on the wall
- Turn the power back on at the circuit breaker
- Configure the thermostat settings
- Test the thermostat to make sure it controls the furnace properly
The most important steps are properly identifying and connecting the wires coming from the furnace to the right terminals on the thermostat. Thermostats usually require a common wire, and older furnaces may not have this, so an additional wire may need to be run. The number of wires required depends on the type of thermostat and furnace.
Turn Off Power to the Furnace
Before doing any work on the thermostat wiring, it’s crucial to shut off power to the furnace at the circuit breaker. This prevents electric shock and avoids short circuits. Locate the circuit breaker that controls the furnace and switch it to the “off” position. Verify the power is off by turning on the furnace – it should not ignite or spin the blower fan. Working on the thermostat wires while the furnace circuit is live can potentially cause injury or damage components.
Remove Old Thermostat
After cutting power to the furnace, the next step is taking down the old thermostat. First remove the cover plate and take note of what wires are connected to each terminal. If the wires are labeled, even better. There will likely be between 3-5 wires terminating on the old thermostat.
Use a small screwdriver to loosen each terminal screw and free the wires one at a time. Leave them hanging for now. Don’t let wires fall back into the wall. Once all the wires are detached, unscrew the thermostat control panel from its wall plate and set it aside. You may be able to reuse the existing wall plate if it’s compatible with the new thermostat model.
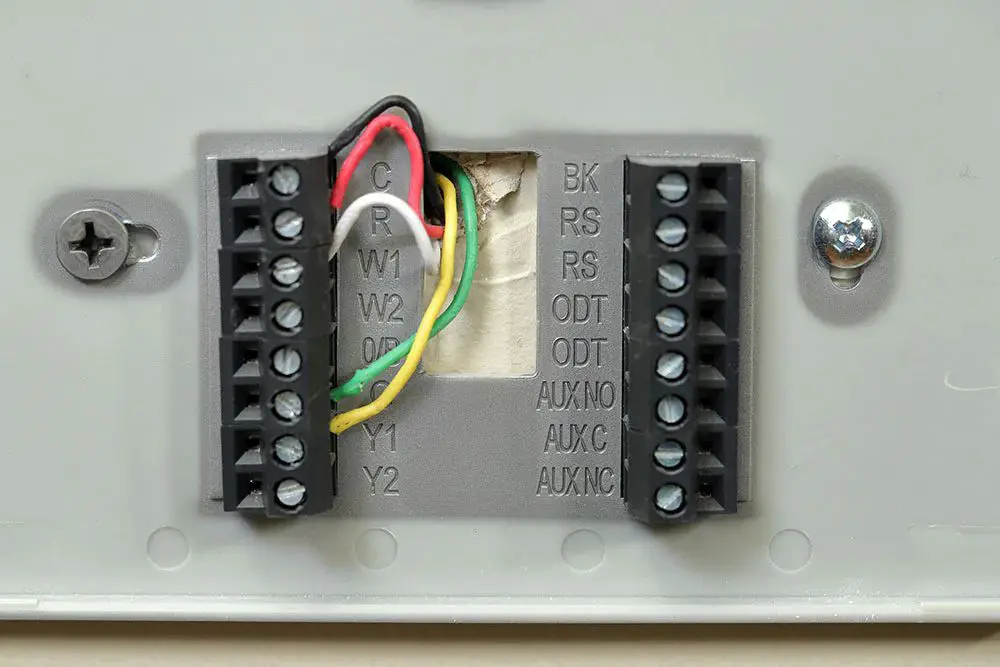
Identify the Wires
With the old thermostat removed, you should have a number of wires protruding from the wall. It’s essential to identify what each wire is for. Wires are usually 18 or 20 gauge solid core copper. The purpose of each wire is typically coded by color:
- Red – 24V AC power
- Yellow – Outdoor compressor
- Green – Fan control
- White – Auxiliary heat
- Blue – Common wire
The common blue wire provides a ground reference and may not be present in older installations. If not, you’ll need to run an additional wire between the thermostat and furnace to provide a common. The other wires connect to control terminals on the furnace circuit board. Consult the furnace wiring diagram if you can’t determine what each wire does based on color.
Match Wires to Thermostat Terminals
Once you’ve identified the function of each wire, they can be attached to the corresponding terminals on the new thermostat. Wire colors and terminal labels usually match:
- Red wire to “R” terminal
- Yellow wire to “Y” terminal
- Green wire to “G” terminal
- White wire to “W” terminal
- Blue wire to “C” terminal
On some programmable thermostats, the yellow compressor wire gets connected to the “O/B” terminal instead of “Y”. Consult the instructions for your new thermostat to confirm which wire goes where. Make sure any protective plastic shields are stripped off the ends of the wires so they make a solid connection in the terminals.
Screw Wires Into New Thermostat
Once you’ve verified each wire is going to the proper terminal, screw them securely into place. Most thermostats use small screwdriver adjustable terminal blocks. Hold each wire firmly in place and tighten the screw down onto the wire. Give each wire a gentle tug to ensure none come loose. No bare wire should be exposed.
Double check that you don’t have any wires crossed or terminating in the wrong spot. One wrong connection can prevent the thermostat and furnace from working properly. The wires must match wire-for-wire from the old thermostat. Refer to the manufacturer instructions if you have any questions about the wiring.
Mount New Thermostat
After double checking the wiring is correct, you can mount the new thermostat on the wall. Most models have mounting holes on the base plate that align with standard junction boxes. Use the included screws to mount the thermostat. Level it and tighten the screws down securely.
If you’re reusing the old thermostat wall plate, attach the new thermostat control panel to it following the directions. Carefully press all the wires into the box, then install the trim plate cover.
Restore Power
With the new thermostat securely installed on the wall, you can switch the furnace circuit breaker back on to restore power. Make sure heating and cooling systems are turned off for now. Turning them on prematurely can damage components while the wires are connecting.
Turn the thermostat mode to “off” and let it power up. It may take a few minutes to boot up when first energized. The temperature reading should display accurately after power stabilization. Now you’re ready to configure the thermostat.
Configure Thermostat Settings
Refer to the thermostat manual for instructions on programming. Make sure the date and time are set correctly. For a programmable model, enter your desired heating and cooling schedules on the appropriate day screens. Set the fan mode to either auto or on depending on your preference.
Adjust any other system settings in the thermostat configuration menu. Many models allow you to configure humidification, dehumidification, and auxiliary heat sources. Enable or disable these features as needed. Enter your local ZIP code for the most accurate weather information.
Finally, set your desired temperatures for the heating and cooling modes. Adjust in small increments and give the system a few minutes to reach and stabilize at each setting. The thermostat should closely regulate the indoor temperature.
Test Operation
Once configuration is complete, it’s time to thoroughly test operation of the heating and cooling systems with the new thermostat. Here are some key tests to perform:
- Turn on heating mode and raise the target temperature 5-10 degrees above room temp. The furnace should ignite after a short delay.
- With heating on, drop the target temperature below room temp. The furnace should stop after a short delay.
- Switch to cooling mode and lower the target temp. The A/C should turn on after a short delay.
- Raise the cooling temp setting above room temp. The A/C should stop after a delay.
- Verify fan operation in auto and on modes.
The thermostat should directly control the wall furnace to raise or lower indoor temperatures as desired. If anything is not working properly, recheck the wire connections for errors. The thermostat and furnace must be precisely wired for proper operation.
Troubleshooting Guide
If you encounter issues getting the thermostat to control the wall furnace, here are some troubleshooting tips:
| Issue | Solution |
|---|---|
| No power to thermostat | Check furnace circuit breaker is on. Inspect wire connections for problems. Test voltage at “R” and “C” terminals. |
| Heating or cooling doesn’t turn on | Recheck wiring matches wire-for-wire from old thermostat. Check any fuses in furnace. |
| Thermostat doesn’t control temperature | Make sure to configure proper modes – Heat, Off, Cool. Adjust fan mode. Check thermostat batteries if applicable. |
| Room temperature reading inaccurate | Allow thermostat to stabilize for 24 hours. Compare to known accurate thermometer. Recalibrate thermostat if required. |
Conclusion
Installing a thermostat on a wall furnace requires care to correctly identify and connect the wiring. But once properly wired and configured, the thermostat gives you precise smart control over home heating and cooling. Test thoroughly to ensure proper operation. Refer to troubleshooting tips if the thermostat is not controlling the furnace after wiring is complete.