Installing a compression fitting water shutoff valve is a straightforward DIY plumbing project that can be completed in less than an hour by a homeowner with basic tools and skills. A shutoff valve allows you to turn off water to a fixture or appliance without having to shut off the main water supply to the entire house. Compression fitting valves use a compression nut and sleeve to form a strong, leak-free seal around a water supply pipe.
In this comprehensive guide, we’ll walk through the entire process of installing a compression fitting shutoff valve step-by-step. We’ll cover choosing the right type and size of valve, gathering the required materials, turning off the water supply, cutting into the pipe, connecting the valve, and testing for leaks. With the right knowledge, a little patience, and proper safety precautions, DIYers can successfully add a shutoff valve in their home plumbing system.
Page Contents
Benefits of Installing a Shutoff Valve
Here are some of the top benefits of installing a dedicated shutoff valve:
– Allows you to turn off water to a single fixture for repairs and maintenance without disrupting supply to the rest of the house.
– Lets you isolate and shut off leaks or bursts to a specific appliance or faucet.
– Allows you to shut off an outdoor hose spigot in winter to prevent freezing and pipe bursts.
– On kitchen sinks, lets you turn off the dishwasher without cutting off the entire sink.
– Provides control over individual components in the plumbing system.
– Compression style valves are easy to install for DIYers with no soldering required.
Choosing the Right Compression Fitting Shutoff Valve
When selecting a compression fitting shutoff valve, you’ll need to choose:
Valve Type:
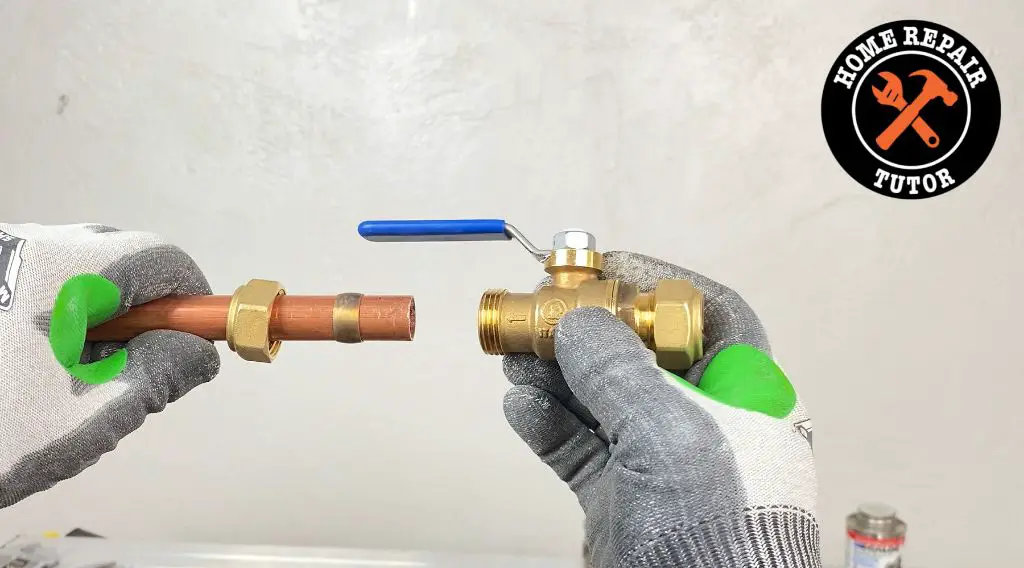
– Ball Valve: A ball valve uses a rotating ball inside to control water flow. Ball valves open and close with a simple quarter turn. They completely shut off water flow when closed. Ball valves are quick-acting and long-lasting.
– Gate Valve: A gate valve uses a metal wedge that lowers up and down into the water flow to regulate it. Gate valves provide a tight seal but are slower to operate than ball valves. The wedge can also get stuck over time.
Valve Size:
– Match the pipe size the valve will connect to. Common sizes are 1/2 inch, 3/4 inch and 1 inch. Consult your pipe size before purchasing.
Valve Material:
– Brass: Most durable. Stands up to frequent use without breaking.
– Plastic: More prone to breaking over time. Choose reinforced plastic valves.
– Chrome: Corrosion resistant. Provides a decorative finish.
Once you know the valve type, size and material, you can purchase the proper compression shutoff valve for your project. Ball valves are preferred for most applications.
Gathering the Necessary Materials
Installing a shutoff valve requires just a few supplies:
– Compression shutoff valve
– Pipe cutter or hacksaw (for cutting pipe)
– Deburring tool (for smoothing pipe edges)
– Adjustable wrenches (2)
– Teflon tape
– Rag
– Bucket (to catch water)
– Safety glasses
Make sure to get all materials ready before starting. Clear sufficient space to work around the pipe area. Lay down newspapers or a tarp to catch drips if working on crawlspace or ceiling plumbing.
Turning Off Main Water Supply
The first step is always shutting off the main water supply valve for the house. This is the only way to cut off water to the pipe section you’ll be working on.
– Locate the main valve where the water supply enters your home. It’s usually near the front foundation or in the basement.
– Turn the main valve clockwise until it stops.
– Turn on the lowest sink faucet to drain the pipes.
– Verify water is fully shut off throughout the house.
With the main water supply turned off, you can now safely cut into the pipe.
Cutting the Pipe
Use the following steps to cut into the pipe:
– Locate the pipe you want to install the shutoff valve on. Make sure it’s fully drained first.
– Measure and mark the pipe on the area you’ll cut. Make the section around 3 inches long for easier handling.
– Place a bucket under the marked area to catch drips. Wear safety glasses.
– Use a pipe cutter to slowly score around the pipe section. Make a groove all the way around.
– Alternatively, wrap tape around the cut line to prevent burrs and use a hacksaw.
– Twist the cut section back and forth until it separates.
– Use a deburring tool or file to smooth the pipe edges so they don’t scrape the o-rings.
The open section of pipe is now ready for the new valve.
Connecting the Compression Fitting Valve
With the pipe cut, you can now install the compression valve:
– Slide a compression nut followed by the sleeve onto the end of the pipe.
– Insert the pipe into the valve and tighten the nut 3-4 turns. This squeezes the o-ring sleeve against the pipe.
– Place Teflon tape onto the valve’s threaded outlet. Thread on a short nipple piece if connecting to a union coupling.
– Orient the valve handle on top or side for easy access. Union couplings allow you to position it properly.
– Use a second wrench to tighten the union nut or outlet fitting to prevent valve damage.
The valve is now installed! All that’s left is to check for leaks.
Testing for Leaks
With the valve installed, restore water and test for leaks:
– Turn the main water supply back on and check for drips.
– Slowly turn the valve from open to closed. The shut off should be smooth.
– Leave the valve closed and check for drips which indicate leaks.
– Wrap joints with additional Teflon if leaks are found and tighten.
– Open the lowest faucet and allow air to bleed from the system once the valve is reopened.
The shutoff valve is now ready for normal use! You can turn water on and off to the fixture as needed. Be sure to check for drips and tighten the valve if leaks develop over time. Properly installed compression valves should provide years of reliable service.
Tips for a Successful Installation
Follow these tips to ensure a smooth installation:
– Shut off main water supply and drain pipes before cutting valve into the line.
– Choose a ball valve design for easiest on/off control. Gate valves can stick.
– Match valve to your pipe size or use couplings for a secure fit.
– Cut pipe squarely and deburr the edges to prevent leaks.
– Position valve handle for convenient access once installed.
– Wrap threads with Teflon tape to prevent leaks at joints.
– Open faucet to allow trapped air to bleed when restoring water.
Take your time and double check for leaks. Adding a shutoff valve gives you greater control over your home’s plumbing!
Conclusion
Installing a compression fitting water shutoff valve is a manageable project for DIYers that pays dividends through increased control over your plumbing. With proper planning, materials, safety precautions and patience, you can successfully integrate a shutoff into your existing pipes in around an hour. Compression style valves form a durable seal without requiring soldering or gluing. By following the steps covered in this guide you can avoid leaks and enjoy the benefits of isolating fixtures and appliances from the main water supply. So don’t be afraid to take on plumbing projects like adding shutoff valves throughout your home!
| Tool | Purpose |
|---|---|
| Pipe cutter or hacksaw | Cutting into the pipe |
| Deburring tool | Smoothing pipe edges |
| Adjustable wrenches | Tightening compression nut and fittings |
| Teflon tape | Sealing threaded joints |
| Bucket | Catching water when cutting pipe |
| Safety glasses | Protecting eyes from debris |
| Valve Type | Description | Benefits |
|---|---|---|
| Ball Valve | Uses a rotating ball to stop water flow. Operates with a 90 degree turn. | Fast action, complete shutoff, long lifespan. |
| Gate Valve | Uses a lowering metal wedge to stop water. Operates with multiple turns. | Good seal when fully closed. |
| Valve Size | Pipe Types |
|---|---|
| 1/2 inch | Water lines under sinks, dishwashers, smaller appliances. |
| 3/4 inch | Kitchen sinks, bathroom sink supplies. |
| 1 inch | Main water lines, outdoor spigots. |