Installing a hardwired light can seem daunting, but it’s actually a straightforward process that most homeowners can tackle themselves. The key requirements are having the right materials, understanding electrical safety, and following the proper steps for installation. In this comprehensive guide, we’ll walk through everything you need to know to successfully wire and install a hardwired light fixture in your home.
Page Contents
What You’ll Need
Before getting started, you’ll want to make sure you have all the necessary materials and tools on hand. Here’s an overview of what you’ll need:
Electrical and Lighting Supplies
- Light fixture of your choice
- Electrical box to mount the fixture
- Wire nuts to connect the wires
- Extra wire if needed to extend existing wires
- Voltage tester to make sure power is off before working
Tools
- Screwdriver
- Wire strippers
- Drill with assorted drill bits
- Drywall saw for cutting into ceiling/wall if needed
- Ladder
- Safety gear like glasses and gloves
Having these supplies and tools on hand will make the installation process much smoother. Always turn the power off at the circuit breaker before starting any electrical work.
Safety Tips
When dealing with electrical wiring, safety should always be your top concern. Here are some key tips to keep in mind:
- Turn off power at the breaker before starting and double check it’s off with a voltage tester.
- Follow all local electrical codes and regulations.
- Only work on wiring you are comfortable with and seek help from an electrician if needed.
- Wear safety glasses and gloves to protect yourself.
- Use a fiberglass ladder when working in the ceiling and don’t overreach.
- Make sure wires are securely connected with proper wire nuts.
- Check that all light fixture parts are in good condition before installing.
- Connect the ground wire to avoid potential shocks.
Following basic electrical safety guidelines will go a long way in keeping you safe. If at any point you feel unsure about the work, consult with an experienced electrician.
How to Install a Hardwired Light Fixture
Once you have all the supplies and have turned off power, you can move on to the installation steps:
1. Remove the Old Light Fixture
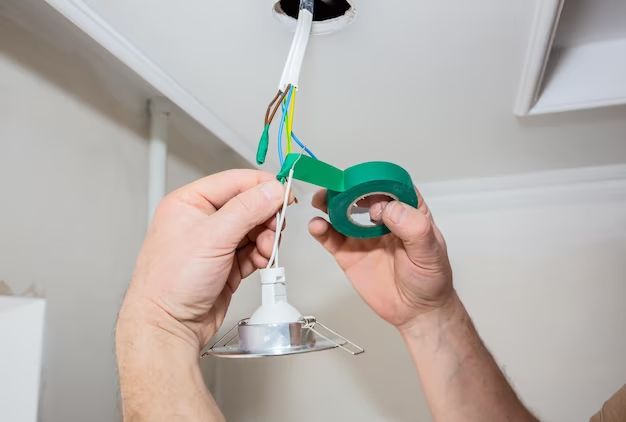
If there was a previous light fixture, start by taking it down. Remove the fixture cover and bulb and disconnect the wiring. You should see two or three wires attached to the fixture—the line (typically black), neutral (typically white), and sometimes a ground wire (typically green or bare copper). Loosen the screws on the wire connectors and pull the wires off the fixture.
Take the fixture down from the electrical box, keeping note of how it was mounted. You’ll need to mount the new light fixture the same way. Dispose of the old light fixture if it will not be reused.
2. Prepare the Wires in the Electrical Box
Check the condition of the existing wires coming out from the electrical box in the ceiling or wall. Make sure no insulation is cracked or damaged. Trim back any excess wire so there is just enough length to connect to the new light fixture.
Use wire strippers to strip 3/4 inch of insulation from the ends of each wire if they are not already stripped. Twist the strands of copper tightly together to prevent fraying. Make sure you identify the black (line), white (neutral), and ground wires.
3. Connect the New Light Fixture
Hold the new light fixture up to the electrical box to identify which mounting holes align. Make small marks at the mounting hole locations with a pencil. Set aside the light fixture and drill holes at the marked locations if needed to mount the fixture bracket directly into the electrical box.
Hold the fixture up to the box again and screw the mounting screws into place to securely attach the fixture. Don’t fully tighten yet though.
Now you can move onto connecting the wires. Line up matching wires—black to black, white to white, and ground to ground. Twist a wire nut onto each connection clockwise until tight and secure. Tug on the wires gently to confirm they are making a solid connection.
Connect the ground wire to the green screw or wire on the light fixture and electrical box. Push all connected wires carefully back into the box.
4. Mount the Fixture Cover and Bulb
With the wires safely connected, you can screw the fixture cover or globe into place on the base. Install a new light bulb that matches the fixture’s specifications. Check that the bulb turns on by restoring power at the breaker and flipping the light switch.
If the light works, tighten up any loose mounting screws to firmly attach the fixture in place. Install any trim pieces or covers to complete the installation.
Testing and Use
Once installed, it’s a good idea to do the following tests and checks:
- Verify the light turns on and off correctly by the switch.
- Test any dimming functionality if the light fixture supports it.
- Check that the light casing is securely attached with no gaps, exposed wires, etc.
- Evaluate the direction and brightness of the light and make any adjustments.
- Monitor the fixture temperature after several minutes of use to make sure it doesn’t get too hot.
With those checks complete, you can start enjoying your new, hardwired light fixture! Just follow common sense precautions like not exceeding the maximum wattage rating and not touching hot bulbs. Hardwired lights provide brighter, more powerful illumination than plug-in lamps and are a great DIY electrical project.
FAQs about Installing Hardwired Lights
Here are answers to some frequently asked questions about wiring and installing hardwired light fixtures:
What’s the difference between a hardwired and plug-in light?
A hardwired light does not have a cord and plug and must be directly connected to your home’s electrical wiring. This provides a more permanent and hardwired solution. Plug-in lamps use power cords and can be moved more easily.
How much wiring knowledge is needed?
Basic skills like stripping wires and connecting them with wire nuts is useful. Understanding electrical safety is also key. If you understand home wiring basics, you can likely install a hardwired light on your own. If not, it’s best to have an electrician do the work.
What tools do I need?
At minimum, you’ll need a screwdriver, wire strippers, ladder, and voltmeter. Safety gear like gloves and eye protection is also recommended. A drill, wire cutters, and drywall saw are also helpful for installing the electrical boxes and fixtures.
Should I turn off the power at the breaker?
Yes, always turn off the circuit breaker for the light fixture before doing any work. Verify power is off by testing with a voltmeter. Working on live wiring can result in dangerous shocks.
How do I determine the right wattage bulb?
Check the fixture or package for a label noting the maximum wattage the light is rated for. Use a bulb at or below that wattage to prevent overheating.
Conclusion
Installing hardwired lighting may sound difficult, but taking the proper precautions and following the steps covered in this guide makes it very manageable as a DIY project. The most important thing is to adhere to all electrical safety rules, turn off power at the breaker, and seek help from an electrician if unsure about any aspect of the work. Hardwired fixtures provide bright, permanent lighting that can significantly enhance your home’s lightscape when installed properly.