Installing a lint trap on a washer hose is an easy way to help prevent clogs and keep your washing machine running smoothly. Lint and debris can build up over time in the hoses that connect your washing machine to your home’s water supply. This buildup can restrict water flow, cause leaks, and damage machine components. Adding a simple inline lint trap gives you an easy way to regularly clean out lint before it leads to bigger problems.
Page Contents
What You’ll Need
Installing a lint trap is a straightforward DIY project that can usually be done in about 10-15 minutes. Here are the basic supplies you’ll need:
- Lint trap – An inline lint trap designed for washer hoses. Choose a 1/4 turn or 3/4 turn style. Make sure the connecter size matches your washer hoses.
- Adjustable wrench – To loosen and tighten connections.
- Old towel or rag – To catch any water drips during the installation.
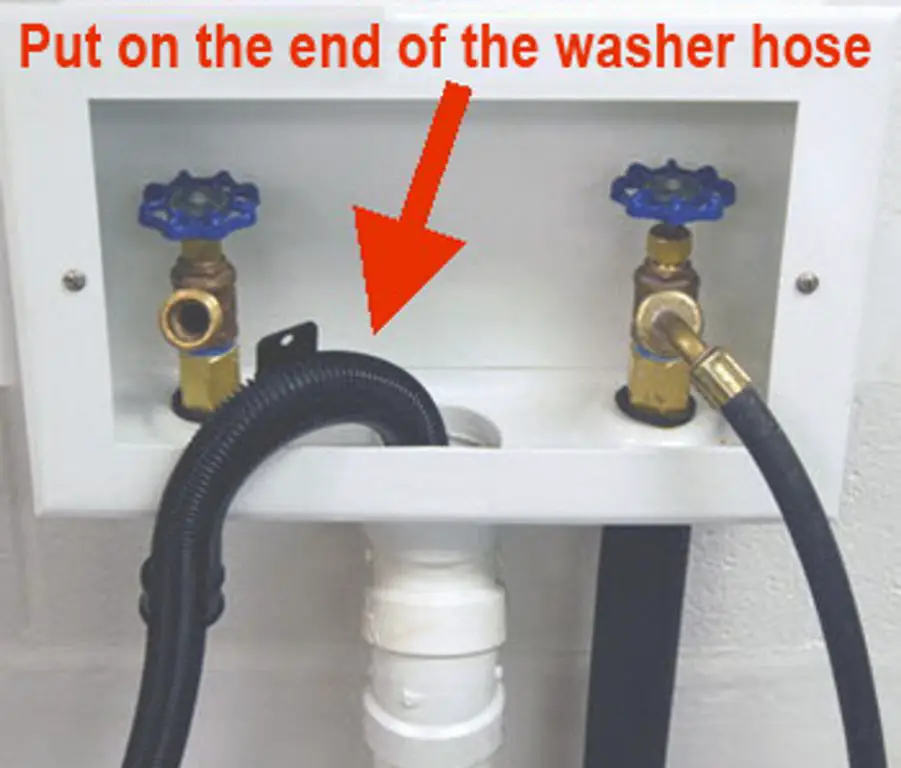
Disconnect the Washer Hoses
Start by turning off the hot and cold water supply valves behind your washing machine. These are usually located on the wall behind the washer. Turning them clockwise will shut off the water.
Place the rag or towel beneath the faucet connections of the washer to catch any drips.
Then, use the adjustable wrench to loosen the couplings that connect the hot and cold hoses to the corresponding hot and cold faucets on the back of the washing machine. Some twisting force will be required to break the watertight connection. Once loose, you can unscrew them completely by hand and set the hoses aside.
Installing the Lint Trap
Now you’re ready to put in the new lint trap. Start by connecting one side of the lint trap to the hot water faucet on the back of the washing machine, using the same coupling nut that was originally there. Get it hand tight and then use your wrench to tighten it further about a quarter turn past hand tight.
Next connect the hot water supply hose to the other side of the lint trap, again using the existing coupling nut. Get it hand tight and use the wrench to tighten it an additional quarter turn.
Repeat this process for the cold water hose, connecting one side of a second lint trap to the cold water faucet on the washer. Then connect the cold water hose to the other side of the lint trap.
Make sure all connections are tightened securely to prevent leaks.
Turn Water On and Check for Leaks
With the lint traps installed on both the hot and cold hoses, turn the water supply valves back on. Check carefully along all the connections for any drips or leaks. It’s normal for there to be some dampness. But if you see water beading up or dripping, turn the valves back off and tighten the leaking connection further with the wrench.
Once no leaks are present, run the washer through a complete cycle to make sure everything is working properly and to flush out the lines.
How to Clean the Lint Traps
Your lint traps will now collect all the lint, dirt, and debris that previously could reach your washer’s internal components. This improves washing performance and longevity.
To keep them working well, the lint traps need to be manually cleaned out on a regular basis. Simply unscrew the coupling nuts by hand, remove the lint trap, flush it out in the sink under hot water, and replace it.
A monthly cleaning is usually sufficient for most households. If you have a lot of laundry lint, or notice flow from the taps slowing down, try cleaning the traps every couple of weeks.
Conclusion
Installing inline lint traps is an easy plumbing task that can protect your washing machine and improve its performance. With the right tools and safety precautions, it can be completed by most DIYers in less than 15 minutes. Be sure to locate your washing machine’s water supply valves, tightly seal all connections, and check for leaks before running the washer. Add regular cleaning of the lint traps to your laundry routine to keep water flowing freely.
Here is a table summarizing the steps:
| Step | Task |
|---|---|
| 1 | Turn off water supply valves |
| 2 | Disconnect washer hoses |
| 3 | Install lint traps on both hot and cold hoses |
| 4 | Reconnect washer hoses to lint traps |
| 5 | Turn water back on and check for leaks |
| 6 | Run washer through complete cycle |
| 7 | Clean lint traps regularly |
Installing lint traps is a quick project that can make a big difference in your washing machine’s performance and longevity. With the right steps, you can do it yourself in very little time. Just be sure to confirm the sizing, securely connect all fittings, check for leaks, and clean the filters routinely. Your machine will operate better and you’ll extend its working life by keeping damaging lint and debris from building up internally.
Lint traps come in a variety of styles and sizes to fit most standard washing machine connections. The key is to match the size of your existing hoses so everything connects properly. The most common sizes are 3/4 inch and 1/4 inch. Measure your washer hose ends before shopping to ensure you get the right fit.
Inline lint traps are a very affordable upgrade for your washing machine. Prices range from $5-15 for a pair of them, depending on materials and build quality. Plastic models with basic compression fittings are the most budget friendly. Stainless steel traps with higher flow rates cost a bit more but are very durable. Brands like Keeney, Oatey, and Everbilt offer reliable options.
Shop around at home improvement stores or order online to find the best lint trap to fit your setup. Consider sizing, ease of cleaning, flow rate, and price when choosing the right ones for your washing machine hoses. Installing them is so quick and easy, it’s one of the best preventive maintenance steps you can take to keep your washer in top shape.
What to Look for When Buying
Here are a few key factors to consider when selecting inline lint traps for your washing machine:
- Size – Match the diameter of your existing hoses, usually 1/4″ or 3/4″. Measure to confirm.
- Style – Choose compression or threaded connections to match your setup.
- Flow rate – Look for CFM ratings of at least 7-10 for adequate water flow.
- Material – Plastic is inexpensive but stainless steel is very durable.
- Ease of cleaning – Opt for quick turn or pull out screens that allow easy lint removal.
- Price – You can find quality options ranging from $5-15 for a pair.
Taking these factors into account will ensure you select durable, convenient lint traps that seamlessly fit into your existing washing machine plumbing.
How Lint Traps Improve Washing Machine Performance
Using inline lint traps brings several benefits that enhance the performance of your washing machine:
- Improves water flow – Removes lint that can clog hoses and restrict water supply.
- Prevents leaks – Lint buildup can damage hoses and cause leaks over time.
- Reduces strain on components – Keeping lint out improves pump and valve function.
- Cleans out detergent – Traps residue that can build up and stain clothes.
- Extends machine life – Lint causes wear and tear on internal parts over time.
- Enhances cleaning performance – Strong, steady water flow helps wash clothes more effectively.
By taking a few minutes to add inline lint traps to your washer hoses, you can optimize your machine’s performance and keep it running like new for longer.
Maintenance Tips
To keep your inline lint traps working properly:
- Check and clean the traps once a month at minimum.
- If water flow seems restricted, clean the traps immediately.
- Open trap housing and flush under hot water to remove all lint.
- Make cleaning the traps part of your laundry routine.
- Replace traps that become cracked or warped over time.
- Verify the seals and connections every few months for drips or leaks.
Proper maintenance will ensure the traps continue collecting lint and debris before it can reach your washer’s inner components. Periodic cleaning and inspection will keep them working optimally.
Conclusion
Installing lint traps is an easy DIY project that can make a big difference in your washing machine’s performance and longevity. The right inline traps will improve water flow, reduce strain on the system, and prevent leaks. Be sure to match your existing hose sizes, make watertight connections, and regularly clean out the lint collected in the screens. Follow the proper installation steps and maintain the traps, and your washer will operate more effectively for many years to come.