Installing a new metal tire valve stem is a relatively simple job that most drivers can do themselves in just a few minutes. A metal valve stem is more durable than a rubber one and less prone to breaking or leaking. Replacing a damaged or worn out valve stem is important to maintain proper tire air pressure and extend the life of your tires. In this comprehensive guide, we will walk through the entire process step-by-step, from gathering the necessary tools and materials to removing the old stem and installing the new one. Whether you are a novice or experienced DIYer, following these instructions will ensure you can get the job done right.
Page Contents
- 1 Benefits of Metal Valve Stems
- 2 Necessary Materials
- 3 Step 1: Deflate the Tire
- 4 Step 2: Remove the Valve Cap and Core
- 5 Step 3: Detach the Old Stem
- 6 Step 4: Install the New Stem
- 7 Step 5: Reinstall Valve Parts
- 8 Step 6: Inflate the Tire
- 9 Step 7: Reinstall the Wheel
- 10 Tips for Maintaining Metal Valve Stems
- 11 Replacing Rubber Valve Stems
- 12 Conclusion
Benefits of Metal Valve Stems
Before getting into the installation process, let’s first review some of the key benefits that metal valve stems provide over rubber ones:
- Increased durability – Metal stems are much more resistant to breaking or cracking than rubber.
- Longer lifespan – A quality metal stem can last upwards of 100,000 miles or more.
- More stable air pressure – The solid build prevents air from escaping as easily.
- Resistance to weathering – Plastic and rubber can become brittle when exposed to ozone, sunlight, etc.
- Easier to tighten – Metal threads allow you to thread on the valve cap tighter to prevent leaks.
For most drivers, the main appeal of a metal stem is the enhanced durability and longevity. Rubber valve stems often need to be replaced every couple years due to cracking or damage from the high pressures inside the tire. A metal stem all but eliminates this issue when installed properly.
Necessary Materials
Installing a metal valve stem is not difficult, but you need to have the right replacement stem and tools on hand. Here are the materials required:
- Metal valve stem – Make sure to get the proper type and length for your vehicle’s tires. The stem should match the rubber grommet inside the rim.
- Valve stem tool – This special tool grips and turns the valve stem for easy removal and installation. Often has a built-in gauge.
- Rubber mallet – Helpful for tapping the new stem in place and seating the grommet.
- Pliers – Standard pliers may be needed to pull the old stem out if corroded.
- Rags – For cleaning the area around the valve hole as needed.
- Tire gauge – Used to check your tire pressure after installing the new stem.
You can find replacement metal valve stems and tools at any auto parts store or online retailer. Purchase quality brass or stainless steel stems from a reputable brand. The total cost is typically $10-20 for a set of stems and tool.
Step 1: Deflate the Tire
Before you can remove the old valve stem, you need to completely deflate the tire. Use the valve stem tool to press down on the valve core pin inside the stem. This will release all the trapped air from the tire.
Continue depressing the pin until you no longer hear air rushing out. Make sure to press it slowly and avoid a rapid air release, as this could potentially damage the tire beads. The tire should be completely flat with no remaining air pressure.
Step 2: Remove the Valve Cap and Core
With the tire deflated, unthread and remove the valve cap from the old stem. Place it in a secure spot, as you’ll need to reinstall it on the new stem later.
Next, use your valve stem tool to unthread and remove the valve core inside the old stem. The core is a small brass pin that seals the stem opening when inflated.
Twist it counterclockwise to remove. This allows any remaining air to escape from the tire and makes it easier to detach the stem.
Step 3: Detach the Old Stem
Now comes the trickiest part – detaching the old rubber valve stem from the steel rim hole. This often requires quite a bit of wiggling and prying.
First, take your valve stem tool and try turning the stem counterclockwise to unscrew it. If it’s corroded or stuck, spray some penetrating oil around the base and let it soak in for 5-10 minutes to loosen it up.
If you’re still unable to unscrew it by hand, lock a pair of pliers around the base of the stem. Grip tightly and turn counterclockwise while pulling out firmly.
Once broken free, pull the old stem directly away from the rim hole until it detaches. Use a rag to clean up any rubber residue left behind on the rim opening.
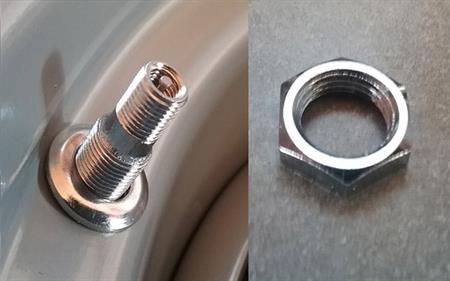
Step 4: Install the New Stem
With the old valve stem removed, you can now install the new metal replacement. Start by threading the new stem through the rim hole from the inside of the wheel.
Hand-tighten it clockwise until snug against the rim. You want the base to fit snugly into the rubber grommet seal inside.
Use the rubber mallet to gently tap around the base of the stem. This seats it firmly into the grommet for an airtight seal.
Finish tightening the new stem by hand until oriented correctly. Make sure it’s screwed in straight. The top of the stem should point directly away from the wheel surface.
Step 5: Reinstall Valve Parts
With the new metal valve stem fully threaded into the rim, you can reinstall the internal valve parts:
1. Thread the valve core clockwise back into the new stem by hand until tight.
2. Screw the valve cap back on over the end of the stem. Hand tighten only.
These valve components seal the stem opening and prevent air leaks when reinflating the tire.
Step 6: Inflate the Tire
The new metal valve stem is installed, but you still need to reinflate the tire to the proper air pressure.
Use a tire pressure gauge to measure the PSI as you inflate. Fill the tire to the recommended inflation pressure printed on the sidewall.
When it reaches the target pressure, give the valve cap a final tightening with the stem tool. This ensures an airtight seal.
Step 7: Reinstall the Wheel
If you removed the wheel to access the valve stem, the final step is reinstalling it on the vehicle.
Line up the wheel bolts with the lug nut holes and hand tighten them. Then use the lug wrench to securely tighten each nut in a star pattern.
Lower the vehicle from the jack once complete. Torque the lug nuts to the wheel manufacturer’s specs after 24 hours.
Tips for Maintaining Metal Valve Stems
Follow these maintenance tips to get the longest life from your new metal valve stems:
- Check tires weekly for proper inflation.
- Always use a valve cap to protect the stem.
- Avoid overtightening the cap.
- Lubricate the stem occasionally with light oil.
- Periodically inspect the stems for damage or leaks.
- Avoid hitting curbs or potholes which can bend the stems.
With proper care and maintenance, quality brass or stainless steel stems should provide many years of reliable use. Be sure to periodically check the torque on the stem as well using your valve tool. Catching a loose stem early prevents air leaks.
Replacing Rubber Valve Stems
While metal stems are ideal for longevity, you may prefer keeping the factory rubber stems on certain vehicles. Here are some quick tips for replacing standard rubber valve stems when needed:
- Rubber stems pull straight out of the rim after deflating the tire.
- Lightly lubricate the new stem with soap or water to ease installation.
- Thread until the stem base seats snugly against the grommet.
- Rubber stems usually do not require tightening with pliers or a mallet.
- Inspect regularly for cracking which indicates replacement is needed.
Replacing rubber valve stems is easiest done by hand versus metal stems which often require tools. Follow the same deflation, core removal, and inflation steps.
Conclusion
Installing new metal valve stems is an easy DIY job anyone can accomplish with the right materials and tools. Following the proper steps for removal and installation ensures you get a tight, airtight seal. Taking the time to replace aged rubber stems with durable metal versions will extend the life of your tires and provide stable, optimized air pressure. And performing regular stem maintenance keeps your tires in top shape for safety and performance.