Installing an underground fence for your pet is an effective way to keep them safely contained in your yard without ruining the aesthetics with a visible barrier. While there are several quality brands to choose from, Petsafe underground fences are some of the most popular and easiest to install. With the right planning and setup, you can have a new Petsafe system up and running in your yard in no time.
Page Contents
What is an Underground Fence?
An underground fence, sometimes called an invisible fence, is a containment system that uses a wire buried around the perimeter of your yard along with a receiver collar worn by your pet. The system works by transmitting a radio signal through the boundary wire. As your pet approaches the boundary, the collar receiver picks up the signal and administers a safe but startling static correction to deter them from crossing. This trains your pet to remain within the set boundaries you establish.
Underground fences provide a great alternative to traditional fencing that preserves your view and doesn’t obstruct your yard. Petsafe is one of the leading brands in underground fencing equipment and offers systems to suit yards of any size. While professional installation is available, Petsafe products are designed to make DIY installation simple for any pet owner.
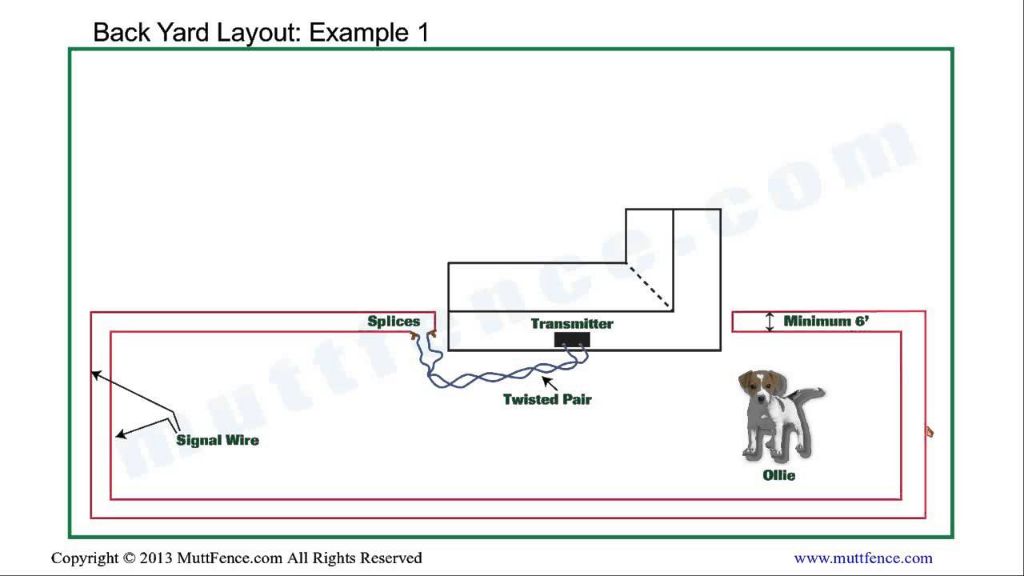
Planning Your Layout
Carefully planning out your boundary layout is a crucial first step when installing your Petsafe underground fence. Here are some tips to help you design an effective containment area:
- Walk your yard and determine the areas you want to restrict access to like gardens, pools, or the front yard.
- Consider how much space your pet needs and provide enough area for adequate exercise.
- Avoid running the wire over or near any metal objects which can cause signal interference.
- Create smooth turns and avoid any sharp corners in the boundary.
- Plan for any gates, entrances, or crossing points you want your pet to have access to.
It’s helpful to sketch out ideas on paper first before installing the fence wire. Having a good layout planned ahead of time will make the installation process go much smoother.
Gathering Supplies
Once you have a boundary layout mapped out, take inventory of all the supplies you’ll need for installation. Petsafe systems come with the basic components, but you’ll want to make sure you have the following handy:
- Petsafe wire and collar
- Wire splicing caps or waterproof caulk
- PVC pipe, conduit, or lawn staples to hold down the wire
- Zip ties, duct tape, flags, or lawn paint to mark layout
- Wire stripping pliers
- Electric drill, shovel, and lawn edger (if burying wire)
- Voltmeter to test the system
- Safety equipment like gloves and eye protection
Gathering supplies ahead of time prevents delays and allows you to install your fence efficiently without having to stop to find missing tools.
Installing the Boundary Wire
With your layout set and supplies in hand, you’re ready to start installing the boundary wire:
-
Unroll the boundary wire and follow your planned layout, using flags or paint to mark it visibly. Secure the wire to the ground temporarily with lawn staples.
-
Once you have the full layout in place, begin permanently securing the wire. Burying it is ideal but you can also encase it in PVC piping or conduit if needed.
-
If burying the wire, use an edger or sharp shovel to cut a 1-3 inch trench around the perimeter. Place the wire into the trench and backfill the dirt over top.
-
At any gate or doorway, wrap the wire in PVC piping and bury across the opening so your pet can pass through without getting corrected.
-
At all splice points, use waterproof wire nuts or caulk to seal the connections and prevent moisture damage.
-
Leave 12-18 inches of slack at all corners so the wire splices don’t pull apart over time.
-
Avoid making 90 degree turns at corners. Instead, make rounded turns for better distribution of the signal.
-
Once the boundary wire is installed completely, connect both ends to the transmitter location.
Taking care to properly bury and splice the wire will create a boundary that will hold up for years of use by your pet.
Installing the Transmitter
The transmitter delivers the radio signal through the boundary wire to create the containment zone.Choose an indoor location like a garage or basement near an electrical outlet. Here are some tips for installing the transmitter:
- Select a location away from large metal objects which can cause interference.
- Place the transmitter on a flat, stable surface or mount it to the wall using the mounting holes.
- Plug in the transmitter power cord to a grounded 120-volt outlet.
- Connect the boundary wire ends to the transmitter terminal following the color codes.
- Turn on the transmitter and adjust the boundary width control knob as needed.
- Keep the transmitter in an indoor temperature controlled area to prevent weather damage.
Consult your Petsafe manual for detailed transmitter setup and mounting instructions depending on your specific system.
Fitting the Receiver Collar
The receiver collar delivers the correction when your pet reaches the boundary zone. Getting a proper fit is important so follow these steps:
-
With your pet standing, center the contact points underneath your dog’s neck so the tips touch the skin.
-
The collar should fit snug but not be constricting. You should be able to fit one finger between the strap and your dog’s neck.
-
Allow your dog to wear the collar for several days while keeping the system disabled. This lets them get accustomed to wearing it before training starts.
-
Check the fit daily and readjust as needed. Monitor for any skin irritation from the contact points.
-
Once your dog is comfortable wearing the collar, you can begin the boundary training.
Getting the receiver collar properly positioned ensures consistent detection of the boundary signal.
Training Your Pet
With the system installed, you’re ready to train your pet on their new fence boundaries. Training should be introduced in small segments to teach your pet to turn back from the boundary when they hear the warning beep rather than crossing into the zone of static correction. Here are some helpful guidelines for effective training:
- Always reward and praise your pet for turning back from the boundary zone when they hear the beep.
- Gradually increase boundary distances over time starting from just a few feet wide and building up over several weeks.
- Use training flags at wider distances to help your pet understand how far the boundary extends.
- Practice training sessions multiple times per day for 5-10 minutes each over a period of 2-4 weeks.
- Introduce distractions slowly over time adding play, toys, or family members near the boundary.
- Be patient! Some pets may take longer to learn the boundaries than others.
Consistent, positive training will help your pet quickly learn the fence boundaries and avoid unnecessary corrections.
Installation Tips and Tricks
Here are some helpful tips and tricks to make your Petsafe underground fence installation even smoother:
- Pre-mark your wire route – Use spray paint or flour to mark the layout before burying the wire for better visibility.
- Keep signal strength consistent – Bury wire at a consistent 1-3 inch depth instead of varying depths.
- Prevent wire damage – Use PVC piping or conduit over driveway crossings or rocky areas.
- Loops and islands – Use looped wires in high traffic zones instead of a single wire to prevent damage.
- Gates – Bury wires at least a foot deep under gates or driveways to prevent signal interruption.
- Test the system – Check for signal gaps by walking the boundary while testing the collar.
Taking precautions during installation will create a robust fence free of signal issues.
Troubleshooting Common Problems
Even with proper planning and installation, you may encounter some occasional issues with your underground fence. Here are some common problems and solutions:
| Problem | Potential Cause | Solution |
|---|---|---|
| Weak or inconsistent signal | Loose wire splice, low transmitter battery, damaged wire insulation | Check all wire splices, replace transmitter battery, repair any wire damage |
| Dog gets no stimulation | Poor collar contact, low or dead battery | Ensure collar has good skin contact, replace collar battery |
| Dog crosses boundary | Boundary width too narrow, collar not fitted properly | Expand containment area, refit collar firmly against dog’s neck |
| Dog hesitates at boundary | Signal strength too high | Turn down transmitter boundary control knob slightly |
Addressing any functionality issues right away will help maintain the effectiveness of the fence and your dog’s training.
Conclusion
Installing a Petsafe underground fence takes planning and careful setup but provides a great way to safely keep your pets in your yard. By mapping out your layout, properly installing the wire, fitting the collar correctly, and taking time to train your dog, you’ll find an underground fence is an easy and effective containment solution. Address any issues immediately and perform regular system testing to ensure your underground fence provides your pet with years of worry-free enjoyment within their safe play area.