Page Contents
Overview
Installing a railing on porch steps helps provide safety and stability when using the stairs. Having a proper railing system prevents falls and injuries, especially for seniors and young children. Putting in a railing is also a great way to improve the aesthetic appeal of a front porch. With some basic DIY skills and the right materials, installing railings on porch steps is a straightforward weekend project. The main steps involve preparing the site, installing the posts, attaching the top rail and balusters, and adding finishing touches. Advance planning and accurate measurements are key to getting sturdy, level, and visually appealing results.
Things Needed
Installing porch step railings requires gathering the right building supplies and tools ahead of time. Here is an overview of the materials and equipment needed:
Railings
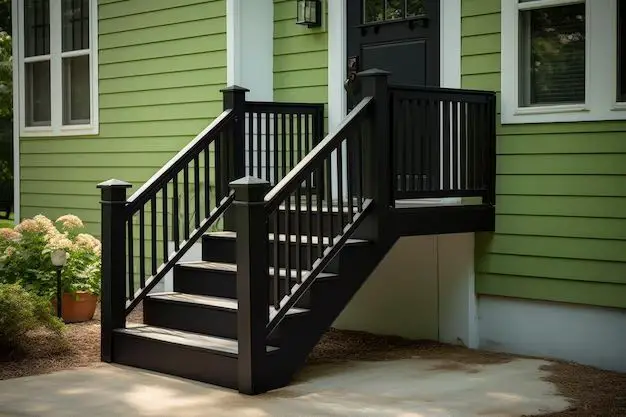
– Top rail – A long, sturdy board made of wood, vinyl, or metal that runs horizontally along the top. This provides the main structure.
– Balusters – Vertical supports that go between the top rail and bottom rail spaced evenly apart. Wood and metal balusters are common.
– Bottom rail – A second long horizontal board at the base of the railing system to anchor it.
– Newel posts – Vertical posts at the ends of the railing to mount it to. Often decorative.
– Rail brackets – Metal brackets to attach rails to newel posts.
Fasteners
– Galvanized screws and nails
– Railing mounting hardware like lag bolts and anchor bolts
Tools
– Tape measure
– Level
– Saw – miter for cutting angles on wood
– Drill and drill bits
– Wrench for tightening bolts
– Safety equipment – gloves, eye protection, etc.
Having all materials and tools prepared ahead of time ensures efficient and smooth project execution.
Step 1: Measure and Mark Post Locations
The first step is using a tape measure to determine the exact locations for installing the newel posts at the start and end of the porch steps. The posts should line up with the edge of the deck or porch on one side and the outer edge of the bottom stair tread on the other. This provides the anchoring points to mount the railing system between.
Use a pencil or marker to mark the centers of the newel post locations based on your measurements. Having accurate marks for drilling the holes and securing the posts is critical. The posts must align properly on each side for the railing to fit snugly and have the right look.
If adding railings to both sides of the steps, measure and mark post positions on each side an equal distance apart to ensure they match up.
Step 2: Install the Newel Posts
With the newel post locations marked, use a spade bit or auger bit matching the diameter of the posts to drill holes in the decking or porch flooring at each mark. Drill down at least 24 inches deep.
Place each newel post in its hole. Temporarily brace the posts with boards and clamps to hold them straight while securing in position.
Mix concrete and pour it in the holes around the posts. Fill each hole to about 2 inches below the top surface. Allow the concrete to fully cure as per manufacturer instructions, generally around 48 hours.
Once cured, the concrete will permanently anchor the newel posts in place to handle the pressure of the railing installation.
Step 3: Install the Bottom Rail
The bottom rail provides the base for the balusters to connect to. With the posts in place, measure the distance between them. Cut a length of bottom rail board to precisely fit the opening snugly.
Position the bottom rail piece between the posts. Have it facing up to eventually allow balusters to connect into it from above. Utilize shims underneath if needed to ensure the top face of the rail is as close to horizontal as possible.
Attach the bottom rail to the newel posts with rail brackets and screws. The rail should be firmly fixed in place while keeping it level to properly support the rest of the railing structure.
Step 4: Install the Top Rail
The top rail gets mounted parallel to the bottom rail you just installed. Measure again between the newel posts and cut the top rail board to an exact custom fit.
Place the top rail piece in position centered above and parallel to the bottom rail. Use spacers or shims underneath if needed to make sure the top rail is horizontal and square.
Attach the top rail to the newel posts using rail brackets and screws. Having this top horizontal structure completed provides a stable frame for adding the vertical balusters between.
Step 5: Install Balusters
With both rails securely mounted to the posts, you can start inserting balusters in between them.
First, determine the ideal spacing between balusters based on local building codes. For example, leave no more than 4 inches between them if young children will be using the stairs. Wider spacing may be allowable for railings on decks or porches not near steps.
Measure and mark the center points for each baluster location on the rails. This ensures evenly distributed spacing.
Cut the balusters to the correct length to fit snugly between the rails. Insert each baluster into the openings on the bottom rail and align it with the marks on the top rail.
Use screws driven through the inside of the rails to firmly attach both ends of each baluster. Driving screws from the inside provides a cleaner look.
Work across the length of the railing, installing balusters at each marked location until the space between posts is filled.
Step 6: Install Decorative Trim
With the structural railing components fully installed, additional decorative trim can be added to give a finished look.
Options include:
– Corner trim – Covers exposed corners of rail ends for a seamless appearance.
– Skirts – Vertical trim pieces on bottom rail to conceal open space underneath.
– Cap rail – Covers top of baluster ends for smoother lines.
– Newel post caps – Decorative caps on top of each post to finish them off.
Carefully measure and cut trim pieces to fit. Use adhesive, nails, or screws to securely attach them based on the material.Take a step back to ensure all trim aligns evenly for optimal aesthetics.
Step 7: Seal, Prime, and Paint
Sealing all wood surfaces before painting is important to protect from moisture damage. Apply exterior-grade wood primer to all railings, posts, and trim prior to the final coat.
Choose a high quality exterior paint in a gloss or semi-gloss sheen for best durability. Apply two or more coats allowing proper dry time between coats.
Proper prep and painting provides moisture, rot, and UV protection to maximize longevity of the porch railing installation.
Tips
– Check local building codes for railing height and baluster spacing requirements.
– Wear safety glasses and gloves when cutting, drilling, and nailing to avoid injuries.
– Use a miter saw to cut rail and trim pieces at 45-degree angles for perfectly mitered corners.
– Pre-drill baluster screw holes to prevent splitting wood.
– Weatherproof metal railing components to limit rust and corrosion.
– Add lighting fixtures to newel posts or rails to improve nighttime visibility on dimly lit porches.
Conclusion
Installing railings on porch steps is an important safety upgrade. With some carpentry skills and the right materials, it can be completed successfully as a DIY project. Careful planning and accurate measuring are essential to getting a professional look that enhances the home’s curb appeal. Maintaining the railings properly with paint and sealants ensures they provide safe access to porch steps for years to come. Improve the function and beauty of your front porch with a well-built railing addition.