Installing a sink in a laundry room can be a great way to add convenience and functionality to your home. With a laundry sink, you have a dedicated place to pre-treat stains, hand wash delicate items, fill up a mop bucket, and more. Putting in a laundry sink is a relatively straightforward home improvement project that most DIYers can tackle. In this article, we’ll walk through the entire process step-by-step. We’ll cover planning considerations like location and plumbing, recommendations for sink and faucet selection, details on connecting the drain and water supply, and finally installing and sealing the sink. Read on to learn everything you need to know to successfully add a sink to your laundry room!
Page Contents
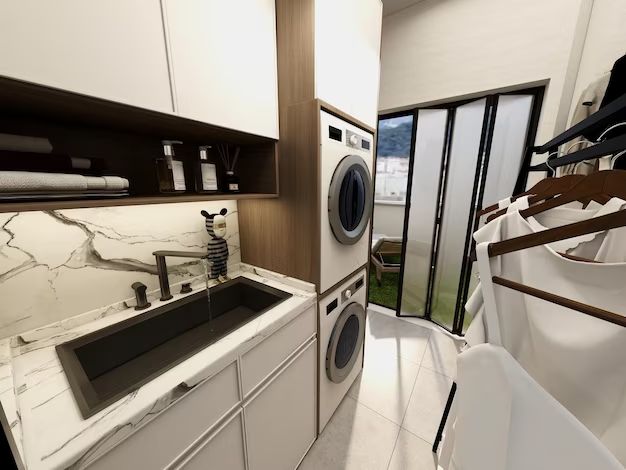
Should You Install a Sink in the Laundry Room?
Adding a laundry sink is one of the most popular laundry room upgrades. The main benefits of having a sink in the laundry room include:
– Convenience for pre-treating stains, hand-washing delicates, filling a mop bucket, and other laundry-related tasks. No more lugging buckets back and forth from the kitchen!
– Access to water for mess clean-up. Spills and accidents happen, so it’s handy to have a sink right there to wet a rag.
– A dedicated space to fill pet bowls, clean paintbrushes, or do other utility tasks.
– Increased home value. Upgraded laundry rooms are attractive to buyers.
– Flexibility if you decide to use the room for another purpose down the road, like a craft room or extra pantry space.
The main downsides are the cost of the plumbing work and losing some floor space in what is often a small room. But for most homeowners, the convenience factor outweighs any drawbacks. Adding a sink is one of the best ways to upgrade your laundry.
Choosing a Laundry Sink and Faucet
When selecting a laundry sink, there are a few key considerations:
– **Size** – Laundry sinks are available in a range of widths, from compact 16-18 inch models up to larger 30-32 inch sinks. Measure your space to ensure a comfortable fit. Allow for elbow room on each side.
– **Depth** – Deeper is better for laundry, ideally 10 inches or more. This leaves room for soaking items and filling buckets.
– **Basin shape** – Look for a sink with a flat bottom and sloped sides. This prevents water from pooling.
– **Material** – Enameled cast iron, stainless steel, and porcelain enamel steel are durable, stain-resistant options. Plastic is cheaper but may stain or scratch.
– **Faucet** – Choose a sturdy faucet in a chrome or nickel finish. Look for a swing spout for filling buckets easily.
– **Additional features** – Some sinks have built-in drying racks, pedestals for more stability, or side cabinets for storage.
Here are some recommended laundry sink and faucet combinations:
– American Standard Cadet Sink with Swing Spout Faucet
– Kohler Whitehaven Enameled Cast Iron Sink with Single-Handle Faucet
– Sterling Performa Stainless Steel Sink with Pull-Down Faucet
– Mustee Laundry Tub and Faucet Combo Unit
Shop around to find the right balance of size, features, and price point for your needs. Also factor in the look you want—some prefer stainless steel’s modern vibe, while enameled cast iron offers a traditional farmhouse feel.
Laundry Room Sink Plumbing
The two most important plumbing considerations for adding a laundry sink are the hot and cold water supply lines and the drain/vent lines. Here’s an overview of how to handle each:
**Water Supply**
– Shut off the hot and cold water valves below the existing laundry room faucet or washing machine.
– Install new hot and cold supply lines from the valves to the location of the new sink. Use braided stainless steel or PEX tubing.
– Alternatively, tee off the washing machine supply lines if they have adequate pressure.
– Add shut-off valves at the sink location to allow easy future maintenance.
**Drain/Vent**
– Tie the sink drain into the existing standpipe drain pipe for the washing machine.
– Alternatively, install new drain/vent lines if there’s access below the room. A professional may be needed in this case.
– The drain must slope 1/4 inch per foot to prevent clogs.
– Venting helps the water flow and prevents gurgling sounds.
Having access to the plumbing from below in a basement or crawlspace makes the job much easier. The existing washing machine hookups provide an ideal spot to tap into the water and drain lines. Doing the plumbing during the rough-in stage of new construction is also the most straightforward option.
Installing a Laundry Sink
Once you have the sink and the plumbing prepped, it’s time for installation. Follow these key steps:
1. **Apply caulk** – Lay down a thick bead of silicone caulk around the top edge of the sink. This seals it to the countertop.
2. **Lower into place** – Have a helper hold the sink steady as you lower it into the cutout hole in the countertop. Press down firmly to adhere the caulk seal.
3. **Secure sink** – Use sink clips, brackets, or blocking from below to solidify the sink in place. Tighten until snug.
4. **Connect plumbing** – Attach the drain line to the sink tailpiece. Connect hot and cold supply lines to the faucet.
5. **Seal countertop** – Apply color-matched caulk around the sink edges where they meet the countertop. Smooth with a wet finger. Let dry.
6. **Test for leaks** – Turn on the water supply and check above and below for any drips or leaks. Tighten connections if needed.
7. **Finish plumbing** – Install the P-trap and drain arm to complete the drain assembly.
8. **Make backsplash** – Cut and adhere a stainless steel or tile backsplash to protect the wall behind the sink.
Taking it slow and double checking your work as you go helps ensure a smooth install. Having an extra set of hands makes balancing the sink and plumbing connections easier as well.
Using and Maintaining a Laundry Sink
Once your new laundry sink is successfully installed, it’s ready to become the hardest working sink in the house! Here are some tips for using and caring for your laundry room sink:
– Keep spray bottles of pre-treat solutions like stain removers, vinegar, or OxiClean handy on the counter or in cabinets below.
– Use a rubber drain protector when pouring bleach or harsh chemicals to prevent corrosion.
– Occasionally pour boiling water down the drain to dissolve built-up grease and detergent gunk.
– Scrub the basin regularly with a cleanser like Bon Ami to prevent stains and mineral deposits.
– Rinse thoroughly after each use to avoid residues. Sticky detergent residue attracts dirt over time.
– Wipe spills right away to keep the countertop and backsplash looking their best.
– Check for drips or leaks around plumbing connections periodically and tighten as needed.
– Shut off water supply valves before long vacations in case of undetected leaks.
With proper care and maintenance, a laundry sink provides years of convenience, and your laundry room stays looking as fresh as the day you installed it. Enjoy your upgrade!
Laundry Sink FAQs
Here are answers to some frequently asked questions about installing laundry sinks:
What size sink should I get?
For most laundry rooms, a sink between 18-24 inches wide will provide a good amount of workspace while fitting comfortably. Measure the area to find a sink that maximizes your existing space.
What depth sink is best?
Look for a laundry sink that is at least 10 inches deep. This provides enough room for soaking laundry and filling buckets for cleaning.
Should I get a sink with a cabinet or shelf below?
This depends on your space and needs. Some storage is nice for laundry supplies. But a sink with an open base allows room for buckets or appliances. Assess your room layout.
What kind of faucet is best?
A single-handle faucet with a swing spout allows you to easily control temperature and fill buckets or pots without splashback. Go for sturdy metal construction.
Where should I locate the sink in my laundry room?
Somewhere easily accessible, but out of the main circulation path is ideal. Near the washing machine but not right next to it works well.
How difficult is the plumbing for adding a laundry sink?
If you have access to plumbing from below, the job is fairly straightforward. Tapping into the existing washing machine lines simplifies it. Doing all new plumbing from scratch is more complex.
What mounting options exist for securing the sink?
Self-rimming sinks have holes for sink clips. Undermount sinks use brackets attached below. Stainless steel can be welded for durability.
Should I hire a pro or can I do this project DIY?
Handy homeowners can likely handle a basic laundry sink install themselves. But if you need a lot of new plumbing work or have limited DIY experience, hiring a pro ensures it’s done right.
Conclusion
Installing a sink in your laundry room provides major functional benefits and convenience. By carefully planning the location, selecting the right sink and faucet, doing the plumbing properly, and taking care during installation, you can successfully upgrade your laundry room with this useful addition. A laundry sink makes your washing tasks easier and keeps your laundry area neat and tidy. With the steps and tips in this guide, you’ll be ready to tackle this useful DIY project.