Installing a slip fit tub spout is a relatively straightforward home improvement project that most DIYers can tackle. A slip fit spout slides over the existing tub spout pipe and seals with an O-ring, eliminating the need to sweat copper pipes or use threaded connections. With a few basic tools and some careful measurements, you can have your new tub spout installed in less than an hour.
Page Contents
- 1 What You’ll Need
- 2 Preparing the Pipe
- 3 Measuring and Cutting
- 4 Installing the New Spout
- 5 Troubleshooting Problems
- 6 Conclusion
- 7 Complete Step-By-Step Guide
- 7.1 Materials Needed
- 7.2 Step 1: Turn Off Water Supply
- 7.3 Step 2: Remove Old Spout
- 7.4 Step 3: Clean and Sand Pipe End
- 7.5 Step 4: Measure and Mark Cut Line
- 7.6 Step 5: Cut Pipe
- 7.7 Step 6: Deburr Ends
- 7.8 Step 7: Apply Teflon Tape
- 7.9 Step 8: Lubricate O-ring
- 7.10 Step 9: Install New Spout
- 7.11 Step 10: Secure Spout
- 7.12 Step 11: Caulk if Needed
- 8 Tips for First-Time Installers
- 9 Common Mistakes
- 10 Cost to Hire a Plumber
- 11 Maintaining Your Slip Fit Spout
- 12 Helpful Plumbing Resources
What You’ll Need
Before starting any home plumbing project, it’s important to make sure you have all the necessary materials on hand. Here’s what you’ll need to install a new slip fit tub spout:
- Slip fit tub spout
- Tape measure
- Hacksaw or tubing cutter
- Sandpaper
- Rag
- Teflon tape
- Adjustable wrench
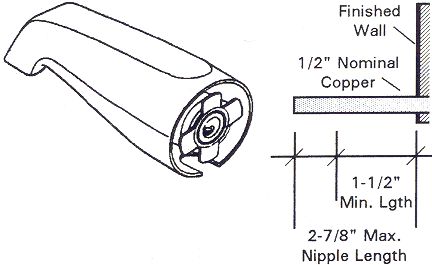
The most important thing is getting the right size slip fit spout for your existing pipe. Most tubs have 1/2″ nominal copper pipes, but it’s worth measuring yours just to be sure. The packaging for your new spout should indicate what size pipe it’s designed to fit.
Preparing the Pipe
Before installing your new spout, you’ll need to remove the old one and make some preparations. Start by turning off the water valves under the sink or tub. Then remove the old spout, using a wrench to loosen the retaining nut at the base.
Once the old spout is off, take a look at the end of the pipe. You want it to be straight, without any dents or burrs that could affect the seal with the new spout. Use sandpaper to smooth out any rough edges on the pipe end. Wipe away any dust or particles with a rag.
Measuring and Cutting
The next step is to measure and cut the pipe to the right length. Slip fit spouts need a portion of straight pipe to grip onto. Typically, you’ll want 1 1/2″ – 2″ of exposed pipe above the tub deck.
To measure, place the new spout over the pipe end, down to the tub deck. Mark the pipe at the top edge of the spout. Remove the spout and measure how much pipe is exposed above your mark. If it’s less than 1 1/2″, you’ll need to cut the pipe.
Use a hacksaw or tubing cutter to cut the pipe at your marked length. The cut end should be straight and free of burrs. Sand and wipe the cut end clean.
Installing the New Spout
You’re now ready to install the new slip fit spout onto the prepared pipe. Follow these steps:
- Wrap the exposed pipe with 2-3 layers of Teflon tape. This will provide a watertight seal.
- Apply plumber’s grease or silicone to the spout’s O-ring. This helps it slide on and seal properly.
- Carefully slide the spout onto the pipe end until it contacts the deck. Don’t force it – stop if you meet resistance.
- Place the retaining nut and washer over the end of the pipe and tighten securely with a wrench.
- Turn the water back on and check for leaks. Tighten the nut more if needed.
Be sure the spout is oriented correctly before tightening – you want the spout outlet pointed toward the tub drain. With the nut tightened securely, the job is complete!
Troubleshooting Problems
If your new spout doesn’t seem to be working properly, there are a few common issues to check:
- Leaks around the base: Tighten the retaining nut further or apply more plumber’s putty.
- Spout is loose: The pipe may be too short – the spout needs 1 1/2″ inserted for a firm grip.
- Low water flow: Make sure the pipe is cut straight with no burrs. Consider a larger sized spout.
- Spout won’t slide on: Pipe end may be damaged. File and sand it smooth so the O-ring can seal.
With some adjustments and fine-tuning, you should be able to resolve any issues that come up with your slip fit spout installation.
Conclusion
Installing a new slip fit tub spout is one of the easier DIY plumbing tasks. In less than an hour, you can replace an old, worn-out spout with a fresh new fixture. The key steps are measuring and cutting the pipe correctly, smoothing any rough edges, and making sure the spout slides on evenly before tightening it down. Follow the steps carefully and you’ll have a leak-free and properly functioning spout.
Complete Step-By-Step Guide
For a more detailed, step-by-step guide to installing a slip fit tub spout, follow these expanded instructions:
Materials Needed
- Slip fit tub spout
- Pipe wrench
- Hacksaw or tubing cutter
- Sandpaper
- Rag
- Teflon tape
- Plumber’s grease or silicone
- Measuring tape
- Basin wrench
- Goggles
Step 1: Turn Off Water Supply
Locate the shutoff valves underneath the tub and turn them clockwise to shut off the hot and cold water lines. Confirm the water is off by turning on the tub faucet briefly. If valves are stiff, spray with penetrating oil first to loosen them up.
Step 2: Remove Old Spout
Use a basin wrench to loosen and unscrew the retaining nut holding the old spout in place. Twist counterclockwise to loosen. You may need to wedge a flathead screwdriver into the tub spout opening and turn to help break it free initially. Pull the old spout away from the pipe.
Step 3: Clean and Sand Pipe End
Examine the exposed pipe end protruding from the tub. Use sandpaper to smooth out any burrs or roughness on the end of the pipe. Wipe away any particles with a dry rag. The pipe end should be smooth and clean for the new spout to seal properly.
Step 4: Measure and Mark Cut Line
Slide the new spout over the pipe down to the tub deck to measure how much pipe needs to be exposed. Mark the pipe 1 1/2″ above the top of the spout. Remove the spout. For cutting, allow an extra 1/4″ above your mark.
Step 5: Cut Pipe
Using a hacksaw or tubing cutter, cut the pipe at your marked line. Keep the cut as straight as possible for the best seal. The cut end should be smooth and even when finished. Wipe away any metal shavings or debris.
Step 6: Deburr Ends
Use a round metal file to deburr both the inside and outside of the freshly cut pipe end. Remove any sharp edges or ridges. Sand the end smooth and wipe clean. The pipe must be smooth to allow the spout to slide on evenly.
Step 7: Apply Teflon Tape
Wrap the exposed portion of the pipe with 2-3 overlapping layers of Teflon tape. Cover the threads if threaded pipe. This seals the threads and provides a water tight connection.
Step 8: Lubricate O-ring
Locate the O-ring inside the spout opening. Use a small amount of plumber’s grease or silicone to thoroughly lubricate the O-ring. This allows the spout to slide smoothly into place.
Step 9: Install New Spout
Orient the spout correctly with the outlet pointed toward the tub drain. Slide the spout onto the pipe until it stops at the tub deck. The spout should fit snugly without excessive force. If tight, twist slightly to help work it on.
Step 10: Secure Spout
Slide the spout retaining nut and washer over the pipe and thread it onto the spout shank. Tighten with a wrench or basin wrench. Tighten firmly but do not overtighten. Turn on the water valves and check for leaks.
Step 11: Caulk if Needed
If gaps are visible around the spout base, apply a bead of clear silicone caulk. Smooth with fingertip and allow to cure overnight. This provides extra protection against moisture getting behind the tub spout.
Once secured without leaks, your new slip fit tub spout is ready for use! Be sure to give the silicone caulk a full 24 hours to cure before using the tub.
Tips for First-Time Installers
Installing a tub spout for the first time can seem daunting. Here are some useful tips to ensure success on your first try:
- Watch online video tutorials to see the steps in action before starting.
- Have a second person available to help if needed.
- Protect surfaces with drop cloths – metal shavings can scratch.
- Go slowly when cutting – rushing leads to crooked cuts.
- Use goggles for eye protection when cutting pipe.
- Be patient sliding on the spout – don’t force it if tight.
- Check for leaks with soapy water – easier to spot bubbles.
- Don’t caulk until you’ve confirmed the spout won’t leak.
- Allow full curing time before using new spout.
The most important things for first-timers are taking your time, following all steps, and having someone available to lend a hand if you get stuck. Expect the project to take an hour or two from start to finish. The end result will be a functional new spout installed with your own hands!
Common Mistakes
While installing a slip fit tub spout is fairly straightforward, there are some common mistakes that can be made. Being aware of these potential pitfalls can help you avoid them on your project:
- Not fully shutting off water – Creates a big mess and wastes water.
- Rushing the pipe cutting – Can lead to crooked cuts that don’t fit spout properly.
- Forcing spout onto pipe – Must slide on evenly to ensure proper sealing.
- Not cleaning pipe end – Debris can interfere with O-ring seal.
- Not lubricating O-ring – Allows spout to slide on smoothly.
- Incorrectly orienting spout – Make sure outlet points into tub.
- Overtightening retaining nut – Can crack tub surface. Tighten firmly only.
- Not checking for leaks – Caulking before testing can seal in leaks.
Avoiding these common missteps will go a long way toward a quick, frustration-free tub spout installation. Measure carefully, clean thoroughly, lubricate generously, and test for leaks before finishing the job.
Cost to Hire a Plumber
If you don’t feel up to tackling a tub spout installation yourself, hiring a professional plumber is always an option. Here are some points on what you can expect from the cost of hiring a plumber to replace your tub spout:
- Simple slip fit spout replacement: $75 – $150, parts included.
- Removing old spout and installing new pipe + spout: $200 – $350
- Service fees and trip charges: $50 – $100
- Weekend or emergency rates: 1.5X typical rate
The specific total will depend on your location, the complexity of the job, and local labor rates. More extensive replacements costing $500+ are possible if pipes must be rerouted or surrounding surfaces repaired.
Many homeowners choose to do slip fit installations themselves since the plumbing work is straightforward. For major tub plumbing overhauls, hiring a pro may be worth the cost.
Maintaining Your Slip Fit Spout
Once your new spout is professionally installed, following these maintenance tips will keep it working properly for years:
- Wipe down exterior regularly with nonabrasive cleaner and rag.
- Rinse and flush interior of spout with hot water periodically.
- Do not force or overtighten spout in the future.
- Inspect base sealant and reapply caulk if any gaps appear.
- Lubricate O-ring every 1-2 years with silicone grease.
- Replace spout immediately if leaks develop.
With routine cleaning and by avoiding damage from forcing or overtightening, your slip fit spout should provide reliable, leak-free performance. Check the connections periodically for any signs of trouble.
Helpful Plumbing Resources
For additional information on home plumbing projects, check out these helpful resources:
Books
- Complete Do-It-Yourself Manual by Editors of Family Handyman
- The Beginner’s Guide to Plumbing by Steven Robert
- Plumbing 101 by Michael Litchfield
Websites
YouTube Channels
- Home Repair Tutor
- Fix This Build That
- The Handyman
- Ultimate Handyman
With some research and preparation, tackling home plumbing jobs like installing a new tub spout is very achievable for most homeowners. Follow safety precautions, take your time, and don’t be afraid to ask for help. The end result will be improving your plumbing skills and upgrading your bathroom space.