Page Contents
What is a Striker Plate?
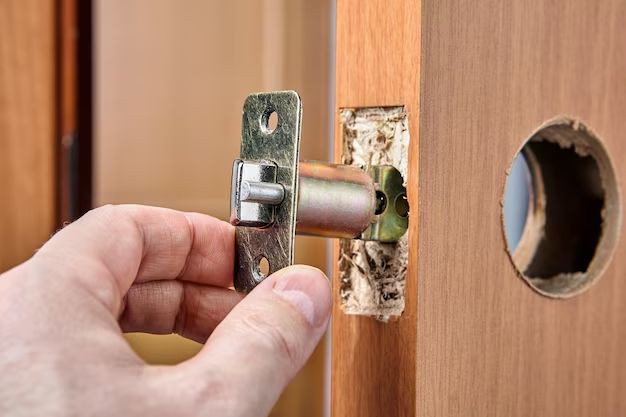
A striker plate, also known as a strike plate, is a small metal plate that is installed around a door lock. It receives the bolt from the lock when the door is closed. The striker plate is screwed into the door jamb, which is the stationary frame that the door closes into. When the door closes, the bolt from the lock slides into a hole or recess in the striker plate and locks the door.
The striker plate serves a few important functions:
– It reinforces the area around the lock, providing extra strength and preventing the door jamb from being damaged when the door is repeatedly closed.
– It gives the lock bolt a stable surface to lock into. Without a striker plate, the bolt would simply hit against the wood of the door jamb.
– It aligns the bolt perfectly with the lock so that it slides in smoothly every time.
– It prevents the bolt from sliding too far into the jamb. Most striker plates have a defined recess that stops the bolt at just the right depth.
So in summary, a striker plate creates a sturdy, properly aligned locking surface for the door bolt to lock into. Installing a striker plate ensures that your door locks securely and functions smoothly every time it’s closed.
Why Would You Need to Install a New Striker Plate?
There are a few common reasons you may need to install a new striker plate:
– **You’re installing a new lock.** If you’re installing a new lock and handleset on a door, you’ll need to install a new striker plate that properly fits the new locking bolt. The new striker plate needs to have a recess that matches the size, depth and shape of the new bolt.
– **The old striker plate is loose or damaged.** Over time, especially in frequently used doors, striker plates can get loose and pull away from the door jamb. This allows the bolt to wiggle around and not fully seat. Closing the door can also gradually damage the plate, deforming the bolt recess so the lock doesn’t function properly. In both cases, a new striker plate is needed.
– **The door is not aligning properly.** If the door is sagging, not closing cleanly, or rubbing against the jamb, it could mean the striker plate is misaligned. Replacing it with a new plate can realign the doorway and solve closure and functionality issues.
– **The recess depth needs adjusting.** Sometimes the bolt is sliding too deeply into the striker plate recess upon closing. This stresses the locking mechanism over time. Replacing the striker plate with one that has a shallower recess can fix this issue.
– **The door frame is being repaired or replaced.** Anytime new wood is being installed around the door frame, whether due to general maintenance or full replacement, new striker plates will need to be installed in the correct positions.
Installing new striker plates is a quick and straightforward process, even for DIYers without much experience. With the right materials and tools, it can be accomplished in under an hour.
Materials and Tools Needed
Installing a new striker plate requires just a few simple materials and tools:
– **New striker plate.** Choose a high quality steel striker plate that properly fits your door lock. Take the old plate with you to the hardware store to find an identical or very similar replacement.
– **Wood screws.** Select screws that are long enough to sink fully into the door jamb, typically around 1 1/2″ to 2″ long. Choose a screw head (flat, oval, phillips, etc) that matches the holes on your new striker plate.
– **Drill/screwdriver.** A drill for drilling pilot holes and a screwdriver to drive in the screws are all that’s needed for fastening the plate.
– **Pencil.** To mark locations for drilling pilot holes.
– **Utility knife.** Helpful for cleaning up old paint/caulk around the jamb prior to installation.
– **Safety glasses.** Wear glasses as a precaution when drilling and chiseling.
You may also need the following preparatory supplies depending on the state of the existing door jamb:
– **Chisel.** For cleaning away old paint buildup and wood filler if present around old screw holes.
– **Sandpaper.** May be useful for lightly sanding the jamb surface if needed to prep for the new plate.
– **Wood filler.** To fill any gouges or defects in the jamb. Let dry completely before installation.
– **Paint.** Matching paint to touch up the filled area and blend with the rest of the jamb.
And that’s it for materials! Just a striker plate, some screws, and basic DIY tools are all that’s required.
Preparing the Door Jamb
With your materials gathered, you can start prepping the door jamb for installation:
1. **Inspect the surface** where the old striker plate was mounted. Look for any protruding screws, old paint buildup, large cracks or defects in the surface.
2. **Remove any remaining screws** from previous striker plate installation. You may be able to simply unscrew them, otherwise use a chisel to pry them out.
3. **Clean the surface thoroughly** with a utility knife, chisel and sandpaper. Scrape and chisel away all old paint and wood filler. Sand the area smooth.
4. **Fill any gouges or cracks** with wood filler and let dry completely. Apply paint and blend with the rest of the jamb.
5. **Make sure the surface is flat and even.** The new striker plate needs to mount flush against the jamb surface.
Once prepped, the door jamb is ready for the new striker plate installation.
Installation Steps
Here are the step-by-step instructions for properly installing a new striker plate:
1. **Position the new striker plate** against the door jamb, aligning the bolt recess with the hole in the jamb. Use a pencil to lightly mark around the striker plate perimeter.
2. **Drill pilot holes** within the marked outline for each of the screw locations. The pilot holes should be slightly narrower than the screws to ensure a snug fit when driving them in. Aim for a pilot hole depth of roughly 1″.
3. **Place the striker plate back over the pilot holes** and align the screw holes with the drilled holes.
4. **Drive the screws through the striker plate** and into the pilot holes using a screwdriver. Make sure screws are sunk fully into the wood for a flush, secure fit.
5. **Perform a test closure** – close the door and engage the lock bolt into the striker plate several times. The bolt should slide smoothly into the recess and align perfectly.
6. **Make any needed adjustments** by loosening the screws and shifting the striker plate until the desired fit is achieved. Re-tighten all screws when properly positioned.
7. **Check door alignment and function.** Make sure door closes cleanly without rubbing or catching. Lock should engage securely every time.
And that’s all there is to it! Properly installing the new striker plate takes just a few simple steps, but makes a big difference in keeping your door locks and hardware functioning optimally.
Troubleshooting Guide
In some cases, you may run into the following issues while installing a new striker plate. Here are some troubleshooting tips:
**Problem**: Striker plate is loose despite driving screws fully into jamb.
**Solution**: Wood filler can help tighten a loose jamb and give screws more to grip into. Fill old screw holes and any cracks/defects before re-installing plate.
**Problem**: Lock bolt sticks when closing door and doesn’t slide smoothly into striker plate recess.
**Solution**: Try sanding the inside edges of the recess so they are perfectly smooth. Lubricating the bolt with graphite powder can also help.
**Problem**: Screws are stripping out of the wood when tightened.
**Solution**: Switch to longer wood screws for a deeper grip into solid wood. Filling stripped holes with toothpicks and wood glue before redrilling pilot holes can also help.
**Problem**: Striker plate is misaligned and bolt rubs against edge of recess.
**Solution**: Loosen screws and adjust placement until bolt slides cleanly and smoothly into recess. Be sure face of striker is perfectly flush against jamb.
**Problem**: Door still doesn’t latch properly after striker plate replacement.
**Solution**: Issue may be due to sagging door, warped jamb or misaligned hinges. Try shimming hinges and/or planing the jamb until door fits squarely into opening.
Let proper preparation and care during installation be your guide to smooth striker plate replacement. With patience and persistence, you can achieve a perfectly locking door.
Conclusion
Installing a new striker plate is one of the simplest and most effective ways to rehabilitate a problematic door lock and realign a door that doesn’t close properly. With just a few basic tools and supplies, it can be accomplished by DIYers of all skill levels. The most important steps are properly preparing the jamb surface, drilling pilot holes at the right locations, sinking screws fully into solid wood, and making adjustments as needed to achieve the perfect fit for smooth locking and closure. Taking the time to troubleshoot any alignment issues will ensure your new striker plate solves the underlying door problems. With a properly installed striker plate, you can look forward to many years of stalwart service keeping your door secured.
Related Articles
- How to Install a Deadbolt Lock
- DIY Guide to Hanging a New Door
- How to Replace Door Hinges
- Tips for Patching Wood Damage Around Doors
- How to Adjust Cabinet Doors That Won’t Close Properly