An insert vent hood, also known as an insert liner, is a great way to add ventilation over your cooktop or range. Insert vent hoods are designed to fit inside your existing cabinetry, providing powerful ventilation without requiring major remodeling. Installing an insert vent hood is a big project, but it can be manageable if you take it step-by-step. In this comprehensive guide, we’ll walk you through the entire process of installing an insert vent hood, from planning to wiring to ducting. We’ll cover all the tools and materials you’ll need, important safety precautions, key steps for a successful installation, and tips for troubleshooting any issues. With some patience and our detailed instructions, you’ll have a brand new, high-performing insert vent hood providing clean air in your kitchen.
Page Contents
- 1 Planning Your Insert Vent Hood Installation
- 2 Tools & Materials Needed
- 3 Safety Tips
- 4 Step-by-Step Installation Guide
- 4.1 Turn Off Power and Disconnect Sink Pipe
- 4.2 Remove Cabinet Doors and Shelf
- 4.3 Measure and Mark Cut Lines
- 4.4 Cut the Vent Opening
- 4.5 Install Mounting Frame
- 4.6 Attach Ductwork
- 4.7 Install Electrical Supply
- 4.8 Mount the Insert Vent
- 4.9 Connect Blowers and Filters
- 4.10 Seal Edges and Reinstall Cabinet Doors
- 4.11 Connect Electrical Supply
- 5 Ductwork Tips
- 6 Troubleshooting Common Problems
- 7 Conclusion
Planning Your Insert Vent Hood Installation
The first step in any major home improvement project is proper planning and preparation. Rushing into an insert vent hood installation without thinking through all the details can lead to mistakes, delays, and frustration. Spending time on the front end to map out the project will make the actual installation go much more smoothly. Here are some key things to consider during the planning stage:
Pick the Right Location
Choose a section of cabinetry that’s centered over your cooktop or range – this will maximize ventilation efficiency. Make sure there’s sufficient height in the cabinets to accommodate the insert vent. Standard sizes are 30″ or 36″ wide and at least 27″ front to back.
Select a Powerful Model
Insert vent hoods are available in various CFM (cubic feet per minute) levels. The higher the CFM, the more powerful the ventilation. Aim for a CFM of 100 or more for adequate smoke and odor removal. Look for a quiet, multi-speed fan motor.
Decide on Ducting
Will you vent your insert hood outside, or recirculate the air back into your kitchen? Outside ventilation is recommended to fully eliminate contaminants. This requires ductwork running through cabinets and walls. Recirculating means filtering and circulating the air, but some odors will linger.
Make Sure You Have Proper Electrical
There should be an electrical junction box properly located to power the insert vent hood. If not, you may need to install new wiring. Check the specific electrical requirements of the model you choose.
Get the Right Tools & Materials
Gather all the tools you’ll need for installation ahead of time. This includes a drill, screwdrivers, level, measuring tape, stud finder, reciprocating saw, safety gear, and more. You’ll also need building supplies like screws, ducting, vents, flashing, and wall caps.
Know Your Cabinet Dimensions
Take measurements of the depth, width, and height of the cabinetry where the insert vent will go. This allows proper sizing and positioning. You’ll need about 30-36″ in width for standard insert vents.
Plan for Cabinet Modifications
An insert vent requires cutting an opening in your upper cabinets. Be prepared to make these cabinet alterations during installation. Careful measurements are crucial.
Budget for Costs
factor in costs for the insert vent unit, wiring, ductwork, tools, building supplies, and possible professional installation. This will give you a realistic total budget before embarking on the project.
Follow All Safety Precautions
Inserting an electrical appliance into cabinetry and running ductwork requires following proper safety measures. Have fire extinguishers on hand, turn off home electricity when wiring, wear protective gear when cutting, and use caution when working at tall heights.
Tools & Materials Needed
To take on an insert vent hood installation yourself, you’ll need to gather the right tools and materials ahead of time. Having everything readily available will make the project go faster and prevent delays for missing equipment. Here are the key items needed:
Tools
– Drill & drill bits
– Screwdrivers
– Tape measure
– Level
– Stud finder
– Reciprocating saw
– Ladder
– Safety gear: goggles, gloves, mask, ear protection
Vent Hood Materials
– Insert vent hood unit
– Damper/flapper
– Blower motor
– Filters: mesh or charcoal
– Hood mounting screws
– Ducting for outside ventilation
– Roof/wall venting caps
Electrical Supplies
– Junction box
– Electrical cable
– Wire nuts
– Conduit/raceway
– Vent hood control switch
Building Materials
– Wood shims
– Loose insulation
– Flashing
– Duct tape
– Caulk/sealant
– Cabinet trims or filler panels
Having all of these insert vent hood installation materials readily on hand will make the project go much more efficiently compared to trying to locate each item mid-installation. Buy everything you’ll need ahead of time.
Safety Tips
When taking on any major electrical and ductwork project like installing an insert vent hood, safety should be your top concern. Make sure to adhere to these precautions:
– Turn off home electricity at main breaker when wiring
– Follow local electrical codes for proper junction box, wiring, and motor
– Wear safety goggles, gloves, mask, and ear protection
– Use extreme caution when working with power tools at height
– Have an assistant help stabilize ladders and vent unit
– Keep fire extinguisher nearby in case of electrical sparks
– Avoid shortcuts – fully insert shims, make duct joints tight
– Double check all measurements before cutting cabinetry
– Support vent hood safely when installing in cabinets
Rushing through an insert vent installation often leads to mistakes and accidents. Take it slowly and focus on working safely. Your diligence helps avoid electrical shocks, falls, cuts, burns, and other injuries.
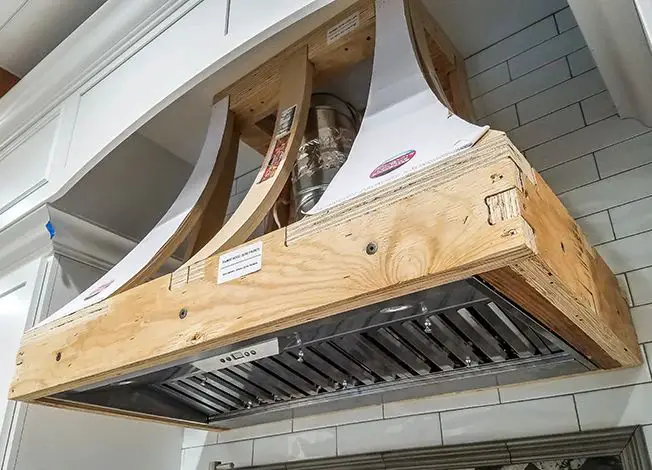
Step-by-Step Installation Guide
Once you’ve completed all the prep work of planning your insert vent project, acquiring tools, and gathering supplies, it’s time to tackle the installation. Follow these key steps in sequence for proper insert vent hood installation:
Turn Off Power and Disconnect Sink Pipe
Start by turning off electricity to the kitchen area at the main breaker. This allows safe shut down of the water supply lines and drain pipes under the sink during cabinet cutting. Shut off the shut-off valves and disconnect the sink drain pipe.
Remove Cabinet Doors and Shelf
Remove all doors and drawers from the upper cabinet section where the insert vent will be located. Also take out the shelf and any other items stored in this space to allow room for installation work.
Measure and Mark Cut Lines
Refer to the exact insert vent dimensions and measure/mark lines on the bottom of the cabinet and inside walls where cuts need to be made. Double check all measurements before cutting to ensure proper vent fit.
Cut the Vent Opening
Use a jigsaw or reciprocating saw to carefully cut along the marked lines, creating an opening in the cabinet bottom and back wall. Wear safety goggles, gloves, and mask when cutting.
Install Mounting Frame
Screw in the mounting frame according to the manufacturer instructions. This provides a sturdy base to securely hold the insert vent hood in the cabinet opening.
Attach Ductwork
Connect ducting to the vent hood outlet, running it back through the cabinet and wall/ceiling for outside ventilation. Use proper flashing and caulking to seal exterior ducting penetrations.
Install Electrical Supply
Run wiring from a properly grounded junction box to the insert vent location. Connect wires to the vent’s internal wiring harness using UL-listed wire nuts.
Mount the Insert Vent
Lift the insert vent hood into position in the opening, having someone support the weight. Attach to the mounting frame using screws drilled into the cabinet sides.
Connect Blowers and Filters
Install the internal blower motor, filters, lighting, switches, and dampers/flappers according to the manufacturer specifications.
Seal Edges and Reinstall Cabinet Doors
Caulk around all open edges and gaps with silicone sealant to prevent air leaks. Reattach cabinet doors and test vent operation. Add trim filler panels if needed.
Connect Electrical Supply
With the insert vent fully installed, turn home electrical supply back on and connect power to the junction box wiring. Test all lighting, fan speeds, and damper functions.
Following these key installation steps in the proper order allows the insert vent to be added in a safe, effective manner. Be sure to get help lifting and positioning the vent unit, since it tends to be heavy and awkard. And take time to seal all openings to maximize ventilation efficiency.
Ductwork Tips
One of the trickiest parts of installing an insert vent hood is properly routing the ductwork that vents to the outside. Here are some useful tips for managing ducting:
Use Rigid Metal Ducts
Flexible plastic duct can sag, reducing airflow. Rigid metal venting maintains maximum air movement for better ventilation.
Minimize Duct Elbows
Keep the number of 90 degree elbows to a minimum. More duct angles slow air velocity, decreasing efficiency.
Slope Ducts Slightly Downward
Give ducts a gradual downward angle so gravity helps condensation flow out. This prevents moisture buildup.
Make Connections Airtight
Use foil tape at all joints in the ductwork path. Leaks let dirty air recirculate rather than venting outside.
Vent Outside Above Roof Line
Run ducting up through the attic and vent above the roof line whenever possible. This avoids backdrafts.
Use Proper Flashing
Where ducting penetrates walls, use flashing and caulk for waterproofing. This keeps moisture out of the home.
Clean Ducts Regularly
Check ducts at least annually and clean as needed so they don’t get clogged with grease over time.
Proper planning of your ducting layout and following these tips will keep your insert vent hood working optimally for years.
Troubleshooting Common Problems
Despite the most careful installation, issues can sometimes arise with insert vent hood operation and performance. Here are some possible problems and solutions to get your vent working properly again:
Weak Airflow
Check for leaks at duct joints, clear any obstructions in ducting path, remove built-up grease in filters, or replace worn out blower motor if needed.
Noisy Operation
Tighten any loose blower wheel or mounting screws, adjust or replace worn motor bearings, or replace defective blower motor if necessary.
Lights Not Working
Check for loose wiring connections, test or replace halogen bulbs, or reset LED light strips if present. Electrical issues can need professional diagnosis.
Metal Rattling Noise
Ducting may have come loose or fallen. Refasten all joints and support ducts correctly to prevent vibration noise.
Insufficient Smoke/Odor Removal
Increase blower speed as needed. Check ducting is properly installed for maximum airflow. Filters may need replacing sooner than expected.
Cabinet Vibrates
Ensure the insert vent hood is securely mounted into the cabinet frame. Add additional mounting screws if needed to stabilize the unit.
Troubleshooting insert vent issues takes some trial and error. Always consult the manufacturer’s troubleshooting guidance as well. Call in a professional if problems persist and prove complex, especially electrical faults.
Conclusion
Installing an insert vent hood requires careful planning, the right tools, and patience to complete. But the results are well worth it – you’ll have a high-powered ventilation system embedded beautifully right into your existing kitchen design. By following our step-by-step guide and using proper precautions, your insert vent hood project can be a great DIY success. Just take it slowly, get help when needed, and don’t be afraid to call in a professional if issues arise. In no time, you’ll have clean fresh air and zero kitchen odors with the customized insert vent hood you installed.