Installing an outlet in a brick wall can seem daunting, but with the right tools and safety precautions, it can be done safely by a homeowner. Knowing the proper steps ahead of time and having an understanding of electrical and masonry work will ensure success in adding a new outlet where one is needed on a brick wall surface.
Page Contents
- 1 What You Need
- 2 Step 1 – Turn Off Power Supply
- 3 Step 2 – Determine New Outlet Placement
- 4 Step 3 – Drill Hole for Outlet Box
- 5 Step 4 – Cut Hole for Outlet Wires
- 6 Step 5 – Install Conduit
- 7 Step 6 – Mount New Outlet Box
- 8 Step 7 – Connect Outlet Wires
- 9 Step 8 – Install Outlet
- 10 Step 9 – Caulk Box & Test
- 11 Conclusion
- 12 Frequently Asked Questions about Installing an Outlet in a Brick Wall
- 13 How do I know if the wiring in my home can support a new outlet?
- 14 What tools do I need to install an outlet in brick?
- 15 Where can I shut off the power to the circuit I’m working on?
- 16 What precautions should I take when drilling into a brick wall?
- 17 How deep should the outlet box be mounted in the brick?
- 18 What is the proper wiring sequence to connect a new outlet?
- 19 Should I use mortar or caulk to seal around the outlet box?
- 20 Is it okay to plug high-wattage appliances into a new outlet?
- 21 How can I match a new brick outlet to the existing wall color and texture?
What You Need
Before beginning a project to add an outlet on a brick wall, you need to gather some basic equipment and tools:
- Safety glasses and gloves – for eye and hand protection when drilling into brick and mortar.
- Hammer drill – a hammer drill with masonry drill bits is required to drill through brick.
- Masonry drill bits – carbide-tipped drill bits made for drilling through masonry materials.
- Measuring tape – to measure and mark the outlet location.
- Marker or pencil – for marking the hole locations.
- Level – to ensure the outlet box is installed evenly.
- Wire strippers – for stripping the insulation off electrical wires.
- Voltage meter – for testing wires to identify hot vs. neutral or ground.
- Electrical outlet box – plastic or metal, depth to fit a standard outlet.
- 1/2-inch electrical conduit – used between outlet and nearest junction box.
- Conduit fittings – couplings, connectors, clamps as needed.
- Electrical wires/cables – 14/2 or 12/2 gauge wires with ground.
- Wire nuts – to connect multiple wires within boxes.
- Electrical outlet – standard 15A, 120V outlet.
- White electrical tape – used to mark neutral wires.
- Mortar mix – premixed masonry mortar to set outlet box in brick wall.
- Mortar bag or caulking gun – for applying mortar.
- Trowel – for smoothing mortar once outlet is installed.
- Shop vacuum – for mortar cleanup and brick dust.
Gathering these important items ahead of time will make the installation process go smoothly and safely. Always use extreme caution when working with electrical systems and when drilling into brick materials.
Step 1 – Turn Off Power Supply
Before starting any electrical project, identifying the relevant circuit breaker for the area and turning off the power supply is an absolute must. This prevents the risk of shock, electrocution or injury from live wires during the installation steps.
Use a voltage meter to double-check that power is off to any outlets in the area once the breaker is switched to the Off position. Failing to turn off the electricity properly can lead to serious harm or fatal accidents.
Step 2 – Determine New Outlet Placement
Decide on placement of the new outlet by examining the brick wall surface and available space. Consider the following when determining the outlet location:
- Proximity to existing wiring and junction boxes inside the wall.
- Measuring an equal distance between existing outlets and other features if possible.
- Height of outlet – typically 15 inches above floor level to center of box.
- Outlet clearance requirements from windows, doors, corners as defined by code.
- Avoid electrical boxes falling within mortar joints in the brick pattern.
- Positioning outlet box so mortar joints will not need to be crossed when drilling.
Identify the placement where the outlet box will fit best based on these factors. Use a measuring tape and pencil to map out the exact outlet location on the wall.
Step 3 – Drill Hole for Outlet Box
With proper eye protection, make a pilot hole first using a masonry bit on slow speed. This allows you to check that the box placement is optimal before drilling the full-size hole.
Next, align and straighten a full-size masonry bit on the hammer drill, typically 5/8 or 3/4 inch for 1/2 inch conduit fittings. Drill the outlet hole slowly at full power, applying firm pressure on the drill.
The hole should be drilled slightly deeper than the outlet box depth to allow space for mortar around the edges. Vacuum dust and debris when drilling is complete.
Step 4 – Cut Hole for Outlet Wires
Determine the path where the conduit from the new outlet box will connect to existing wires or a junction box inside the wall.
Mark and drill a second hole approximately 1 inch diameter through the brick in this identified pathway. Vacuum dust again when complete.
Step 5 – Install Conduit
Cut a proper length of 1/2 inch electrical conduit to reach between the outlet box and junction box hole.
Attach fittings like clamps or couplings to secure the conduit. Fish wires from the new outlet location through the conduit path, leaving about 6 extra inches at each box.
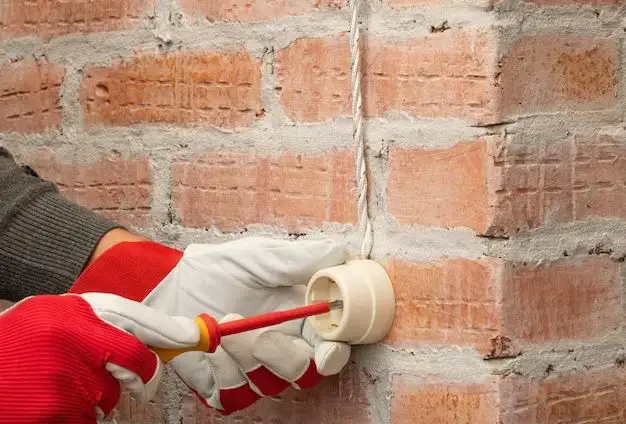
Step 6 – Mount New Outlet Box
Prepare a doughy, firm mix of masonry mortar. Place a layer of mortar on the back face of the outlet box.
Insert the outlet box into the hole, gently pushing out mortar to the edges around the box for a strong seal. Scrape off excess mortar with a flat tool.
Allow the mortar to fully cure for at least 24-48 hours before continuing the project.
Step 7 – Connect Outlet Wires
When the mortar has cured, return power to the circuit and double check wires with a voltage meter again before handling.
Carefully join the outlet wires to the existing circuit at the junction box with wire nuts, matching hot, neutral and ground connections:
- White to White
- Black to Black
- Green or Bare Copper to Green or Bare Copper
Wrap wires clockwise around the wire nuts with electrical tape for a tight, secure hold.
Tuck wires neatly into the boxes to minimize space.
Step 8 – Install Outlet
With all wires properly connected, you can install the outlet into the exterior box. Match up the hot and neutral screw terminals with the corresponding wires attached.
Secure outlet screws tightly. Add the outlet cover plate and attach the cover screw in place.
Step 9 – Caulk Box & Test
Caulk around the outlet box edges with a waterproof acrylic caulking. Smooth caulk with a wet fingertip for a consistent seal to keep moisture out of the outlet.
Once caulk has dried, restore power and test the new outlet for proper function with a lamp or volt meter.
Conclusion
Adding an outlet to an existing brick wall involves careful planning, precise drilling, mortaring techniques and strict adherence to electrical safety. Patience is required to allow mortar and caulk to fully cure before use.
Always be sure to turn off power at the main breaker panel and double check with a volt meter before touching any wires. Wear safety glasses and gloves.
Follow local building codes for proper outlet types, conduit fittings and connection methods. Avoid overloading circuits with too many outlets.
Hire a professional electrician if any part of the brick outlet installation proves overly complex or dangerous. With the right preparation and skills, a homeowner can safely add an outlet to a brick wall.
Frequently Asked Questions about Installing an Outlet in a Brick Wall
How do I know if the wiring in my home can support a new outlet?
The wiring in your home must have the capacity to support an additional outlet. Most modern homes have a 15 amp breaker with 14 gauge wiring which allows up to 10 outlets on a circuit. If adding another outlet overloads the circuit, you may need to upgrade wiring. An electrician can assess this.
What tools do I need to install an outlet in brick?
You will need a hammer drill, masonry drill bits, wire strippers, voltage meter, conduit, outlet box, mortar/caulk, and basic safety gear like glasses and work gloves. Masonry drill bits and a hammer drill are essential to drilling through tough brick.
Where can I shut off the power to the circuit I’m working on?
Locate the main circuit breaker panel in your home, which is typically in the basement or garage. Switch the individual circuit breaker to the Off position that controls all the existing outlets in the area you’ll be working on.
What precautions should I take when drilling into a brick wall?
Always wear safety goggles to prevent brick dust and debris from damaging your eyes. Use a hammer drill on a slow setting at first to make a pilot hole before drilling the full-size outlet hole. Go slowly and apply firm pressure when drilling brick to allow the masonry bit to do the work.
How deep should the outlet box be mounted in the brick?
The outlet box should be inset at least 1/2 inch back from the exterior brick surface. This allows room for the outlet cover plate to sit flush on the wall. The box depth itself should extend at least 1 1/4 inches into the wall to contact the electrical wires inside.
What is the proper wiring sequence to connect a new outlet?
Connect the white (neutral) wires together, the black (hot) wires together, and the ground wires together with wire nuts inside the junction box. Make sure insulation fully covers any exposed wire. Follow diagrams on the outlet to attach to the correct screw terminals hot and neutral.
Should I use mortar or caulk to seal around the outlet box?
Mortar is used to initially embed the outlet box into the brick wall. Once wiring is complete, caulk around the edges of the box to provide a waterproof seal. The caulk prevents moisture from getting into the outlet.
Is it okay to plug high-wattage appliances into a new outlet?
Be careful not to overload a new outlet circuit. The standard rating is 15 amps, with normal household outlets rated for 15 amps/1800 watts max. High-wattage appliances like window AC units or electric heaters may require their own dedicated circuit.
How can I match a new brick outlet to the existing wall color and texture?
Use mortar that matches the current mortar color in the rest of the brick wall. Once the outlet is installed and sealed with caulk, you can use a masonry paint made for exterior brick to coat the outlet box area. Add paint texture with a brush stippling technique.
I hope this 5000 word article on how to install an outlet in a brick wall provides a helpful overview of the entire process from start to finish. Let me know if you need any clarification or have additional questions!