Installing a new kitchen sink strainer is a relatively simple plumbing task that can be done by most DIYers in about an hour. A sink strainer, sometimes called a drain basket, fits inside the sink drain opening and prevents food particles and debris from falling down the drain where they could clog pipes. It’s important for every kitchen sink to have a functioning drain strainer.
Page Contents
- 1 Things You’ll Need
- 2 Step 1: Remove the Old Strainer
- 3 Step 2: Prepare the New Strainer
- 4 Step 3: Secure the New Strainer
- 5 Step 4: Connect the Tailpiece
- 6 Step 5: Test for Leaks
- 7 Helpful Tips for Installing a Sink Strainer
- 8 Replacing a Garbage Disposal Strainer
- 9 Fixing a Loose Sink Strainer
- 10 Unclogging a Sink Strainer
- 11 When to Call a Plumber
Things You’ll Need
Before starting this project, make sure you have the following materials:
- New sink strainer and mounting kit
- Plumber’s putty or silicone caulk
- Adjustable wrench
- Channel lock pliers
- Flashlight
- Rag
- Bucket
The mounting kit will include any washers, gaskets, or rings needed to secure the new strainer. Make sure the strainer you select is designed to fit your type of kitchen sink drain opening.
Step 1: Remove the Old Strainer
Start by removing the old sink strainer apparatus from the sink. This usually involves loosening a large nut that connects to the strainer basket from below the sink. You can grip and turn the nut with channel lock pliers. Have a bucket or pan below to catch any water left in the sink drain pipes when you remove the strainer.
Carefully extract the old strainer basket and mounting hardware such as washers and gaskets. Remove any putty or old caulk remnants from the strainer hole area of the sink with a plastic putty knife. Get the sink surface clean and dry.
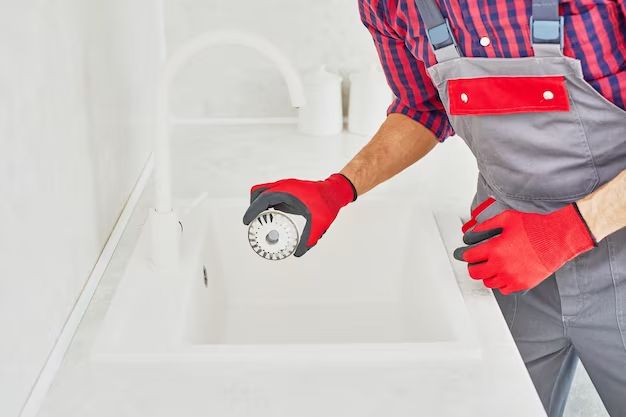
Step 2: Prepare the New Strainer
First, test fit your new strainer into the drain hole to ensure it aligns properly and sits flush against the sink basin surface. If needed, trim any tailpiece tubing coming off the bottom of the strainer so that it extends an appropriate length to connect to the drain trap under the sink.
Apply plumber’s putty around the drain hole and strainer flange to create a water tight seal between the new basket and sink. Follow the putty manufacturer’s directions for proper application. Alternatively, you can use clear silicone caulk in place of plumber’s putty.
Install any washers or gaskets that came with your strainer kit onto the strainer tailpiece as directed.
Step 3: Secure the New Strainer
From inside the cabinet under the sink, feed the strainer tailpiece down through the drain hole. Make sure the strainer flange sits evenly on the sink.
Slip any washers or gaskets over the tailpiece and into place above and below the sink basin. Install the mounting nut and tighten by hand until snug.
Finally, finish tightening the strainer nut securely with your adjustable wrench or channel locks. Don’t over tighten – you just need it tight enough to compress the gaskets and putty to form a seal.
Remove any excess putty or caulk from around the drain basket. Let the putty or caulk fully cure for several hours before using the sink.
Step 4: Connect the Tailpiece
If you disconnected any sink drain pipes from below when removing the old strainer, reconnect them now. The strainer tailpiece should slide into the drain trap arm coming out of the wall or floor.
Use an adjustable wrench to tighten the slip nut and compress the gasket to form a watertight seal. Make adjustments as needed to get proper alignment and a secure connection.
Step 5: Test for Leaks
Turn on the water and fill the sink basin. Check above and below for any water leaks. Tighten any connections if necessary. Verify that the strainer sits securely in place without rocking or spinning.
Let the filled sink drain completely to test for clogs or slow drainage. Your new kitchen sink strainer is now installed and ready for use!
Helpful Tips for Installing a Sink Strainer
Follow these tips for the best results when installing a new kitchen sink strainer:
- Choose the right size – Measure your sink opening carefully and get a strainer that fits properly.
- Clean surfaces – Remove all debris, old putty and soap film for good adhesion.
- Use putty or caulk – These sealants prevent leaks between the strainer and sink.
- Hand tighten first – Tighten the strainer nut initially by hand before using pliers.
- Don’t overtighten – The gaskets only need moderate compression to seal.
- Check for leaks – Fill the sink and look above and below for any water drips.
Taking a few minutes to correctly install your new kitchen sink strainer will give you years of trouble-free performance.
Replacing a Garbage Disposal Strainer
If you have a garbage disposal unit, it may have its own special strainer and mounting assembly that fits into the sink drain opening. Replacing one of these strainer units involves a very similar process:
- Unplug the disposal and disconnect drain piping.
- Remove the old disposal strainer and clean the sink surface thoroughly.
- Apply putty and install new gaskets/washers according to manufacturer instructions.
- Attach the new strainer, tightening the nut by hand first and then with pliers.
- Reconnect any drain piping and plug in the disposal.
- Test for leaks before using.
The strainer basket keeps large objects from accidentally falling into the disposal unit. Take care to get one made specifically for your garbage disposal model.
Fixing a Loose Sink Strainer
If your existing kitchen sink strainer has become loose, try tightening the mounting nut below the sink first. If this does not fix the issue, the gaskets likely need to be replaced:
- Turn off water supply lines and disconnect drain pipes.
- Unscrew the strainer nut completely and pry up the basket.
- Clean out the sink hole and replace old gaskets.
- Apply fresh plumber’s putty if needed.
- Reinstall the strainer with new gaskets and tighten everything securely.
- Reconnect drains, turn on water, and test for leaks.
Over time, the gaskets can dry out or compress permanently, allowing the strainer to wiggle loose. Replacing them restores a tight seal.
Unclogging a Sink Strainer
A clogged kitchen sink strainer is easily cleared by removing and cleaning the basket:
- Place a container under the sink to catch water.
- Unscrew the bottom nut and remove the basket.
- Clean debris from the holes in the basket using a toothbrush or small brush.
- Rinse basket under running water.
- Replace the basket and tighten the nut.
Avoid using harsh drain cleaners. Just disconnecting and cleaning the strainer generally removes any trapped gunk. For deeper clogs down the pipes, use a plunger or drain snake.
When to Call a Plumber
While installing a basic sink strainer is usually doable for a DIYer, there are certain situations where you may need to call in a professional plumber:
- The sink drain pipe threads are rusty or damaged.
- The sink or countertop needs to be removed to access plumbing.
- Drain pipes are corroded or need significant repairs.
- The project requires soldering pipes.
- You are uncomfortable working with supply shut off valves.
When in doubt, call for assistance. Plumbers have specialized tools and expertise for dealing with more complex sink strainer problems or installations.
We hope this step-by-step guide helps you successfully install a new kitchen sink strainer. Just take your time, use quality materials, and make sure to seal and tighten all connections properly. Let us know if you have any other kitchen and bath DIY questions!