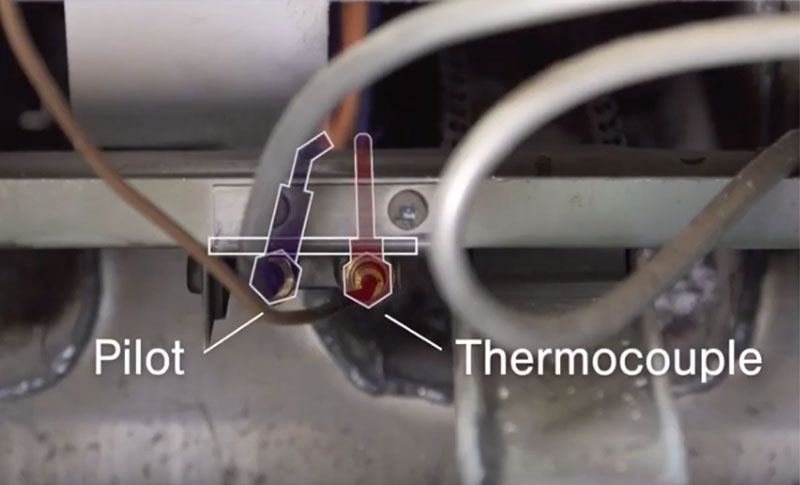
A thermocouple is a device that measures temperature by using the voltage that is created by two dissimilar metals joined together. Thermocouples are commonly used in heating appliances like furnaces, water heaters, stoves, and fireplaces to control the pilot light and regulate the temperature. If your thermocouple is malfunctioning, it can cause a variety of problems including preventing your appliance from igniting or maintaining a proper flame.
Page Contents
What are the signs of a bad thermocouple?
Here are some common signs that your thermocouple may be failing and needs to be replaced:
- Pilot light won’t stay lit – If the pilot light won’t remain ignited after repeatedly lighting it, the thermocouple is likely unable to hold the gas valve open.
- Burners not igniting – If the pilot light is on but the main burners won’t light, the thermocouple may not be generating enough voltage to trigger the gas valve to open.
- Temperature fluctuations – If the temperature fluctuates erratically, it may indicate the thermocouple is intermittently generating voltage.
- Soot buildup – Excess soot around the pilot assembly can prevent the thermocouple from heating up properly.
- Corroded thermocouple tip – Corrosion on the thermocouple tip can inhibit its ability to generate electricity.
- Weak pilot flame – A pilot flame that is not properly adjusted or has diminished can result in insufficient heat on the thermocouple.
How does a thermocouple work?
To understand why a thermocouple fails, it helps to understand how it works. A thermocouple consists of two wires made from different metals joined at one end. This junction is located right in the pilot flame. The two common types of thermocouples used are:
- K-type – Nickel-chromium & nickel-aluminum
- J-type – Iron & constantan (copper-nickel alloy)
When heated, a voltage is generated at the junction of the two metals. As the junction gets hotter from the pilot flame, more voltage is produced up to about 30 millivolts. This voltage then travels to the combination gas valve and triggers it to open and allow gas to flow to the pilot and burners.
The amount of voltage produced depends on the temperature. If the thermocouple tip is damaged, corroded, or improperly heated it can affect its ability to generate sufficient voltage to signal the gas valve.
How to test a thermocouple
If you suspect your thermocouple is faulty, you can test it to determine if it needs to be replaced. Here is how to check a thermocouple:
- Unplug the appliance and turn off the gas supply.
- Remove the thermocouple from the pilot assembly.
- Using a multimeter set to measure millivolts, touch the meter probes to the thermocouple leads.
- Apply heat to the thermocouple tip using a lighter or torch for 30 seconds.
- The multimeter should steadily read 15 millivolts or more. Any reading lower indicates the thermocouple needs replacing.
This simple test will confirm if the thermocouple is capable of producing sufficient voltage. Always take proper safety precautions when testing gas appliances and components.
How to replace a bad thermocouple
Once diagnosed, replacing a faulty thermocouple is a straightforward repair:
- Turn off gas supply and unplug appliance.
- Remove outer burner rack and panels to access bottom of unit if necessary.
- Remove pilot assembly mounting screws or bracket.
- Disconnect thermocouple from gas valve/thermostat using an adjustable wrench.
- Unscrew thermocouple nut from pilot assembly and pull out old thermocouple.
- Install new thermocouple into pilot assembly and tighten nut.
- Reconnect lead to gas valve/thermostat.
- Reassemble pilot assembly and test operation.
Be sure to get an identical replacement thermocouple to match the original type and length. Consult your appliance manual for the specific thermocouple specifications. Also inspect the pilot hood, ignition electrode, and replace them if excessively worn or damaged.
Thermocouple troubleshooting tips
Here are some additional tips for diagnosing thermocouple problems:
- Check electrical connections – Make sure thermocouple lead is securely fastened to gas valve terminals.
- Inspect pilot hood – Remove any soot, dirt, rust that could block the thermocouple.
- Check pilot flame – Should fully envelop thermocouple tip. Adjust as needed for proper heat.
- Assess gas pressure – Low pressure can result in weak pilot flame and insufficient heat.
- Review appliance manual – Consult troubleshooting guide and thermocouple specs.
- Consider age – Thermocouples eventually wear out and should be replaced every 5-10 years.
Taking the time to properly diagnose and replace a bad thermocouple can save time, money, and prevent larger problems. Always refer to your appliance manual throughout the process.
Conclusion
A thermocouple is a crucial safety device in gas appliances that signals the gas valve when a pilot light is lit. Common signs of a failing thermocouple include a pilot light that won’t stay lit, burners not igniting, fluctuating temperature, and soot buildup. Testing the thermocouple with a multimeter and replacing it if voltage is less than 15 mV is the best way to confirm if it’s defective.
Replacing a bad thermocouple is a straightforward repair if proper safety procedures are followed. Take time to also inspect the pilot assembly components and ensure the connections are tight. With a properly functioning thermocouple, your gas appliance will operate safely and efficiently.