Leveling a large concrete slab can be a daunting task, but with the right tools and techniques, it can be accomplished efficiently. In this comprehensive guide, we will walk through the entire process step-by-step, answering common questions and providing tips for success.
Page Contents
- 1 Why Would You Need to Level a Concrete Slab?
- 2 Tools and Materials Needed
- 3 Step 1: Clear the Slab and Address Cracks
- 4 Step 2: Check for Low Spots and High Points
- 5 Step 3: Grind Down High Points
- 6 Step 4: Mix and Apply Self Leveling Product
- 7 Step 5: Re-Check for Level
- 8 Step 6: Smoothing and Finalizing
- 9 Tips for Success
- 10 Frequently Asked Questions
- 11 Conclusion
Why Would You Need to Level a Concrete Slab?
There are several reasons you may find yourself needing to level out a concrete slab:
- The slab has settled or shifted over time, causing an uneven surface
- You are installing new flooring like tile or wood and need a flat subfloor
- You want to eliminate tripping hazards from uneven areas
- To properly install equipment or furnishings that require a level surface
- For drainage purposes, to prevent water from pooling in low spots
Taking the time to correctly level and smooth the slab will allow you to complete your project properly and achieve the best end results.
Tools and Materials Needed
Leveling out a slab will require a variety of tools and materials. Here is a list of the essential items you will need:
- Safety gear – gloves, eye protection, ear protection, masks
- Concrete grinding machine – walk-behind floor grinder or hand-held grinder
- Diamond grinding discs – match grit size to machine
- Floor leveling compounds like self-leveling concrete or polymer-modified patching mortar
- A concrete mixer or mixing drill and paddle
- Measuring buckets, trowels, screed rake, grout float
- Straight board or level with height rod – 4 foot and 10 foot lengths
- Chalk line and chalk
- Knee pads or creepers for working on the floor
Having all equipment ready and materials on hand will make the leveling job go faster.
Step 1: Clear the Slab and Address Cracks
First, thoroughly clean and clear the concrete slab. This means sweeping and mopping to remove all dirt, dust, debris, oils, and any other contaminants. Vacuum up any remaining dust.
Inspect the slab carefully and locate any cracks, holes, pits, or other damage areas. Use a concrete repair compound to fill cracks and patch holes. This will provide a smooth subsurface.
Step 2: Check for Low Spots and High Points
Now you can start assessing the levelness of the slab. Mark a starting point and make it your reference datum. Use a chalk line to create a grid pattern across the entire slab. Be sure to snap perpendicular lines in an X pattern.
Place the long level or straightedge board on the slab, aligning it with your chalk lines. Have another person use the height rod to check under the level for any gaps. Mark any high spots or low spots with chalk.
Work systematically across the grid, one section at a time. Check both perpendicular directions. Look for variations greater than 1/4 inch which will need to be addressed.
Step 3: Grind Down High Points
With all the high points marked, you can now start grinding them down. Use the concrete grinder with a coarse diamond disc installed. Keep in mind that removing 1/8 inch of concrete over 1 square foot will require eliminating about 10 pounds of material.
Work across the high areas in straight back-and-forth passes, holding the grinder level. Make several passes to gradually grind down the spots evenly. Check your progress frequently with the level and rod to ensure you are achieving the desired degree of levelness.
Take safety precautions – wear a respirator mask and safety glasses when grinding. The grinder will generate large amounts of concrete dust. Control the dust by misting the slab with water before and during grinding.
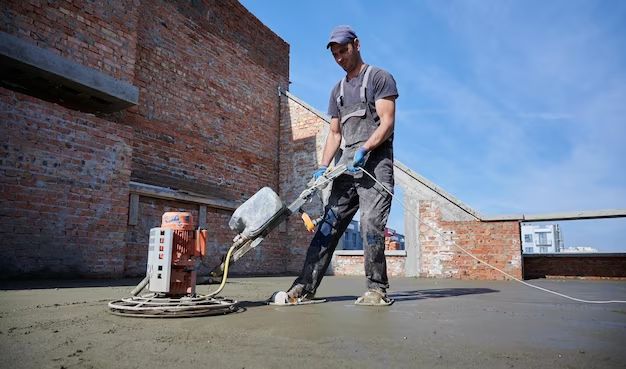
Step 4: Mix and Apply Self Leveling Product
With the high points ground down, you can start filling in the low areas. Self leveling concrete is the ideal product for large slab leveling. Mix it to a fluid consistency according to the manufacturer’s directions.
Pour it slowly over the low spots and use a trowel or squeegee to spread it out evenly. The self leveling product will seek its own level across the uneven areas. Allow adequate cure time before walking on the surface or doing additional work.
An alternative is to use a polymer-modified patching mortar for smaller low areas. Mix it fairly stiffly, pack it thoroughly into holes, and smooth flush.
Step 5: Re-Check for Level
Once your leveling products have fully cured, grind any remaining high spots or imperfections that result. Do a complete re-check on the slab levelness by repeating the process of marking a grid and checking high and low areas.
You may need to apply self leveling product or mortar again to address any remaining unevenness. Be sure the slab meets your tolerance for level before moving on.
Step 6: Smoothing and Finalizing
Your slab should now be acceptably level, but it may still have some roughness or texture from the grinding process. Use the concrete grinder with a fine grit diamond disc to smooth and polish the slab surface.
Work across all areas to create a consistent smoothness and sheen. Vacuum thoroughly when done to remove the fine dust generated by grinding. Your slab is now leveled and ready for flooring installation or other uses.
Tips for Success
Follow these tips and tricks to help ensure you get great results leveling a concrete slab:
- Work in sections – Leveling products can be applied in smaller sections for best results
- Allow adequate drying times according to product instructions
- Check thickness limits for your leveling product and apply in appropriate layers
- Wear proper PPE when using concrete grinding tools to prevent silicosis
- Clean the slab thoroughly before leveling for proper adhesion
- Use primer if recommended by leveling product manufacturer
- Hire a professional for best results on large slab leveling projects
Frequently Asked Questions
What is the proper slab tolerance for flooring installation?
Most flooring manufacturers recommend the slab be within 1/8 inch deviation over 10 feet. Some specify 3/16 inch over 10 feet. The flatter the better for ease of installation.
What causes a concrete slab to become unleveled?
Settling or shifting soil underneath the slab are common causes. Other factors can include improper installation, freeze/thaw cycles, moisture issues, or physical damage to the slab surface.
What size grinder do I need for leveling a concrete slab?
A medium sized walk-behind floor grinder in the 15 to 30 pound range with 200 to 800 watts of power is ideal for most residential slab leveling jobs.
Can I use self leveling concrete over existing concrete?
Yes, self leveling products are designed to be applied over existing concrete. The key is proper preparation and cleaning of the slab first.
How long does self leveling concrete take to cure?
Cure times vary by product but are generally 12-24 hours before foot traffic and 2-7 days before other work can be done on top.
Conclusion
Leveling a concrete slab takes time, effort, and the right mix of tools and materials. But with this step-by-step guide, you should understand the complete process involved. Key steps include assessing high and low spots, grinding down high areas, filling low spots, and taking safety precautions.
Done correctly, you will end up with a flattened, smooth, and level slab perfect for flooring, tiling, equipment use, or just creating an even surface. Pay attention to details like proper cleaning, product mixing, and cure times for a successful and long-lasting concrete leveling project.